Character Modelling - Retopology
09/07/25 - 16/07/25
Introduction
The next stage in the character production pipeline is retopology. The purpose of this is to create a game ready lower poly mesh that the high poly will be baked onto. The baking process creates a normal map that gives the illusion of the higher resolution sculpted detail. This is a skill that I've explored but again not professionally, more just dipping my toes in! This is likely to be a bit of a challenge, however, one that I'm sure I can overcome as I have done with sculpting. I will devote time to researching initially to understand the tools and good practise and then apply to my model. This will build a strong foundation of understanding and then build competence in skills through practical application.
Project Management
Before we start I'm going to take some time to reflect on my project management documentation and progress against my goals. Sculpting took longer than expected. however, the outcomes were worth the additional time.
The image below shows my Trello card for the character creation. I've actually taken out the retopology, uv unwrapping and texturing tasks so that I can retire this card. I'll make separate cards for those tasks.
The next image below shows my full Trello board with the revised tasks. It also shows some freelance work I am juggling at the moment for an exam board. Life is very busy at the moment, however, I'm making progress in all areas.
The image below shows my production schedule which is the key change since last time. I've revaluated my plans and given myself a little more time. I've been able to do this a little more accurately since I've been experiencing how long things are taking rather than guessing. The goal is to finish the character by the end of the week commencing the 14th July so that I can start rigging the character on the 21st July. This feels doable although it will be very busy!
Research
This section studies the retopology research to build a strong foundation. Jensen and Sanden (2018) of Flipped Normals are experienced 3d artists from the VFX industry and their video explores Maya's 'Quad Draw' tool. It focusses on core functionality rather than creative and professional application. Essentially this is me 'learning the buttons'!
The tips I picked up were:
- The Quad Draw tool works in conjunction with live mesh. Live mesh essentially makes everything stick to the mesh. This is great for retopology because the new mesh you create will conform to the high poly mesh - essentially making them overlap. This is key for the baking process because both meshes must align to achieve an effective bake.
- Left click will create verts.
- Shift click to fill in the faces and create a poly.
- Hold tab to extrude from an edge to create a new poly.
- Hold Tab and middle mouse button to extrude multiply faces from the loop.
- Ctrl and shift click will delete an edge loop or faces selected.
- Ctrl will insert an edge loop.
- Holding shift will smooth and relax polys. This enables you to make the quads and polygons more evenly distributed.
- If you press the 'B' key this will enable soft select which allows you to select one poly and affect all polys in an area when manipulating them. This also works with the relax process to relax polys in an area which makes the process of relaxing faster and easier.
- To increase the size of the area that the soft select affects you can hold the 'B' key and drag to increase the radius.
- When relaxing there are some border lock options. The best is 'auto-lock' this means that when you have the border selected and use relax it will only affect the border and not the inside polys and vice versa. This is useful for not destroying your borders when you want to just distribute the polys within a specific area.
- It is also beneficial to hop out of quad draw and use normal modeling tools, like extrude or multi-cut, to create specific amendments. You can go back into quad draw and morph this additional mesh detail to the live mesh to. This process is often referred to as wrapping, as you're wrapping the lower poly mesh to the higher poly sculpt.
Now that I understood how the tool worked I wanted learn how to effectively approach retopologise a character using industry standard workflows. I stuck with Jensen and Sanden (2025), however, bought their character retopology course. I really trusted their knowledge and skills due to their extensive industry experience so I wanted to learn their workflows in a structured format. This was a paid course but high quality, therefore I saved a lot of time searching and knew that I could learn from trusted professionals.
I studied the videos first and made notes before applying the knowledge to my character. My key findings were :
- Preparation:
- Straighten fingers before starting retopology
- Correct scale in Maya to adjust the character to the height you want. I'm going to use 1.8 metres.
- Ensure character is sitting on the ground and facing forward. (Z axis Positive)
- Core skills:
- Edge loop strategy:
- Prioritize key loops first, for example around major joints and facial features. You wants the loops to flow and conform to the surfaces of the mesh.
- Once these key loops are established you can work your way inward from key loops to fill the space.
- Place loops at even intervals like 8 or 10 edges around a circular shape. This makes it easier to connect the loops together later and keeps some standards across the mesh. Odd numbers will not join together as easily because you will end up with extra loops that don't connect.
- When placing loops you're roughly lining them up with other loops, even if not connecting them yet. This will make it even easier to connect them later.
- Ensure there is a centre line with vertices centered down the middle of the mesh. This means you will be able to mirror your character easily. You can use Maya's component editing tool to set the x values to 0 to flatten and centre all the verts down the middle of the character.
- First loops act as anchors; additional loops build from these foundations. This will make deformation easier later since the edge flow is defined and it will make UV unwrapping significantly easier since you can easily section out the character into shells.
- Workflow tips:
- Refinement Process:
- Work down the body as a general rule of thumb. This makes you more methodical in your processes. However, be careful not to add too many loops to quickly. You want it keep it really low resolution so that everything connects easily and then you can easily distribute additional polys later.
- Leave legs until last, If your anchor loops are good it will be easy to connect these up.
- Hide bad topology under the feet or in the ears if necessary - essentially anywhere that isn't going to be seen! Sometimes you need to terminate a loop somewhere since it is almost impossible to get mathematically perfect loops that go exactly where you want! So long as the anchor loops are in the right places then having a few tris hidden away isn't the end of the world!
Preparation
Okay time to start! First I scaled up my character in Blender and made sure that the feet were on the ground. As the image below shows, I placed a cube at 1.8 metres high and matched my character's height to that. I made sure to set my units in blender to metres so that this was accurate - you can see this in the properties panel on the right.

I then went through and applied all modifiers, mainly bevel, solidify and subdivision surface. This was so that I had raw polygons rather than modified ones. I applied scale so that all objects had a scale of 1 rather than non-uniform scales. I also deleted the mirror modifiers so that I only had one of each mesh. I did this because I only needed to retopologise and unwrap one of each mesh and then I can mirror it again later. This will mean that I can maximise my texel density by creating larger UV shells. It will also optimise my texturing process because I will only need to texture one of each asset. I will actually take this one step further and slice all meshes in half, such as the torso, belt, legs and head. This will further optimise my UV unwrapping and texturing. You may also notice that there is only one thorn for the gauntlet too, I will retopologise and unwrap one of these and then duplicate and scale it to create the final spikey gauntlet. Once everything is UV unwrapped and retopologised then I will perform the manual mirror to create the complete character. This create overlapped UVs which is why it optimises the texturing process.
The image below shows this optimisation preparation pass.

Next I imported this character into Maya and renamed the meshes appropriate names to keep things tidy. Somehow my character was facing towards Z-negative rather than Z-positive so I rotated the character around so that it was facing forwards. I also brought in Jenson and Sanden's (2025) project file with the core anchor loops in for reference. this would make it really easy for me to see where I should be placing my anchor loops, in addition to reviewing the specific elements of the course to support me further.

This image below shows Jensen and Sanden's (2025) core face anchor loops. The face is going to be one of the hardest parts of the mesh along with the hands and ears due to the complexity of multiple moving parts in these elements. Therefore, having this for reference will be very useful for comparison. My character has a slightly weird nose, however, largely will follow these humanoid based loops.
This has been very technical so far, however, it does feel very clean. I was actually dreading starting because I was scared I'd uncover some annoying issues that broke elements of the character, however, it had all gone fairly smooth and meant I was ready to start actually retopologising. I was also worried of the transfer between software packages, however, this was also completely fine. Although everything here has been technical it means that the retopology process should go smoothly. Without this step I would likely get into some technical challenges later that could waste time. So overall I'm happy with this progress so far. Whilst I can't say for certain that this is absolutely perfect, I've corrected everything I can anticipate and am aware of so far. The next step is to lay down the core anchor loops across the full body.
Retopology Production
I wanted to first lay down all the anchors loops across all the body parts to create an easy structure that could be filled in and refined later. If I could perfect these it would make everything else significantly easier because everything would essentially line up. Whilst lots of my character was in separate parts I still wanted the loops to roughly align between the different meshes, for example the torso and the arms, because I needed them to deform together easily. For example as the character moves their arms the chest will also move.=m therefore the torso and arm loops need to align so that they can deform together.
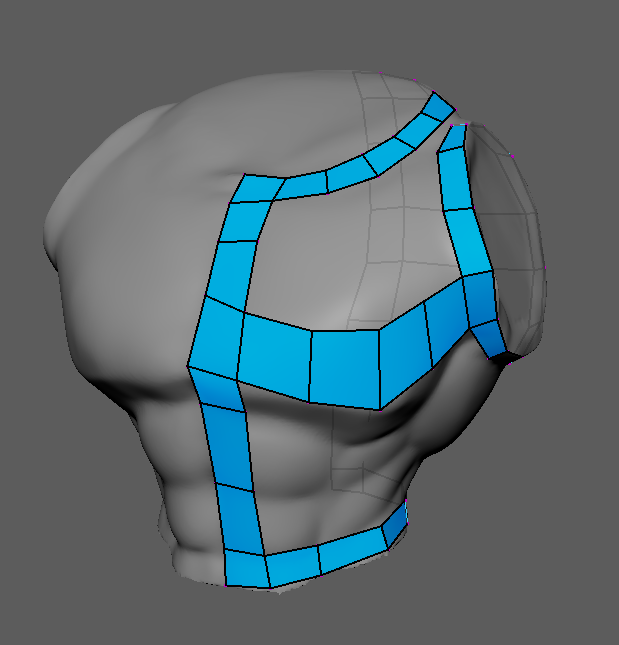
I started with the torso core loops, as shown in the two images below. The core loops go around the neck, around the arm and around the base of the hips. Then there is the core centre line established for symmetry. Lastly some simple connector loops from the centre of the arm to the front of the chest are established to lock in some core sections. For the chest I matches the contours of the mesh to achieve the best flow.

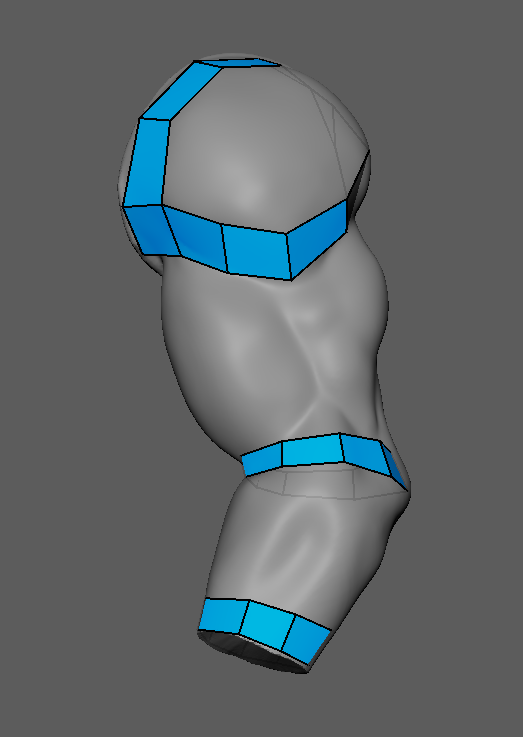
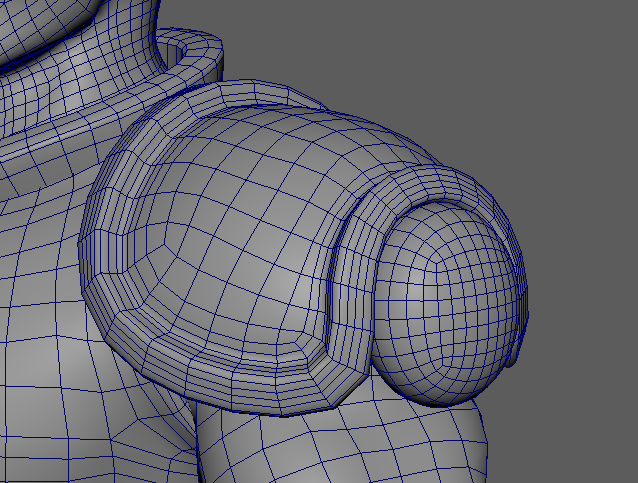
Next I moved onto the arms, as shown in the two images below. The arm is essentially a cylinder which make it very easy to block out. I've added core loops around the wrist, elbow and shoulder. The shoulder is slightly more complex because it is a spherical form on top of the cylindrical arm. The images show how the loops wrap around the base of the shoulder as well as around the outside and under the armpit. This is key to get strong shoulder deformation.

Next I moved onto the legs, which were similar to the arms in some respects. There is a core loop around the waist, a diagonal loops at to top of the cylindrical leg, one around the knee and one around the base of the leg where it connects to the foot (this will be inside the boot and not seen!). Since the knee holds a rounded shape I have added a circular loop around the edge of the knee. This will help it hold it's form as more detail is added. This could have also been achieved with an extrusion I later learnt. however, I was just building confidence with these tools.

Next I laid the core anchor loops on the hand. This included one around the wrist, one around the base of the fingers and one around the thumb's base, This was definitely the most challenging so far - it was really difficult to know how many loops to use. I had some chunky knuckles so was also thinking about how much resolution I needed to achieve the forms here whilst also trying to keep it low poly and think about how many loops would be on the fingers.

At this point I'd laid all the core anchor loops around the body. I would tackle the head as it's own separate entity and I was hoping to use the Quad Remesher (Exoside, 2025) tool to automatically retopologise the armor pieces - since these would be solid, their topology didn't matter quite as much. Therefore I decided to have a go at fully completing the retopology on the hand. I used Jensen and Sanden's (2025) specific hand chapter to support me with this.
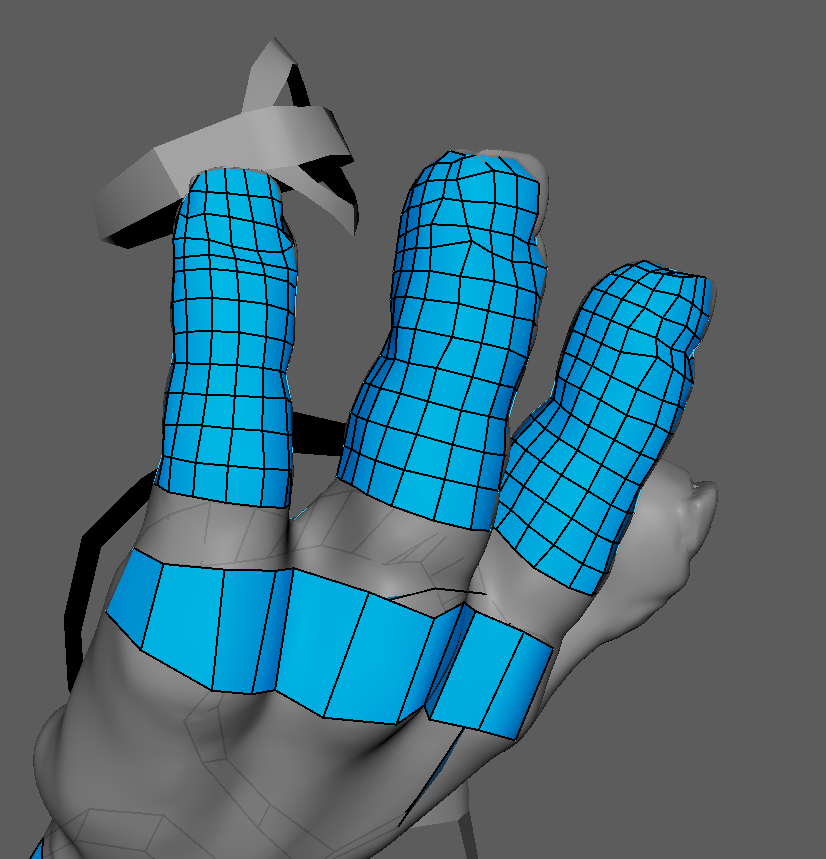
The image below shows the first step, which was to create one finger and then duplicate and wrap it to each of the other fingers. This meant that you saved time and kept the topology consistent. So far so good!
I then connected the fingers to the core anchor loop and created the thumb as shown in the image below. I did reduce the poly count a little on the fingers as it was becoming a little too unruly to work with!

The image below shows the other side of the hand. This clearly shows the reduced resolution compared to when I first created the fingers. This meant that it was a lot easier to connect to this anchor loop! You can also see that the fingers themselves are connected together too. This was super fiddly - I think some of my smoothing had twisted some of the loops which made it harder than expected.
The more I connected the harder it got! Its super complicated because there are multiple moving elements, compared to the body which has a lot less despite being bigger! I deleted the thumb and reformed it to improve the flow, the previous one was causing problems with connecting loops together and it was quicker and easier to reform it with the existing edge flow in mind.

After much frustration, the image below shows the completed and refined hand. It was crazy challenging to fill in the palm and backs of the hands and may need some refinements later. I used some really nice edgeflow on the knuckles to terminate some loops. Some loops are a little wonky and look like they would benefit from some more smoothing. One thing I really struggled with was the funky patterns that appeared when I inserted some edge loops. These would twist and turn around the model changing directions, however, not everywhere. I had laid down some core anchor loops so I could easily section off parts, therefore I tried not to care too much about these small number of awkward edge flow sections. Overall this was super challenging but through problem solving to reach this end result I have built a lot of confidence with the tools and processes!
14/07/25
The major task of the day today was to fill in and complete the retopology for the body so that I could focus on the head on a separate day. Below shows the arm with the anchor loops filled in. Its made it really easy to approach retopology because my character is sectioned up with clear dividers! I later changed the shoulder flow because the way it connects to the arm was a bit too straight and needs some additional poles in the topology.
The image below shows the rear of the arm. I'm using a few small extrusions on the elbow to get some higher density topology on the bones and elbow points. I've also got some tight topology around the part where it connects to the body to allow for easy deformation. I also trimmed some of the faces at the end of the arm because they go directly inside the gauntlet and won't be seen - this saves polys and makes the rigging and weight painting easier later.

I followed the same processes to create the torso. The anchor points made it really easy to fill in. I wasn't sure how to connect the flow on the arms, however, this approach was neatly quaded across the mesh so I wasn't going to stress on this for too long!
The image below shows the rear of the torso. You can see that I don't completely enclose the arm hole - this is because this is where the arm will intersect the torso. This works because it gives the impression the character is wearing clothes which is what I wanted! So far so good - I feel confident with the tools already thanks to my research. It really is a lot of rinse and repeat to create the verts, polys and edge loops across the model - you just need to think about where the poles in the topology should be placed so that it all connects evenly. The fact that this is easy means that my anchor loops have been good!
Next I moved onto the legs. A lot of rinse and repeat here too. The image shows that the leg topology just dips into the boots which again optimises the mesh. The knee filled in well, however, this might have been easier to create with a simple extrusion. Regardless, all the polys lined up and it works well!
The image below shows the rear of the legs.
Now that the organic parts of the body were retopologised I moved onto some of the armor pieces. I started with the back gem and actually did this manually. The manual process was just to remove edge loops, typically in a pattern of every other loop. I tried the Quad Remesher (Exoside, 2025) tool, however, it wasn't doing the cleanest of jobs and was giving my spiral topology which is not nice to work with. Spirals in your topology make it difficult to cleanly UV unwrap and then texture.
I followed a similar process for the belt, however, this time the Quad Remesher (Exoside, 2025) tool worked more favourably. I was getting into a rhythm of trying Quad Remesher (Exoside, 2025) a little and if it didn't yield good results then doing it by hand. Since a lot of these armor pieces started life as simple meshes with bevels and sub division modifiers it was really easy to clean these up and lower the poly count. Since these meshes went across the centre line I would actually cut these in half for further optimisation later.
The next image shows the chest gem, again with similar processes to the previous armor pieces. This would also be halved again later!
Next I did the boot which was split into 4 parts: The upper cuff, the buckle, the sole and the main shoe. This was a lot more complex than other parts and the Quad Remesher (Exoside, 2025) tool was not giving good results. I laid down core anchor loops again to direct the edge flow and then manually created the topology. For the sole I deleted any unnecessary inner faces. It was important to get this right because it would be deforming with the character so needed to bend easily. The outcome is good, possibly a little dense in the middle, however, holds the shape well. I'm hoping the density doesn't create challenges for rigging later!

The image below shows the sole of the shoe. This needed enough geometry to fold as the character walks.
The next armor piece was the shoulder pauldrons! The main part utilised the Quad Remesher (Exoside, 2025) tool with no spirals which was good. The gem was a little tricky. Quad Remesher didn't do a good job, however, I made a cube, smoothed it a couple of times, made the high poly version live and wrapped the smooth cube to it. This worked an absolute charm! This process is actually used for in industry for entire humanoid remeshes rather than creating custom topology like I am (Jensen and Sanden ,2025). Companies will use their base mesh and wrap it onto the newly sculpted humanoid character - whilst the artistic sculpts will be different the retopology will end up being similar. This saves a lot of time.
The kneepad again used similar techniques to other armor pieces. When I used the mirror function in the Quad Remesher (Exoside, 2025) tool I was yielding slightly better results which is good!
The image below shows the gauntlet which was a really easy manual retopology, removing excessive loops. It also shows the gauntlet thorn which worked well with a simple Quad Remesh. This will be duplicated and scaled around the gauntlet after UV unwrapping has been completed. This will mean that the UV shells are stacked which optimise the UV map and texturing process.

The next image shows the hair. This was a bit of a pain since the Quad Remesher (Exoside, 2025) tool didn't work well and it needed to be done manually by removing loops. Whilst it was a pain I got through it fairly quickly. There were a few odd bits of geometry, like stray verts here, likely caused by the slightly unorthodox modelling process I detailed in a previous blog post. Due to the mesh being created from a curve I think this cause a few minor errors when it was converted to a mesh and then retopologised. I removed them by target welding and merging them to core verts.
The image below shows the full progress on the character's body. Its looking clean and good because the polys are evenly distributed across the mesh. I feel very confident with the tools and I'm trying not to care too much when creating the topology in the interest of speed. Whilst not caring too much I am making sure the edge flow is as good as I think it can be.
This image is the same asset as above but shown from behind.
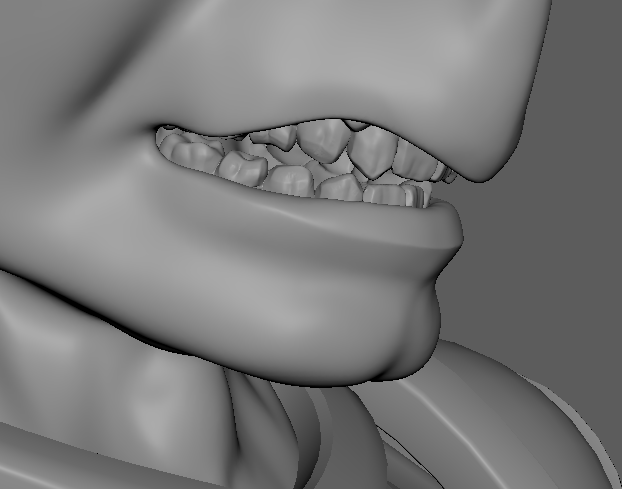
It was time to start the head, which I anticipated would be challenging. To get me going I thought I'd start with the teeth and hope that the Quad Remesher (Exoside, 2025) tool would do most of the work for me! Since these are inside the mouth and not seen often I didn't want to waste loads of polygons on them. I achieved the result below and though that it was good enough to move on!
The more I looked at the teeth the more problems I uncovered. The alignment was slightly off between the top and the bottom. There was a slight X translation meaning it wasn't centred and there was some odd rotation values that also meant it wouldn't mirror nicely. This required a bit of a rejig of the high poly to improve these stats. I centred the mesh properly, froze the transforms and mirrored the mesh to make sure that it was even. I then duplicated and placed the upper teeth so that I had the transform values for these. I wasn't going to retopologise both in the interest of optimisation.
Below shows the outcome of the newly retopologised teeth. This was really fiddly to use the Quad Remesher (Exoside, 2025) tool with, however, it would have also have been fiddly to do by hand. I was getting a lot of spirals and awkward overlaps on the creases, which was challenging. I managed to achieve the cleanest mesh below that had minimal spirals and wrapped it onto the high poly teeth to clean it up a little further. This wouldn't be deforming so mattered less about it being perfect.
A nice simple Quad Remesher (Exoside, 2025) tool on the tongue achieved a useable mesh, as shown below.
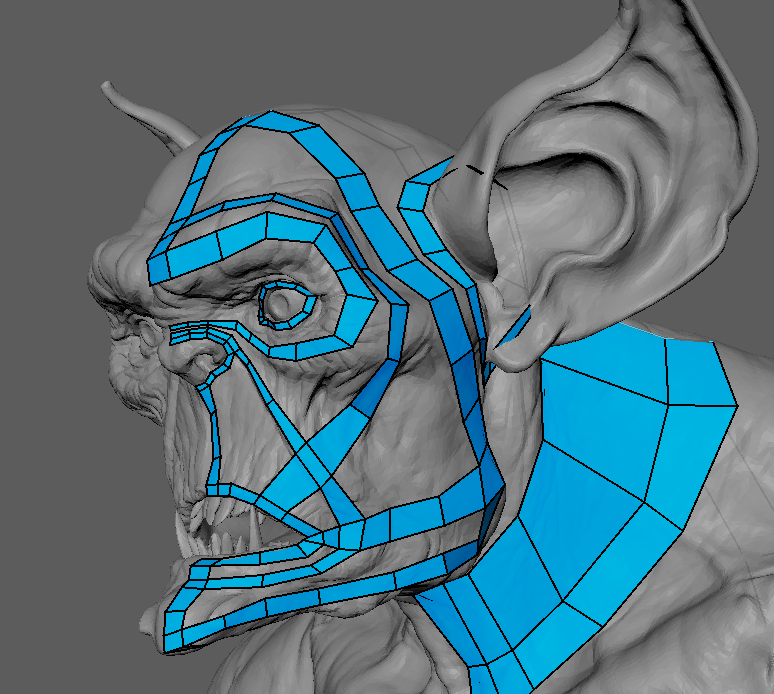
Now finally it was time to start the head. Although this was a challenging part the principles were the same - lay down anchor loops, start simple and line up the loops imagining how they would connect and then connect them up. I used the Jensen and Sanden (2025) course and reference to support my understanding of the core loops. These are so imporant on a face because if you want the face to be emotive and deform naturally it needs to have these core structures. Everything was going super well at this point and I was beginning to imagine how it would connect up easily. It is worth noting that I would do the ear separately but leave a core loop with this.
This next image shows the rear of the head anchor loops. Its worth noting I was creating some connections across to bridge to make sure that there were enough loops in each area. This essentially sections up the model and makes it easier to fill in.
This next image below shows the head fully completed and refined! Its working really well with good loops in all areas to follow the shape of the face. I did wonder whether I should have left it lower poly until I'd done the ear, however, I'd done it now and I'm sure it wouldn't be too difficult"
The next two images below show the character in full again to see how the character is working as a whole. Its looking really good. I feel I could be a professional character artist at this rate with how well it's going!
This image is the same as above but shows the rear view.
This next image below shows the ear of the character. This was challenging but achieved a good outcome. I laid a few core anchor loops in to follow the geometry such as one around the outside and following the internal curves. The density matches the rest of the head and wasn't too much of a challenge. I do want to animate the ears bouncing so I needed the edge flow to be generally good - I think I achieved this. There are few odd terminations of loops, however, due to the general flow and density paired with the limited range of motion it shouldn't matter too much! The tragus and spikey parts nearby all used simple extrusions to hold their detail. Lots of smoothing across the mesh to get the flow working well with the head!
This image shows the rear of the ear. A little simplistic but still holding enough detail to deform and a lot less going on behind the ear! The edge flow could be better, but it felt good enough for the complexity of the forms on the ear.
This is another full shot of the character - I actually really love seeing the full thing together with all the neat quads flowing across the mesh neatly. Game ready meshes tend to be around 20 - 60k polys for a hero character so I was hoping to land somewhere between those. I noticed the chest was looking a little low res, particularly around the pectorals, so I may need to add some detail there tomorrow!

This is the same image as above but from the rear angle. Its also worth noting that I've completely sliced the character in half now for further optimisations as I've discussed throughout. I also used the clean up tool to search for tris or Ngons and to my surprise there were no major issues. I noticed some issues with the hair that I mentioned earlier and fixed these at this point. Tomorrow I would check that all the verts on the centre line were zeroed on the X-axis, final polish, smoothing and inserting of edge loops in addition to creating the eye and mouth cavities. This should then be ready for UV unwrapping.
16/07/25
I started by zeroing out all the verts on the centre line to ensure that these were going to mirror without issues like holes. I noticed some unseen polys on the bottom of the gauntlet thorn spike so deleted these. I realised I'd forgotten to Quad Remesher (Exoside, 2025) tool the eyebrows so I did this, as shown in the image below.
The image below shows the creation of the eye sack and curricula (tear duct). This was created with some simple extrusions to create the cavity, however, since it wouldn't be seen the topology didn't need to be too perfect.
The tear duct supposedly makes the character feel more alive and its obvious when it doesn't exist (Jensen and Sanden, 2025). However, I'm not sure how it will look on my stylised character. I thought I'd try it, following the advice, and see how it goes!

The mouth sack was fiddly and took a lot more time to create. I needed more detail on the lips so I slowly worked my way inwards using my typical retopology flow to ensure the lips were detailed and fully formed. When I got so far inside I extruded and wrapped the polygons to the cavity I'd already created. I needed to align this to the centre since it was way off from the extrusions but after time I got it there as shown in the image below. Again this won't be seen an awful lot so doesn't need to be absolutely amazing!
I noticed that the shoulder pauldron had some angled polys that looked a bit odd. They might bake well but I thought it would be better to try and Quad Remesher (Exoside, 2025) tool this again. I upped the poly count slightly and achieved the result shown below. There were no spirals which was good and the form was more solid. I probably could remove some of the excess loops on the rim, which I may do before UV unwrapping since these loops aren't holding much form.
Next I started to prepare the meshes for baking so I renamed everything using the _High and _Low suffixes to bake per object for clean baking. Its small details like this that make the technical pipeline easier! Albeit not very glamorous!

As a final showcase I mirrored the character so that the full retopology can be seen. I'll reflect on this during the conclusion. This first image below shows the front view.
This image below shows the rear view of the character.
Conclusion
Wow - what another incredible journey! I was worried about retopology in the beginning, however, the outcome is good and even difficult areas like the face have gone well! The end result shows even flowing quads that resembles a professional game ready mesh. I'm really eager to start texturing this character so that I can see the full concept come to life! I am a little worried about time, particularly because I want to sink a decent bit of time into rigging, however, I am confident that I'll be able to get everything done. I've learnt a lot about retopology in this process and it really has helped demystify the process significantly beyond my initial foundational understanding.
Next I'll move onto UV unwrapping before baking and texturing! I'm confident with UV unwrapping, however, I'm worried I'll run into issues when baking. However, if the UV unwrap is good then the bake should be good too. Jensen and Sanden (2025) have a UV unwrapping video which will refine my understanding and help me prepare for baking professionally. I know I will have some pivot point and transform issues, however, I will do some research into snapping the pivots to the centre of the objects.
Onwards to the next chapter!
References
- Exoside (2025) Quad Remesher. Available at: https://exoside.com/ (Accessed: 19 June 2025).
- Jensen, M. and Sanden, S. (2018) Retopology for Beginners in Maya. 29 January. Available at: https://youtu.be/xpDWta5O3n8 (Accessed: 15 July 2025).
- Jensen, M. and Sanden, S. (2025) How to Retopologize a Full Character. Available at: https://flippednormals.com/product/how-to-retopologize-a-full-character-159 (Accessed: 15 July 2025).