
Animate a Spider in Motion [Animal and Creature Animation - Unit05]
Animate a Spider in Motion
20/02/24

Introduction
It’s time to animate a different creature - this time an arachnid! I thought this would be really interesting as it was something very different to bipeds and quadrupeds. I also thought this would be really interesting from the perspective of learning underlying theory that could be applied to other creatures or aliens. At this point in time I thought that this animation might be quite challenging to get moving believable, after all there were double the amount of legs compared to the last creature I animated! However, In a spider we have no feet as such, just ‘tips’ to the legs, therefore, this might make things a little easier.
I started by creating and organising tasks on my Kanban board. I created 2 task cards, one for the spider animation and one to render and prepare a mini-showreel of the work produced so far. I’d read about the formative review on the last week where we were going to share our work with fellow students and offer feedback, although there hadn’t been much direction for how this would happen. Regardless of this I thought it would be good to spend a bit of time preparing the work I’d done so far a little more professionally. It was also looking likely I’d have a little bit of free time this week now that I’d caught up so I thought this would be a good thing to do. Despite this, the main focus was to complete the core learning outcomes of animating the spider in motion first!

Within the main task card I created a small checklist to breakdown the main tasks I wanted to accomplish. I firstly needed to work on the animation as the highest priority, however, the rig I’d found to use had no textures so I thought it would be worth exploring some simple texturing to achieve a higher quality of visual in the end product. None-the-less, this was a stretch goal and I’d initially focus my efforts on completing the animation.

Preproduction and Research
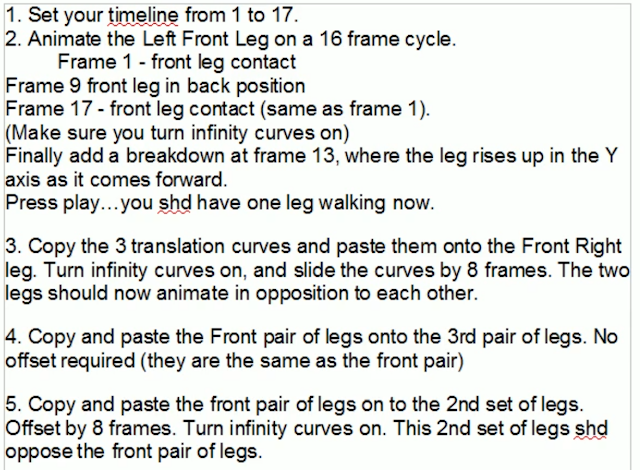
I started exploring the initial theory lecturers (How To Animate a Spider Walking, 2013) and was actually quite surprised at how short this one was! However, when I got into it the content made absolute sense! The core concepts explored were that when the front left leg moved forward the front right leg would move backward - essentially doing the opposite motion. Then leg behind the front left leg would mirror the actions of the front right leg and the leg behind the front right leg would mirror the actions of the front left leg. This continued as you moved further back, so we essentially only one leg moving forward, one moving back and the other legs mirroring this in an offset fashion - nice and easy hopefully!
In the absence of thumbnails this breakdown was provided. I had found the thumbnails really useful on the previous animations, however, I think the number of legs in play for this animation might have actually made it more confusing. These instructions were pretty clear and gave me a good base. I watched the rest of the technical lectures in depth, I’d actually only loosely watched the ones for the horse because the theory lectures were so strong and wanted to explore the theory myself. These enabled me to get a good understanding of how to animate and how copy and pasting could be used. I actually felt the process could be sped up significantly through animating all legs in sync and then offsetting the ones that needed to be offset rather than one by one. However, it was also good to see where overlapping action could be used on the body, head and abdomen to create a more engaging animation.

At this point I wanted to do a bit of my own research to understand how to animate a spider and look for spider reference. I found this alternative animation tutorial from 'Ree Animation and Gaming' YouTube Channel: (How To Animate ANY Creature With Legs in Blender in 4 EASY steps - Spider Walk - Tutorial Part 1 (youtube.com)) What I really liked about this series of animations is that the animation felt a lot more stylised and lively, which I tend to be a little more drawn to. Videos 1 and 2 were particularly interesting to me and I felt built on the theory I’d already covered.
This first video (How To Animate ANY Creature With Legs in Blender in 4 EASY steps - Spider Walk - Tutorial Part 1, 2023) explored initial leg placement and I like the way that he offsets the legs so that they aren’t so identical and are more random. Now whilst this might seem good it isn’t actually in line with our initial theory of how legs are offset and certain legs mirror each other - so this was something to bear in mind. He does actually use the same concepts I thought about by animating all the legs moving and the offsetting them, however, he seems to offset them a little more randomly and moves each leg forward significantly. I planned to use the theory from Alex Williams lectures where frames were only offset by 8 frames as I thought this would keep the timeline cleaner!
This next video (How To Animate ANY Creature With Legs in Blender in 4 EASY steps - Spider Walk - Tutorial Part 2, 2023) was the most useful video for me as it broke down how he achieved a much more lively and stylised body motion - something that I wanted to implement on my animation! It was interesting to see the break down of body rotations tied to the front leg contact poses. I also felt like this gave the animation more force and energy and given that this animation was based around a 16 cycle loop I felt this body rotation would match the speed of this animation - less than 1 second per cycle!
The next video (How To Animate ANY Creature With Legs in Blender in 4 EASY steps - Spider Walk - Tutorial Part 3, 2023) in this series explored animating the abdomen, however, I felt less interested in this as I knew I’d be able to animate a similar motion using overlapping action and make my own judgements on what looked good. I still reviewed the video as it was good to get a feeling for how this person planned to finish their animation.
I probably paid even less attention to this final animation (How To Animate ANY Creature With Legs in Blender in 4 EASY steps - Spider Walk - Tutorial Part 4, 2023) as it was focused on refinements and I didn’t really pick up much that would help me in my animation. I gathered it here to complete the series and refer back to in the future, however, I felt confident enough to make my own final tweaks to my animation so that it was individual to me rather than a complete copy.
I’d spent a good amount of time exploring technical research but I really needed to see a real spider in action to understand how they moved and provide me with reference to refer back to as I was animating. Therefore, I started searching for reference of real spiders from good angles. I’m not going to lie this was a little terrifying - I’m pretty scared of spiders in real life, however, they aren’t so bad on a screen!
The first video (Tarantula Walk Cycle, Different Angles, Spider Walking ~ Animation References, 2020) I came across that I felt was useful was this one below. The camera angles were strong on this one and there were multiple of them! The downside of this one was that the spider was moving pretty slow and it was also a lot more chunky than the rig I was planning on using. None-the-less this was good to study the motion of the legs and compare the theory I’d learnt earlier to and help me understand the movement of the legs in relation to one another.
The next video (Tarantula Walk Cycle, 2013) I came across also had some really strong angles, however, actually had similar problems to the first by being very slow. The legs didn’t quite seem to mirror the theory I explored, however, similar to what I learnt on the quadruped walk, trot and run the speed does dictate a lot to the poses you create.
If I saw this next spider in real life I would most definitely be jumping in my car and covering as much ground as possible! Now this reference (Spider Walking, 2019) was actually a lot stronger than the previous two. Not only was the spider more similar to the rig I was using - it was also moving a lot faster! Here was are seeing the overlapping of the legs happening closer to the theory, however, also there is some overlap in the legs that are meant to mirror each other - but not much! Perhaps I could experiment with a 1 or 2 frame offset on the legs that should mirror each other to create a more believable and realistic motion - definitely something to consider.
Lastly I found this video (Spider Walk Cycle - Final (4 views), 2014) that was an example of animation that another animator (Cecilia Mason) had animated that included a range of camera angles. I felt this was useful to see what another artist had produced and how they had interpreted theory and reference alongside using stylisation and animation principles to create their outcome. There is a slight bit of overlapping/intersection on the middle legs and this was something I wanted to make sure I avoided in my animation - particularly as when offsetting keys you aren’t 100% sure what the outcome will be.
Rig Acquisition
The HighEnd3D website had just gone down and I was unable to access the rigs that were referred to in the class lectures. I did some simple research and came across the talented Figgins (no date) who had a who host of killer rigs available for download. I tested the rig and it was super easy to use with no performance issues so I knew it would be a good choice for this task.

Animation
I felt at this point I’d gathered enough reference and learned a lot about spider animation from a theoretical and technical perspective to start my animation. The rig I had was arranged in a 4 legs forward and 4 legs back fashion which would be a difficult starting pose to get smooth motion without popping due to the range of motion in the legs from this starting pose. Therefore, I needed to create a natural and neutral starting pose. I kind of wanted to create a creepy pose, perhaps to help overcome my arachnophobia, so I moved the legs into the pose as seen below. I liked the ‘craning’ like pose with these creepy legs being high in the air and then curling round with the body suspended in place. This should provide a good place to start sliding the ‘feet’ forward and backward.

Now that I had a neutral starting pose I felt like I could start the animation process. One thing I really wanted to do was to get the motion through the animation curves nailed and high quality at the start before I started offsetting. If I tweaked the keys at this point and got the motion feeling engaging then it would be easier later as I wouldn’t have to work leg by leg to refine the animation, which could take a long time. The motion I wanted to nail was the lineararity in the backward motion of the legs to keep the ground contact and the up and down motion in the Y axis. I wanted the leg to really plant and impact the ground rather than easing into it, therefore I would break the tangents on the translate Y and ensure there was a sharp up and sharp down, which in turn should create a. Bit of hang in the air.
For the first pose I shifted all the feet forward for the extreme forward contact pose :

Next I would create the opposite - the leg back extreme pose. This would mean that the spider had pushed forward with the same amount with all legs and therefore make it foot planting easier :

After I had these two extreme poses I could create the breakdown pose that causes the legs to raise and plant down. I mentioned that I really wanted to get the curves right of this core motion so that I didn’t need to refine everything later. Below shows my refinement of the core curves. Firstly the translate Y curve that has a slight ease in on the way up reflecting the slight acceleration to counteract gravity and then a sharp decrease down for a strong, sharp plant. The second image shows the translate Z animation curve, The main thing happening here is the linear motion as the legs move back into a slight ease out and then linear motion moving forward. Again the idea here is trying to prevent any further tweaks later after I offset the legs and keys which will make everything more complex.


The below two videos show the posing and curve tweaks that I showed in the imagery above. Now whilst it kind of looks like this creature is rowing across the water, the actual motion of the legs is good! The timing and range of motion feels good and the impact I intended to create lands well. I felt like the quality of motion was good enough to move onto the next stage of offsetting. Without offsetting there was little more I could do to assess quality as the motion was not yet reflective of the theory I explored in the beginning.
The following two videos show the outcomes of offsetting the animations. Firstly this process of animating the legs in sync and then offsetting them was significantly easier than the approach of copying curves one by one. I was able to select all the legs that needed to be offset at once and slide them along 8 frames to offset the motion. The outcome instantly looked more ‘spider-like’ and it was good to see this motion come to life. However, it did feel quite erratic on the whole - particularly for a 16 frame loop. Upon further inspection I noticed that I was also getting quite severe intersection on the legs that was difficult to rectify by changing the translate Z values. I would need to address this first before moving on - potentially by reducing the range of Z motion to help each leg occupy its own space.
I started to try and fix the leg motion by tweaking the placement of the translate Z but I was still getting intersection on the back legs. It seemed that I’d given too much range to the translate Z that although worked fine when the legs were in sync - caused problems when they were offset. It was also clear that the range of motion was too much for the speed of the loop too which made it feel erratic. It was clear that I needed to tweak the range of Z translation in order to improve the animation.
I used the scale tool in the graph editor to focus on reducing the amount of Z translation. This made a huge difference as the animation and motion felt a lot more believable. Due to the lower range of motion the speed felt a lot more believable and I was able to tweak the position of the feet to eradicate any intersecting that was the original problem.
Now that the feet were moving naturally I needed to tweak the 2 pole vector controllers on each leg. With all the tweaks I’d made recently the legs were in weird positions and I needed to use the pole vector controllers to straighten out the legs, keep them rigid and ensure other parts of hte leg didn’t intersect. I went through each leg individually and corrected each keyframe to ensure that the legs kept a natural pose. This made a huge difference to the quality of posing compared to before. The below two images show the forward and backward extreme poses, which I feel are a lot more natural and ‘spider-like’! I was happy with these tweaks and then went on to capture the motion in a playblast.


The below playblast show the outcomes of these tweaks. The spider actually felt a lot more creepy at this point, which was a good sign as it meant it was looking a lot more realistic. You can see that the smaller range in Z translation has helped with the overall speed and timing of the legs and it feels less erratic and more controlled. Maybe a little too controlled, however, I could tweak this further a little later, at this point in time it would be better to set my focus on the body and see how this affects the overall posing of the animation. The overall posing was really satisfying at this point as the legs crane around the main body - a very ‘spider-like’ pose that I was happy to have created!
It was now time to tackle the body motion. I’d learnt a little bit about this from Alex William’s theory videos, however, my further research showed me how I could bring even more life and motion to this animation. From studying the videos from ‘Ree Animation and Gaming’s’ YouTube channel I learnt that as the front left leg comes down the body should move, tilt and turn to the left and tilt to the left into that leg and vice versa for the other leg. This would emphasise the transfer of weigh the spider was making as it moved forward and help me accentuate and stylise this motion depending on how exaggerated I made these. Furthermore, I’d be able to move and rotate the head and abdomen in the opposite direction to that described above that would create overlapping action and add a bit more energy to the body motion. I’d be able to use successive breaking of joints to help make this look nice and natural too.
The below videos show my initial blocking out of the body motion using one core controller to create the rotation and translation of the body. I used the initial theory frames to lay out this motion with the body being up on frame 1, down on frame 5, up on frame 9, down on frame 13 and finally up on frame 17. This enabled me to create a base but start to incorporate some of the rotation and sideways translate motions so that it wasn’t so 2 dimensional in motion. I felt this was a really good base for motion that would be further accentuated through the rotation and flexibility in the body, head and abdomen.
At this point in time it is worth sharing the shelf and quick selection sets I’d set up. I hadn’t really needed them on any other rig prior to this, however, as this rig was more complex with a lot of controllers I wanted to create an array of quick selection sets that grouped the motion together. I’ve never actually done this before ever, although I understood the concept, and in this case it proved extremely beneficial so that I could easily selected different body parts and make tweaks to the animation curves instead of constantly selecting them all one by one.

The below playblast show my experimentation with adding rotation to the body, head and abdomen. I used a similar approach to what I used on the horse tail and head to rotate these in the opposite direct to the main body motion; offset the parts by 1 frame the further you moved down the chain and exaggerate the motion further the closer you got to the end of the chain. This was now really starting to give some energy and force to the animation. It did feel a bit too wriggly and would potentially benefit from further tweaks, however, I was happy with the general motion and the stylisation this brought to this motion. I now felt like I was nearing the end of the animation with just the feelers and forward motion to explore, however, these reflections I’d identified throughout would form my final polish pass on the animation.
The last key part of animation to tackle was the feelers. I treat these in a similar way to that I did of the ears on the horse. I made sure that they were offset from the head motion and had a greater range of motion towards the tips. I spent a good amount of time tweaking these so that they felt more controlled rather than super flappy. After tweaking the curves I ended up with the following result shown in the 2 videos below. I had a nice bit of swing on the feels to show that they were a little looser, yet not too much that they still looked controlled by the creature. These felt pretty creepy again, which I liked and felt matched the main motion of the body.
The whole animation was starting to feel quite polished and natural. The motion as a whole was feeling very creepy, ‘spider-like’ which was satisfying to watch and helped me understand that I was en route to creating a high quality animation. I’d initially thought this would be a challenging animation, then it appeared it might be quite simple and easy before proving to be a little bit of a mix of both!
Tomorrow I wanted to experiment with a few final polish passes before I drew a line under this animation. The rotation in the abdomen in particular was still feeling a little erratic and bouncy and I wanted to experiment with reducing and offsetting this to get it feeling squishy and soft but not out of control. I wanted to experiment with the Z translation and see if I could push it a little further to increase the Z range slightly, which I also thought might help with the good amount of energy I’d achieved in the body. Next I wanted to run a pass over the pole vector controllers and ensure quality here was good. If I tweak the Z translation of the feet then these would need correcting, however, I also wanted to review the animation curves and ensure the pole vector controllers moved in a similar way to the foot controllers. Once I’d done this I’d be able to add the forward motion on the ‘all-mover’ controller to see how this cycle looked as it was moving to complete the animation!
21/02/24
The first order of business today was to address the texturing on the asset. I'd applied a ramp before, however, this was a simple solution and I'd planned to maybe unwrap and texture this creature in Substance Painter. I opened up the UVs and started with a quick planar map of all the objects from the side angle to get some default UV's I could work with. The plan was to then select edges and cut them to unwrap this properly, however, the mesh was constructed in a lot of separate parts and this was going to be time consuming. The outcome of the planar map actually made the ramp texture apply to the mesh a lot nicer and I was able to get some nice top to bottom gradients working. This seemed good enough for me and would allow me to not lose too much time with texturing and focus on animation.

I adjusted the ramp slightly to highlight the tips of the legs red and adjust the rest of the ramp colours to spread across the body. This image below shows the outcome of the ramp texture node applied to the simple UV mapping. I was happy with the quick result to get a little bit of colour into the model. The head feet actually helped pick out when they were striking the ground a little more - there are a lot of legs so it is easy to lose them in the chaotic motions.

Next I wanted to run a final polish pass across the animation that I'd highlighted yesterday. First aspect I wanted to improve was the rotation in the body and abdomen in particular was way too exaggerated and needed to be toned down slightly so that it wasn't so erratic. I went into the rotation curves across the various body and abdomen controllers and used the scale tool on the curves to bring the amount of rotation down. This enabled the body to still look flexible, however, wasn't so erratic and exaggerated, therefore, made the whole motion feel more believable.
Secondly, I had toned down the Z translation on the tips of the spider legs to prevent intersection, however, it was a little too much and I think I could exaggerate this to get a greater range in motion. I went into the translate Z curves and increased the range of motion - not too much but I did push this by monitoring the forward and backward motions. This tweak to the translate Z range was looking good - you could visually see the spider covering a bit more ground which was more reflective of the energy I had in the body, so I was happy with this!
Next I noticed a little bit of popping on the knee joints caused by the pole vector controllers so I wanted to try and reduce this to make the animation more visually appealing. The tweaks I'd made to the Z translation of the feet had actually improved this already which was good! I adjusted the pole vector controllers to ensure their range of motion followed the legs and they didn't need to travel too far which can sometimes cause popping. I was still getting a few cramped poses on some of the legs so I went in and added a little bit of tilt to the tips of the legs to pull them away from the body a little. This made a big difference and kept the legs craning outward whilst also preventing super cramped poses and pops on the knees!
Next I wanted to add a little bit of offset to some of the legs to prevent twinning and implement what I'd observed from the reference videos I studied, where it was difficult to see any twinning/mirroring of leg motion at all! This was pretty tricky as there were so many legs to offset from each other. I also wanted to stay true to the theory so in this case I focuses on the back 2 pairs of legs and offset these by 1 frame. This meant that each side of the spider had no absolute twinning and created a little bit more overlap. I did start to experiment a little further but it was starting to feel messy and I was worried about loosing the good motion that I had therefore I left it there. I was a positive change and I felt made the spider legs look that little bit more natural and less robotic.
Lastly, I would experiment with the all mover controller to move the spider forward in time to see how successful my loop was. I used the exact some method I'd learnt through experimenting with this on the horse trot and gallop. I used my first pose, the front left leg contact as a point of reference, Understood where it was on the grid, moved the 'all-mover' controller forward over the duration that this leg was on the ground and then set the translate Z curve of the 'all-mover' to cycle with offset in pre and post infinity. This worked perfectly and I couldn't detect any foot slide at all, which was great! This is where the animation really came to life as you saw the spider moving itself across the ground in a natural and believable motion. It was also incredibly creepy seeing this spider crawl across my screen thus I knew I'd done a good job in creating believable motions!
Final Outcomes
Below are the playblasts of my animation cycles showing the final refinement animation passes that I explained above. I captured these from a range of different angles to study and prove the motion and I will reflect on quality in the conclusion.
The below videos show the spider moving forward using the 'all-mover' that I also explained above.
I was really happy with the progress that I'd made on these final refinement passes. I do feel like I upgraded the quality of the whole motion and again this shows the impact that small tweaks can have on producing a professional outcome. The simple tweaks to the texturing actually made a big difference in making the poses more readable - especially the red on the tips of the legs. I was really happy with the more subtle body motion, it still felt alive and like it was propelling itself forward without being too over exaggerated. The overall motion felt very 'spider-like' and as I discussed earlier was even creeping my out a little, therefore, I felt this was a good sign at confirming I'd achieved a natural, believable spider locomotion! I definitely wouldn't want to come across this little guy in real life!
Conclusion
This was a super fun exercise and I feel I have learnt a lot about arachnid locomotion through creating a high quality animation. When animating 8 legs it is a little bit more complex to manage, however, the underlying theory does make this more accessible. I felt the approach I took to animating the legs was strong than copying and pasting and enabled me to focus on the quality of the leg motion initially before I begun the offset pass to implement the theory. I'm happy with how I implemented my further technical research to help stylise the body motion a little further. I always find if you stick 100% true to real life then your animation can feel a little stiff, however, on the flip side if you exaggerate too much you lose the believability of the natural posing, therefore it is a tender balance! I felt that I was a little bit too exaggerated at the end of my work yesterday, however, today I feel I've struck a perfect balance between realism and stylisation which I am happy with as I feel there is a little bit more character in this spider than if I hadn't have exaggerated the body at all.
I feel I have achieved the learning outcomes, listed below, because :
- I've explored arachnid locomotion theory through studying initial theory, reviewing a technical approach to animating spiders in software and through studying real life reference to gain an understanding of how spiders move. I've then applied this to my own animation to result in a natural, believable locomotion cycle!
- I have not explored the Raa Spider Rig due to being unable to source the rig with the High End 3D website being down, however, I have been resourceful and located another suitable rig. I've explored a whole range of the controllers available on this rig and used these to create my spider locomotion cycle.
- I've explored optimising the animation workflow in numerous ways. I used the custom shelf and quick selection set buttons to group controllers together to make it easy for me to quickly select multiple parts of the spider. This significantly improved speed when making initial poses but also tweaks towards the end of the animation so I could quickly isolate controllers and adjust their curves. I also reflected on the animation process of 2 animators and identified further areas of optimisation that could be made. Rather than animating one leg, copying and pasting and then offsetting - I animated all legs and refined this motion and then offset the relevant legs. This meant I could focus on the leg motion and perfect the curves before offsetting in one go rather than focusing on leg by leg. I found this method highly optimised.
- Finally I completed the locomotion animation cycle and proved this by animating the 'all-mover' to show how the spider would move in motion. I feel I implemented the theory clearly, as explained, and effectively to produce a high quality animation. There is no foot slide at all showing that the leg motion is reflective of real life leg motions and this would be useable as an animation cycle in a game engine.
Learning Objectives :
- Understanding Arachnid Locomotion: Study the nuances of spider movement. Learn how spiders navigate their world, the subtleties of their leg articulation, and the secrets behind their seamless motion.
- Introduction to the Raa Spider Rig: Familiarise yourself with the Raa spider rig, a powerful tool that simplifies the animation process. Discover its features, controls, and how it can elevate your animation projects.
- Optimizing Animation Workflow: Master the art of efficient animation workflow by breaking down the spider animation process into manageable steps. Explore techniques to streamline your work and enhance the overall quality of your animations.
- Hands-on Tutorial – Animating Spider Motion: A comprehensive tutorial that guides you through the process of animating spider motion using the Raa rig. Start with a single leg, understanding the principles of leg movement, and then seamlessly propagate your animation across all eight legs using smart copying and pasting of curves.
Finally to review my project management - I'm completely up to date with the current module! This feels super good and gives me ample space to ensure I'm focusing on quality and potentially some of the stretch goals that I could explore. This week I still have a little bit of time available, therefore, I'd like to explore the presentation of work that'd already completed by rendering some of my animation cycles and creating a mini-showreel to collect my final outcomes in one place. I read that we should do this for a formative review and whilst this hasn't happened yet I assume that it will and this will help me prepare for that. Also I feel it will be good to capture my progress over time and reflect on the range of tasks completed.

Although not super far into the course I have done quite a lot of work already so I made myself a little checklist to tick off as I go to compile an effective mini showreel. My plan is to set up a 3 point lighting rig that I can share across multiple files and then render from consistent angles to help make the final video. I will render the frames of the cycle and then repeat them in premiere to create multiple loops. I'm also keen to composite 4 angles into 1 video to show the animation from multiple views and maybe play the perspective animation large as well. This would help cut down time by removing the need to render a turn around which would require a lot of frames.

Reference list
- Figgins, K. (no date) Animation Rigs. Available at: https://3dfiggins.com/Store/ [Accessed 28 March 2024].
- How To Animate a Spider Walking (2013) YouTube video, added by Alexander Williams [Online]. https://www.youtube.com/watch?v=k1in7evdAO8 [Accessed 28 March 2024].
- How To Animate ANY Creature With Legs in Blender in 4 EASY steps - Spider Walk - Tutorial Part 1 (2023) YouTube video, added by REE ANIMATION & GA [Online]. https://www.youtube.com/watch?v=KxyC7tpclsA [Accessed 28 March 2024].
- How To Animate ANY Creature With Legs in Blender in 4 EASY steps - Spider Walk - Tutorial Part 2 (2023) YouTube video, added by REE ANIMATION & GA [Online]. https://www.youtube.com/watch?v=OvdSqsDYlXI [Accessed 28 March 2024].
- How To Animate ANY Creature With Legs in Blender in 4 EASY steps - Spider Walk - Tutorial Part 3 (2023) YouTube video, added by REE ANIMATION & GA [Online]. https://www.youtube.com/watch?v=H3IWSuNlpEU [Accessed 28 March 2024].
- How To Animate ANY Creature With Legs in Blender in 4 EASY steps - Spider Walk - Tutorial Part 4 (2023) YouTube video, added by REE ANIMATION & GA [Online]. https://www.youtube.com/watch?v=6lhT_XBd5UY [Accessed 28 March 2024].
- Spider Walk Cycle - Final (4 views) (2014) YouTube video, added by Cecilia Mason [Online]. https://www.youtube.com/watch?v=E9-_gZ8m0Eo [Accessed 28 March 2024].
- Spider Walking (2019) YouTube video, added by 999KTDY [Online]. https://www.youtube.com/watch?v=l_94jyUTSe0 [Accessed 28 March 2024].
- Tarantula Walk Cycle (2013) YouTube video, added by Alex DIxon [Online]. https://www.youtube.com/watch?v=5eABaBg-Tyc [Accessed 28 March 2024].
- Tarantula Walk Cycle, Different Angles, Spider Walking ~ Animation References (2020) YouTube video, added by Animation References [Online]. https://www.youtube.com/watch?v=kglYycDFKUc [Accessed 28 March 2024].


