Animate a Bird in Flight [Animal and Creature Animation - Unit06]
Animate a Bird in Flight
27/02/24
Introduction
Another new one for me - Birds! We’ve gone from large horses to tiny spiders to something that might eat a spider - pending level of toxicity! This was another exciting loop to explore - animating a bird flapping in flight! I’d been reading my copy of ‘Timing for Animation’ by Harold Whitaker and John Halas over my brief mini break in Prague and I’d came across the animals and bird flap section of the book which sounded really interesting! I was excited to experiment with another vastly different animal and learn core locomotive motions.
I started off this module by organising my project management Trello board and creating a task card with a checklist to break down my process across multiple days. As I’d been away in Prague I’d actually lost my Monday (my day off work) so I would need to break the task down into smaller chunks that I could tick off as the week went by. Now that I was caught up this felt a lot more manageable and it was easier to break tasks down without feeling rushed. I felt like I had enough time in the week to focus on the animation without needing to press ahead to get to the next task. My only overall deadline I needed to achieve was to complete this ‘bird flap’ task by Sunday so that I could start the new task on the Monday with no hangover of the previous task. Nice and manageable!
As you can see here I’ve organised the task card into a checklist that explores all the key beats of the task from exploring the theory lecturers to sourcing a rig and so on. I also threw in some days that I wanted to tackle the tasks to see how the week might look. This is super useful as it means I am constantly making progress across the week rather than feeling like I’m forever working towards something.
I started off by studying the theory lecturers an understanding to core motion of the bird. These are the most useful parts of the programme for me as I feel confident with rigs and tools, however, understanding the theory allows me to use the tools to create realistic and engaging animations. The main parts of take away from the theory lecturers were to use overlapping actions on the wings so that when the part closest to the body started to move down the tips would still be moving up and vice versa. Also that when the wings go down the body is going up and when the body goes up the head and tail are going down. This is very similar to other animal motions we have looked at and true to our core principle of overlapping action.
My initial thought response to this was that I’d pose the wings in the up and down position and then offset each control as it moved down to get the overlapping motions. I also wanted to study reference images and footage to really understand the motion of a crow in flight so that I could incorporate elements of realism whilst also using exaggeration to make an engaging animation. The lecturers also showed that Muybridge studied birds too so this would be a great starting point to assist my thumbnails for initial posing.
Research and Reference
Next I started to gather a range of research and reference materials to support my understanding of these motions. Again, this locomotion is completely different to a walk or run so I wanted to ensure I had a range of materials that would inform my posing rather than making it up. I’ve found that this vastly improves my animation quality so it seemed a good thing to do.
This image (Parks, 2017) showed 2 different wing poses in one which was great! I particularly liked the bottom crow where you can see the tips of the feathers dragging behind due to the flexible nature of feathers mixed with the air resistance. The top core also shows an underside shot to study how the feet might be posed.
This was a beautiful down shot (King, 2015) with a clear silhouette of the wings being shown. Here we have the tips of the wings completely down but the bird’s shoulders are starting to be pulled up to start the next flap - again showing that overlapping action.
This pose, shown in the image found in the article by Hamilton (2017), had a strong silhouette with the tips curved. However, this does look more like the bird is gliding in to land or grab some prey. I’ve kept this as you can see how the bird has angled its body and curled it’s wing to slow its motion and stick out it’s legs to reach it’s target. I thought this could be useful if I ever were to animate the crow landing.
Another strong shot of a bird in flight mid flap cycle from the Estes Valley Spotlight (2021). What I particularly liked about this one was the aero dynamic posing of the body and tail. I had felt that the body and tail might be quite stiff and streamlined, however, also thought that this might make quite a bland animation. Therefore, after gaining enough imagery I would study some video reference to see how bodies moved and consider how this might be exaggerated slightly to make an engaging animation without pushing it too far that it loses it’s realism.
Another image I found from Lievano (no date) that I thought was incredibly strong due to the range of poses shown. I’d assume this was a fast capture of the same bird in flight collaged together. The pose silhouettes are strong here and are almost ‘thumbnail’ liked but you can also see a little bit of translation in the body, albeit that this is a collage so the photographer may have chose how to place them together.
I felt like I had enough photographic reference to study a range of poses so I moved over to looking at video reference so that I could see timing and how the poses blended together. This first piece (A Crow taking Flight 🦅 Slow motion @abishekrajan763, 2022) was a slow motion analysis so helped me see the poses really clearly. It was a take off animation so not fully in flight, however, you could clearly see how the wings were acting to keep the bird in flight. One key thing I noticed was that there was a slight circular rotation on the shoulders with the wings being slightly forward on the way down and slight backward on the way up. This was an element of realism that I wanted to incorporate into my animation to prevent it beings a simple up down flap.
This next video shows as ‘unavailable’, however, if you click it or use the link in the reference list - it will work fine on YouTube.
Another strong slow motion video (Raven flight in slow motion filmed on iPhone 5s, 2016) that shows how the bird flaps over time. In this one you can see how the feet retract and curl into the flight position which was really interesting. It’s also showing the body position and movement which is very streamlined and static with all the energy going into the wings. I feel this might look a bit bland if I animate my bird in this way so I planned to add a little bit of motion to the head and tail to create more overlapping action, however, make sure that it isn’t too exaggerated that it looks like its wriggling through the air!
This video (Crow flying, 2010) showed an extended flight flap after the take off which enabled me to study the ‘in flight’ aspect further. This was important as I would be animating the loop when the bird would already be in flight for this exercise, therefore, this was the part I was interested in. Here you can actually see the slight rocking motion in the body that the theory lecturers discussed and a little bit of motion and flexibility into the tail. This was good as it supported my plan for my animation and how I planned to make it engaging.
Lastly, I wanted to study flocks as I wanted to create a mini-animation sequence at after I’d finished my loop of multiple birds moving through a 3D scene. I wanted to look at their behavior and how they moved in relation to one another. In this video below (Crow Behavior, 2022) I noticed that they never tended to move in straight lines and there was also a slight variation to the path they took. This first video was interesting as you could see how they followed one another at slightly different heights; how there tends to be a leader at the front of a flock and generally there is a straggler at the back. This was something I wanted to include in my animation sequence to help it feel more natural.
This video (Huge murder of crows!, 2016) really showed that non-straight path crows take in their flight when in flocks. You can see how they twist and turn and how there is a slight lag to the rest of the flock as leaders change directions. This behavior was really interesting as it was showing overlapping action again in the way birds moved in relation to one another. Again, this is something I’d like to replicate in my mini-animation sequence of a small flock.
Next I wanted to gather the thumbnail references of a crow in flight from Muybridge (1887) and the ‘Timing for Animation’ (Whitaker and Halas, 1990) book so that I had a point of reference for creating the poses. I’d use the above photographic research to refine and compare my animation to once I’d laid out the key poses and had the core motion working. Muybridge’s reference below is always super strong due to the angles he photographs his subjects, enabling me to almost mathematically study the poses and replicate across my animation rigs. The overlapping motion on the wings is clearly seen here, whilst also showing a slightly forward down pose on the wings which was interesting.
The below image (Muybridge, 1887) is actually the same as the above one but the colour contrast is slightly different and it focusses on one of the cycles. I included it due to this simplification to focus on when creating my animation poses.
Next I thought I’d present my learning from the ‘Timing for Animation’ book (Whitaker and Halas, 1990), a book I’d had for some time but never properly read. I was really enjoying learning about Core Animation theory and whilst I could have done this on my undergraduate degree I feel my level of maturity and expanded knowledge at the moment is able to digest this information more effectively. I find that because I am confident with tools and techniques I am better able to experiment with and implement theory to raise the quality of my outcomes whereas on my undergrad I was also learning the tools so it felt like a barrier.
The core theory I learned from this were :
The feet should trail behind in flight. This makes a lot of sense, however, it also looks like legs so of compact against the body too from the real life reference. The thumbnails here had quite short legs therefore this might impact how they should be posed. Also different birds may hold them in different ways so I thought it would be good to experiment when I get to animating.
The down flap was the power stroke that would push the bird up due to the cushion of air below it.
The muscles controlling the upward stroke are smaller with less air resistance, therefore, I wanted to experiment with a slightly slower down flap and faster up flap. This was actually something I noticed when I went back to watch the video reference so I wanted to include this spacing of timing in my loop to get a more realistic flap motion.
The poses of the down flap and up flap are not identical and that the down flap will be slightly forward and the up flap slightly backward. This also tracks with my study of the rotation on the shoulder and should make the animation more realistic with a circular arced path on the wing motion.
The smaller the bird the more strokes per second will be taken and the larger the bird the less strokes per second. This was explored in the theory lecturers too with a crow taking roughly 2 flaps per second so working to a 12 frame loop.
I found a digital scan of the thumbnails (Whitaker and Halas, 1990) themselves, the same ones that were in the theory lecturers, so I grabbed these as a point of reference for creating the initial poses. The thing that was going to be slightly awkward was that if I copy the poses then I wouldn’t need to offset and instead would need to smooth my animation curves, however, this is typically more challenging as I’d have more key frames, therefore my motion might be more jerky. The other approach I could take was to animate everything in sync and then offset the curves using pre and post infinity so that the curves are easy to make smooth but create similar poses to below. The problem with this is that the poses might not be exactly the same. I’d planned to experiment with both methods and see which yielded stronger visual outcomes to decide what I would move forward with.
When searching for the digital scans of the above thumbnails I also came across the below image (O’ Connor, 2018) which showed a comparison to a larger bird including frame numbers. This blog is acting as an in-depth study and point of future reference for myself so I wanted to include this here even though I was animated a more medium sized bird. It also had a great breakdown and annotation of the wing poses that would be similar regardless of the size of bird (generally)!
This research then brought me to the below image (Horst, 2005) which had an in-depth study of paths of motion using lines that I found super interesting. It breaks down a cruising flight loop in addition to a climb flight - something I thought that would be useful in the future. It was also great to see the lines in paths of motion and the mathematical breakdown of the different elements of the bird and their positions over time. The really interesting thing was the sine wave style motions and the height of the sine wave for different elements - like the should and the tip of the wings.
This image below (Parslew, 2015) is similar to the one above, however, shows body positions in elevation. Again I’ve more saved this as a point of reference for the future.
Lastly I reviewed the theory in the 'Animator's Survival Kit' (Williams, 2009). Here you can see some great thumbnails and breakdowns of the theory of motion across the body. A lot of this theory is backing up what I've already learnt, however, it is presented very clearly. The thumbnails at the top show the position of the body in relation to the flap and how these are offset from one another. All thumbnails are showing the wings in almost 2 halves and how the tips are offset from the motion of the wing part closest to the body. Again, it was good to confirm this theory and have further thumbnails that I could refer to.
Animation Rig
I knew I was going to have a few problems here, particularly as the lecturers mentioned that the most ideal free rig wasn’t available and the only way to get it was to email Alex from the tutorial videos. I was hopefully that I would be able to find an alternative, however, the challenge would be to find a crow, since all my research and theory study was centred around a crow and if I found another type of bird the theory would need to be altered. Also the rig that was referenced in the theory lecturers was very low poly so I wanted to find something that looked more interesting!
I struggled a little, however, eventually I found this rig (Figgins, no date) that seemed absolutely perfect - the only catch being that it wasn’t free. However, I had used the spider rig from Kiel before and it was very good therefore I trusted the creator and the price was not extortionate and the quality seemed high therefore I was happy to purchase and use this rig. I have a Dropbox that is very neatly organised and I’ve set up a rigs folder so that I can maintain future access. I’ve also favorited this creator as there are a large number of rigs here for different characters that I feel could be useful. The below images show the rig I’ve chosen to move forward with!
The rig came with a readme file that needed various viewport and colour settings set up to display properly. There was also a note around random lag with the rig and a suggested fix so I followed the steps to eliminate the large and fix the colour/viewport issues as shown below!
I also experimented with the rig controls to check that this would provide the dexterity I needed and I was happy with what I found. What I really loved about the rig was that you could have as much or as little control over individual elements that you wanted. For example, there were 4 main controls for the wings to create the flap, however, you could also turn on individual feather controls to tweak the poses even more. Initially overwhelming, however, it gives you so much flexibility. This meant I could keep it simple in the beginning and turn on additions controls if I needed them.
I also ran a few test renders, forward thinking to the presentation of this at the end. I actually struggled a little getting good Arnold renders, the issue was that it wasn’t using Arnold shaders, however, when I went to set one up the metalness and roughness had been combined into one image using RGB values for different maps, however, there was no documentation around how this had been done. Therefore, ideally I needed to use Maya Software renderer to render this, however, it just didn’t look as good as Arnold renders. However, it was still possible to do this and I didn’t want to lose too much time getting bogged down with technical elements and instead I wanted to spend the time focussing on animation.
Lastly I wanted to gather a 3D set that I could use to create the mini-animation sequence after I’d perfected the loop. Something I hadn’t done on previous animations because I felt it didn’t really add anything to the animation loops, however, on this one I felt it was more relevant as I would be creating a path of motion for the flock of crows therefore it would make more sense to have a 3d scene for them to move through.
I found the below 3D set by DJMaesen (2019) that seemed perfect. I loved the gritty fantasy building and thought the crows could fly through the middle of this perhaps. I downloaded the FBX and saved the link so that I could credit the author.
A quick update of my Trello card showed that I was bang on track with the key beats I’d set out in the checklist. I was happy with the progress I’d made through studying theory, gathering reference and sourcing and rig and felt ready to hop into animation tomorrow. I feel I’d learnt a lot about theory and captured this in this blog and thus felt like I would be well supported and well informed when approaching the animation.
Animation Loop
28/02/24
It was now time to put all that theory into practice and breathe life into this crow! I started with the approach that used the thumbnails to pose the character, essentially copying the thumbnails to build a base. The below images and playblast show frame 1 as the wings up, body down pose; frame 7 as the body up and wings down pose and finally frame 13 which is a duplicate of frame 1.
I ended up with this result which felt very mechanical. I knew it wasn’t going to look developed with just these two poses but I wasn’t feeling that confident that this approach would yield the results I wanted. I wanted to move onto the breakdown poses to see if this changed my opinion of my progress. I was also wondering about the feet position. The rig had lovely feet on it but they felt quite big and long. If I trailed these behind it would be really long so I compacted them to the body as I saw in my reference. I wasn’t sure if I’d got this completely right, however, it felt good enough at this point in the animation. I think I really needed to study anatomy of birds in flight further to really understand this.
Next I moved on to the main breakdown poses to create the overlapping animation. The below images show frame 3 where the wing base is heading down but wing tips heading up and 9 which is the exact opposite. This now should have enough detail in the core poses to get a good feeling for the motion.
The below playblast shows the outcome of these 4 key poses and honestly, I absolutely hated it. It still felt very mechanical and there just didn’t feel like a nice overlapped and flowing motion on the wings at all. I knew that the approach I was taking just wasn’t working and I’d get stronger results if I adopted another approach that I detailed earlier. This alternative approach was to animate the wing fully up and fully down; turn on infinity on the animation curves and then offset and exaggerate the range of motion from there. This way I would get a beautiful sine wave animation curve with overlap happening in the offset. I could still refer and compare to my thumbnails to see whether the poses matched at the same frames even if there technically wasn’t a keyframe set there. I felt this would give me a more engaging animation more easily than trying to battle with the key poses I created here.
I deleted all keyframe and essentially started again. The below image shows the alternative plan to offset using curves. This image and playblast shows the new animation pre-offset. essentially I have my extremes of up and down here and I would then offset the wing controllers more the further I got down the hierarchy. For example there are 4 main controllers so I would ensure these were each offset by one another by 1 frame. I would then compare this to the thumbnails to ensure I had a good range of motion and tweak the range of motion from there. What tends to happen is that the further you get towards the end of a hierarchy chain the greater the range of motion - I also love my exaggeration to push the range of motion and get a slightly cartoony feeling so this was something I was looking out for and planning to implement!
The below playblast shows the same animation as above but with the wing controllers offset by 2 frames - I found that a 1 frame offset wasn’t enough to get the poses matching the thumbnails. I was really happy with this and felt like I could move forward. Compared to my previous attempt the quality was significantly greater and it was much easier and allowed for much easier control and tweaking after. My body still felt very mechanical, however, I knew I’d be able to improve this with some rotation paired with offset tail and head motion. This felt like a really strong base that I could build upon that wouldn’t have been possible with the previous approach.
I began my refinements through adding some forward and backwards rotation on the wings that I learnt from studying my reference and backed up by the theory from the ‘Timing in Animation’ book. This was quite subtle but in the shoulder you can really see this range of motion reflecting the ball joint rotation where the wings connect to the body for the shoulder. I was really happy with this, such a small tweak made the wings feel much more realistic and natural compared to the previous straight up and down motion.
I also started to work on improving the body and added a slight rotation to tilt the body as it was moving. This was the beginning of my ‘hyper-real’ exaggeration where I needed to be careful not to add too much but add just enough to bring more energy to the animation. I offset this X rotation from the Y translation a little and this helped create overlapping action across transforms and helped make this feel more natural. My reference also showed a lot of birds are fairly static when in flight due to being streamlined and aero dynamic so I had to make sure this was fairly subtle. I was happy with this motion - when I just had Y translation it felt so unnatural so adding this rotation in instantly made it feel more organic. I knew I could tweak the range of rotation later so I was happy enough to move on.
At this point it was some time past 10pm at night and I needed to sleep ahead of work the next day. I created myself a small plan to progress the animation so that I didn’t lose my chain of thought. I love creating loops when I’m ‘in the zone’ and constantly evolving them so this short checklist would remind me of that chain of thought and give me a direct plan for where to jump into. I had a lot of the core motion so tomorrow I wanted to add some motion to the head to overlap the main body; add some motion to the tail to overlap the main body and look at the advanced controllers here; study the legs and ensure that these were anatomically correct; add some slight up and down motion to the legs so that these felt a little looser and finally tweak the timing and spacing of the wing flaps so that the down stroke is slower and the up stroke is faster as I learnt from studying both theory and reference.
29/02/24
I actioned everything that I discussed previously right a way. It was super useful having made the list as it meant I could do a day of work and pick up right where I left off. I will comment on what I’ve done near the video, however, I wanted to focus on the jaw animation that I’ve done a little. From my reference I learnt that crows tend to ‘caw’ or square a lot as they fly around so I wanted to include this in my animation loop. I spent a long time fiddling with the animation curves and resulted with the outcome shown in the image below. I have an ease in to the jaw opening, an ease out as it reaches it’s peak, an ease into the close motion and then a snap shut. The snap shut was achieved through breaking the tangents and this really helped add a bit of impact to the animation. I tried the same on the open but it was a little too abrupt and the muscles would take a little bit to reach maximum speed therefore an ease in here made more sense.
In this phase of development I was also focusing on the motion of the legs and I mentioned I wasn’t completely certain on how these should be posed so I did a little bit of further research and I came across this anatomical breakdown of a bird’s legs in flight (John et al., 2010).
The key parts I learnt were that bird’s legs are longer than people think, therefore this confirmed that my rig was accurate and that the thumbnails from ‘Timing for Animation’ were probably not quite anatomically correct. The link presented some further photography of a peregrine’s legs that helped me understand these a little further in some slide show images I found (John et al., 2009). The anatomical drawing also helped me see how the bones should move with the red lines representing a ‘relaxed’ position and the blue arrows showing how the legs could fold. This actually matched how I had posed my legs on the whole, however, it looked like the feet should maybe fold back a little more. I actually tried this but it didn’t look natural so I kept them somewhere in between. This was super useful as I could tweak and refine my leg posing to make it more accurate before I went into the animation to help make this feel more organic.
The below playblast show the development of my animation including the head rotation, jaw animation, leg animation and tail animation. All of these offset from one another to create overlapping action.
The animation was now starting to feel really alive! I had a lot more motion than a realistic bird in flight, however, it felt more engaging and realistic with all the overlapping action that was occurring. I was really happy with how this was looking - particularly the jerk on the legs to make the whole animation feel natural and organic. I offset each leg by one 1 frame so that they weren’t twinning to help it feel even more natural. One thing I wasn’t as happy about was how curved the wing motion was on the whole. Was it too curved? Should I reduce the range of motion on the tips of the wings? Was I getting intersection that needed to be addressed? Was the range of circular motion enough? These were questions that were flying through my mind as I reviewed the animation and were things that I would experiment with on my next iteration.
The videos below show my further tweaks and experimentation - particularly with the wings. I’ve offset the circular rotation on the wings so that the wings land a bit further down opposed to forward which feels a little more natural. I exaggerated the range of circular motion too which feels like it has better flow but I feel it might be a little too much and I’m not sure if I’ve strayed too far from the natural motion of this cycle. I feel I will need to continue tweaking the animation curves tomorrow whilst reverting back to my reference to really understand how the bird should move and use it to raise the overall quality of my animation. Again this is all about striking the tender balance between a stylised exaggerated ted animation but still ensuring to achieve natural and believable locomotion.
I again made myself a list of things I wanted to tackle next, particularly as I knew I wouldn’t be able to do any work Friday night (I need a break at some point right?) and the next time I would revisit this would be Saturday - so I didn’t want to forget my point of focus! I wanted to continue tweaking the wings in conjunction with studying my reference to reach a point I was happy with. I wanted to add a slight unfurl to the claws/toes so that these appeared a little looser, as I’d achieved with the legs. I wanted to add a kink to the tail as it felt a bit too ‘flat’ - now their tails do tend to stay flat in motion as they act as an air rudder, however, If I turn on the additional controls, add more bend and then offset these controls it should make it look a little more fluid whilst also maintaining a straighter appearance due to the offset. Once I’d done these I could then playblast the final animation from multiple angles as well as a turn around. After than it would be time to experiment with motion paths and creating a small animated scene.
02/03/24
The following videos show my final refinement exploring all the concepts I detailed in the paragraph above. I was really happy with these developments and felt that I could call this animation complete! I particularly liked what I achieved with the tail - the plan that I explained previously worked an absolute charm and make the animation more fluid but also natural at the same time! One thing I also did was alter the wing animation curves so that they weren’t exactly the same on each side - creating a little more overlap and making it less mechanical and more natural again.
I feel the quality of this is now very good, particularly for an animation cycle. I’ve got overlapping action happening left, right and centre making the animation feel natural and fluid throughout. I feel the jerk on the head, legs and tail gives a sense of weight to this mid sized bird in addition to making it feel quite loose and less than perfect, which I feel gives a lot of appeal to this animation. I could possibly experiment with the additional feather controls of the wings, however, I don’t feel like this would add a lot and there are an awful lot of them so I don’t feel like this would be a good use of time. Instead I would like to focus on the small animated scene using the 3D set that I found earlier.
Below are the turn around videos to show this cycle from multiple angles before I render and present this later. The reason there are 2 is because I annoyingly noticed that one has a locator across the middle of the bird as I’d forgotten to turn this off and I found it distracting. However, by the time I’d noticed this I’d experimented with lighting and shader settings which is why the birds appear slightly differently!
Animation Scene
Next I began to experiment with motion paths and the 3D set to create a small animation sequence. I imported the set I found from earlier after copying the textures to the source images folder and it imported perfectly into my scene. I did scale it down so that it matched the size of my rig, however, I did forget to zero out the position so it was a little off in space - this was fine to work with but definitely something I should remember in the future. This meant every time I imported a new crow that was off in the distance as that is where (0,0,0) was on the grid!
I used the CV curve tool to create a path that went in-between the buildings. I created this in top view and then edited the individual curve points in perspective to get the path you see below. The plan was to get one curve working properly and then duplicate and tweak for the other paths. I’d actually learnt quite a lot about motion paths when I worked on the mobile title ‘NASCAR : Red Line’ (Shown below) where I was the sole animator creating all the animated car sequences you see in the video.
One of the key things I learnt was that you could key the motion path properties directly to increase and decrease speed after you’d attached your object to the path. However, the challenge I faced in the past was that the curves would have their own speeds based on the distance between the curve points. To tackle this I used the rebuild curve tool that would allow me to increase curve points, space them evenly but retain the shape of the curve. This was something I used whilst creating the motion paths for these crows to ensure that the animation was smooth, however, the path of motion and animation along it would be linear and less complex than what I did for the NASCAR Red Line, as showcased in this video (Nascar: Redline - Universal - HD Gameplay Trailer, 2013), where I needed cars to be ‘fighting’ against each other to get in front. None-the-less an important learning that would enable me to create higher quality motion path animation based on my previous experience.
Below shows a screenshot from the camera angle I’d planned to use - a simple ‘crane-arm’ rotation focussing on the house as an establishing shot with the crows flying through the middle of the 2 houses. You can also see the duplication of the motion paths here. I’ve tweaked each one based on what I learnt from the flocking reference videos to give each crow its own flight path. I’ve offset each crow’s animation so that they aren’t flapping in synch. Finally, I’ve edited the start and end frames of the motion path so that the crows are flying through the scene at different points, as they would in a flock. I made sure that there was a clear ‘leader’ and also a straggler that was a decent bit further behind. I’d hoped all this offsetting would make the scene more natural.
The below video shows my final outcome of the 3d scene with some further tweaks. I noticed that the dip down was very sharp so I eased the curved slightly so that hte birds flowed into it a little further. I also spent some time experimenting with the offset in position on the curves to get that natural flocking feeling. I also deleted the smaller branches from the trees as these were using transparency maps that only showed in the render and I was having some issues with the render too so it seemed easier to simply remove them.
I was really happy with this small shot and felt like it would work well as an establishing shot for this environment in a film. All my intentions I described previously had came to life well and I particularly liked the straggler crow that was lagging behind the rest. I could have actually slowed his flap down a little so that it seemed to be a heavier and more out-of-shape crow to add some comedic value, however, this would be an idea if I was actually developing this into an animated film rather than a short sequence. The path of motion was good as each crow takes their own path as they ride through the air. It could have been nice to render this but I wasn’t getting very good results initially and there were a lot of textures for this 3D scene so I decided to focus my efforts on rendering the cycle in the same style as my other animations in this module rather than spend the time getting a render for this scene, which would also take longer to render!
I had all manner of issues rendering the crow, particularly with Arnold, that I mentioned earlier due to the way the textures were presented. However, I decided to set up an aiStandard shader and plug in the textures as shown below. What I’m actually doing here is plugging the red channel of the metalness/roughness map into the roughness channel and plug the blue channel into the metalness channel. I’d done some research online about combined texture maps and this seemed to be the most common way of doing things. I ran some test renders with some default lighting and it looked good, a similar quality to my horse renders, so I decided to move forward with this.
I tried a few different iterations of lighting from the sky dome to a 3 point lighting set up. Due to the odd transparency set up on the bird I was getting some weird issues with the rim light on the feathers that didn’t look as nice as it did on more three dimensional forms so I decided to go with the sky dome light that provided good soft lighting from all angles. It was actually easier to use this too as I didn’t need floor shadows due to this bird being in the air so the bounced lighting from the sky dome underneath looked better than it did on other cycles. I set up and locked cameras from multiple angles and rendered each angle. I created the composition in Premiere Pro and the export of this can be seen below :
I was really happy with the final render quality and the final animation! The lighting came out well and was similar to previous animations so felt like it matched the style. The motion when rendered felt like it could have maybe have done with a little bit of motion blur - particularly as the wings flap really fast and have a large range of motion. I’d like to experiment with motion blur in Arnold in the future, however, I know this will take a lot of experimentation and might require re-rendering a lot. I really like the range of motion on the wings - I spent a long time experimenting with this and it feels like it flows together well. The slower downward flap and stronger upward flap gives it a lot of energy and makes it less mechanical by not being perfectly even. The overlapping action in the body, head, tail and legs also helps this feel a little looser and more natural as this crow propels itself through the air. It looks a little odd as the crow is constantly squawking, however, when studying my reference it did look like they square a lot so I feel this was a good addition to the loop.
Render Scene
25/04/24
I wanted to revisit this project and render the crow flying through the scene and to render it properly for my showreel. I'd initially left this as the rendering of the crow was really tricky and needed a lot of material alterations in addition to the same being needed for the 3D scene itself. The 3D scene had a lot of different materials in so I knew it was going to take longer. However, I did really love the fly through playblast I did and my feedback from Alex Williams highlighted that it would be better to see this animation in a scene so I wanted to invest the time to fix the materials and render it for my showreel.
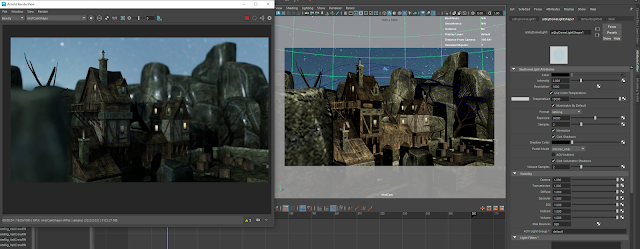
One of the biggest time consuming aspects of the the set up of this render was converting all the materials to Arnold materials. When imported the materials were mainly Phongs and Blinns that just didn't really work when using Arnold lights and renderer so they had to be converted and re-setup including plugging in all the texture files again. The image below shows the large number of materials that needed to be converted. The crow was most complex as it had a range of different texture files that needed to be plugged in as the graph editor shows. I kept my renderer open and tweaked the values until I reached a quality I was happy with.
I loved the HDRI lighting I'd been using recently so I started looking for a nighttime HDRI that would match the moody and spooky nature of the environment and raven creatures. I came across this HDRI by Guest and Zaal (2022) which showed a dark, mysterious and starry sky that I thought would suit the scene perfectly. I would get a good amount of cold blue lighting coming from the colours when I plugged this into a sky dome to help the scene feel more realistic and build a strong, mysterious and creepy atmosphere.
The below image shows the HDRI plugged in and some basic depth of field set up on the camera. I developed the environment a littler further to hide the horizon line. There were various rock assets around so I duplicated, scaled and rotated lots of these to build a rocky mountain like environment. I'd said earlier that this shot looked like an establishing shot for this building, perhaps this was the goal or destination for character to reach after they had climbed the perilous mountain or perhaps a creepy character lived here, outcast from the world and hiding in the creepy mountains!
The below image shows my experimentation with the lighting settings to get a balance of darkness to help the image look like nighttime. I would probably edit the colours further in post to balance the image and achieve that creepy nighttime look that I wanted, however, achieving a balanced base would be important. If it was too dark I wouldn't have enough information to tweak in post. I particularly played around with the colour temperature to get the scene feeling cold as it would be at night!
The below images show output renders of the scene using the skydome HDRI based lighting with colour temperature applied. It also shows how all the materials look with the conversion to Arnold shaders. I was happy with the result - it was looking so much appealing compared to when I initially worked on this animation and the non-Arnold materials were giving tones of unpleasant artefacts. The lighting felt reflective of real life and therefore made the scene feel realistic. The slight cold tint to the image was really nice too. One thing I didn't like was that it was a little bright - maybe close to dawn - whereas I wanted more of a midnight feeling, however, I could do this in post production!
I experimented a little further with the light settings and the material settings to ensure that the image had clarity and wasn't too dark. I also added a little bit of motion blur and placed some objects in the foreground to help add more depth to the scene. The below images show this experimentation. I've lost almost all definition in the sky at this point, however, if I turn this off in the render and then render using alpha channel I will be able to composite the sky behind to bring the definition in the sky back and also have more control over the sky's colour settings separate to the 3d scene.
The below image shows the simple composition of the 3D rendered scene and the sky layer beneath it. As stated before, the 2 tracks mean I can apply different enhancements or effects to them separately which will give me more control.
One issue I did have with this method was the sky felt a bit odd static as the camera rotated. This was relatively simple to fix as I applied some simple translation animation to the sky video track. I had a lot of spare space to play with as the HDRI was 4k in resolution and my output resolution was 1080p so loads of room for this basic post production animation.
The below two images show the colour correction that I explored in Premiere Pro. The first image has none applied and the second image colour correction on both the sky and the 3D rendered scene. I was really happy with this as I feel it nails the spooky, cold nighttime atmosphere I was going for when I set out to render this animation.
First image, no colour correction
Second Image, colour correction applied
Finally, below we have the final scene animation. Overall I am really happy with this animation. The colour came out extremely well and sets a very deliberate tone and feeling to the shot which helps support storytelling elements. The simple sky animation really helps match the camera animation - I did this purely through eyeballing and reviewing the footage until it matched and I was happy with the outcome as hopefully its something people won't even notice, however, if I did nothing they definitely would! The animation of the crows is really nice - its actually completely unchanged from before. I love how they move as a slightly random flock with each crow taking it's own path but moves in the same general direction. I also really love the straggler crow towards the rear - I perhaps could have exaggerated this even further. The depth of field effects are really nice as the initial rock almost reveals the scene which I thought was a great touch to help the overall visual quality.
Conclusion
Overall I feel I have achieved well on this animation to create a high quality bird animation. It was really fun to study a completely different animal again and learn the core underlying theory. I feel my in depth study of theory and reference has allowed me to really understand the way that birds move and I feel I could apply this to other birds of varying sizes. I’ve created a small animation sequence to extend this animation beyond a cycle and create an interesting establishing shot with the implementation of some flocking theory. I am really happy that I returned to render the playblast scene to render this, its actually one of my favorite shots in my showreel at the moment. Ithas a really nice storytelling element to it through the colours, 3D environment and camera motion to help it really feel like an environmental establishing shot from a movie. The colours and feeling of the shot are fairly creepy and as the raven is a slightly more evil looking character, having a flock of these fly through really helps sell this shot as a establishing shot for a creepy location.
I feel I have achieved the learning outcomes, listed below, because I have :
Studied avian locomotion in depth from analysis of thumbnails, reading theory, studying photographic reference, studied video reference and reflected deeply on this to plan my animation.
I’ve sourced an effective rig online and experimented with its range of features. I’ve investigated rigs from created I trust and made informed decisions about what I can move forward with to source a rig I feel I would be able to create high quality outcomes with.
I’ve created the avian flap locomotion cycle, specifically for a crow making 2 flaps per second, that successfully integrates my theory. I’ve reflected on theory and reference throughout to drive the quality of my outcomes. I’ve experimented with multiple approaches and evaluated effective methods to form a strong base for my animation.
I’ve experimented with motion paths and 3D sets to create a simple but engaging shot that places my animation into a practical environment, showing its potential use. I’ve used my previous knowledge from working extensively with motion paths on ‘NASCAR : Red Line’ and implemented that knowledge to this animation to create high quality animation quickly and avoid the problems I faced when working on this game.
I’ve also rendered this animation professionally and integrated it into my growing showreel (shown on the contents page of this module) to present my animation from multiple angles to a high quality.
Learning Objectives :
Decoding Avian Locomotion: Explore the principles governing bird flight. Uncover the unique challenges posed by animating creatures that defy gravity.
Freeware Bird Rigs Introduction: Familiarise yourself with the array of freeware bird rigs accessible on the web. Discover their features, controls, and how these rigs can be used to create bird animations.
Optimizing Animation Workflow: Learn the art of efficient animation workflow as we guide you through the process of animating a crow in flight.
Hands-on Tutorial – Crow in Flight Animation: A detailed tutorial where you'll animate a crow taking flight. Learn how to create a seamless motion cycle, leverage infinity curves for continuous motion, attach your bird to a dynamic motion path, and import immersive sets and props to enhance your animation.
That’s a wrap! Lastly, I’ve updated my project management to show that I am fully on track. Tomorrow the next task will appear and I have the full week to focus on this task. It feels super good to not be behind and be fully in synch with the programme. This is super important when juggling all the things I do in my life from this Masters to my teaching job to family life too. It’s all in a tender balance but I feel I am developing my knowledge and skills whilst also managing the work loads effectively.
There is nothing better than ticking off that final task in the checklist and watching the small ‘Mexican wave’ animation showing that you’re complete!
Reference List
A Crow taking Flight 🦅 Slow motion @abishekrajan763 (2022) YouTube video, added by Abishek Rajan 2 [Online]. https://www.youtube.com/watch?v=u1M8hhHtOqI [Accessed 28 March 2024].
Crow Behavior (2022) YouTube video, added by Mountain Lake PBS [Online]. https://www.youtube.com/watch?v=dZ1h-seBo0E [Accessed 28 March 2024].
Crow flying (2010) YouTube video, added by TIM YOUNG [Online]. https://www.youtube.com/watch?v=Ca71xOyx4q0 [Accessed 28 March 2024].
Crow in Flight, [Online]. https://huxleyparlour.com/wp-content/uploads/2021/06/press-release-pdf-EADWEARD-MUYBRIDGE.pdf [Accessed 28 March 2024].
DJMaesen (2019) Medieval scenery, May 14th [Sketchfab]. Available at https://sketchfab.com/3d-models/medieval-scenery-8eaf7c8ad725408ea23c23afb3b99be5 [Accessed 28 March 2024].
Estes Valley Spotlight (2021) Five Fun Facts About… The American Crow. Available at: https://www.estesparknews.com/estes_valley_spotlight/article_dea7d7fa-13d8-11eb-8595-53135378952f.html [Accessed 28 March 2024].
Figgins, K. (no date) Animation Rigs. Available at: https://3dfiggins.com/Store/ [Accessed 28 March 2024].
Guest, J. and Zaal G. (2022) Kloppenheim 02 (Pure Sky), December 24th [Poly Haven]. Available at https://polyhaven.com/a/kloppenheim_02_puresky [Accessed 29 April 2024].
Hamilton, S. (2017) IN A FLAP Evil crow terrorises Cork Institute of Technology with series of vicious campus attacks that required medical attention. Available at: https://www.thesun.ie/news/1065938/evil-crow-terrorises-cork-institute-of-technology-with-series-of-vicious-campus-attacks-that-required-medical-attention/ [Accessed 28 March 2024].
Horst, R. (2005) How ornithopters fly, How Ornithopters Fly - The Principle of Flight. Available at: http://www.ornithopter.de/english/principle.htm (Accessed: 28 March 2024).
Huge murder of crows! (2016) YouTube video, added by Jesse McNeil [Online]. https://www.youtube.com/watch?v=3wVUXCApuNU [Accessed 28 March 2024].
John, K.St. et al. (2009) Concentrate!, Outside my window. Available at: https://www.birdsoutsidemywindow.org/2009/08/06/concentrate/ (Accessed: 28 March 2024).
John, K.St. et al. (2010) Anatomy: How do birds fold their legs in flight?, Outside my window. Available at: https://www.birdsoutsidemywindow.org/2010/11/26/anatomy-how-do-birds-fold-their-legs-in-flight/ (Accessed: 28 March 2024).
King, J. (2015) Crow, [Online]. https://www.flickr.com/photos/93099027@N05/16234224078/in/photolist-qJyDe9-EFz53A-PAwLqw-4QV8bp-8LSmbF-qJ7XHW-bBwbsE-2awenUj-2crfo3x-4bLTL9-FZCpxT-nJ1gqy-UXmoaM-qyFS2f-dTrF8D-8otXkV-5JBPwW-8SQYhX-8Hj7YQ-5o5SL3-ReYms8-ezSvRH-agXmc3-oSb6f5-9VfeDA-ibJa6t-9tkrin-audNSf-86YcQz-fhVF68-dmFyuR-Z1e2mE-eMndfr-8yUEJJ-4NKQry-27VFgtc-ezSwec-2ajCedC-riG1pT-2eac1cR-WmJEep-r7tJQz-4BywVP-LE1uSB-24KYHk8-bQ3mJn-8bPxpu-2cYk2y9-2fjdTB1-e68VQj [Accessed 28 March 2024].
Lievano, S. J. (no date) flying sequence of a isolated crow against a blue clear sky, [Online]. https://stock.adobe.com/uk/images/flying-sequence-of-a-isolated-crow-against-a-blue-clear-sky/352396600?prev_url=detail [Accessed 28 March 2024].
Nascar: Redline - Universal - HD Gameplay Trailer (2013) YouTube video, added by TouchGameplay [Online]. https://www.youtube.com/watch?v=gmIcW92Ejew [Accessed 28 March 2024].
O’ Connor, D. (2018) Flying Creatures. Available at: https://www.angryanimator.com/word/2018/03/21/flying-creatures-with-dragon/ [Accessed 28 March 2024].
Parks, G. (2017) Two Crows In Flight, [Online]. https://pixels.com/featured/two-crows-in-flight-gene-parks.html [Accessed 28 March 2024].
Parslew, B. (2015) Predicting power-optimal kinematics of avian wings | Journal of ..., Predicting power-optimal kinematics of avian wings. Available at: https://royalsocietypublishing.org/doi/10.1098/rsif.2014.0953 (Accessed: 28 March 2024).
Raven flight in slow motion filmed on iPhone 5s (2016) YouTube video, added by Avetorro [Online]. https://www.youtube.com/watch?v=BnwVGu1yRA8 [Accessed 28 March 2024].
Timing for animation. London u.a.: Focal Pr.
Whitaker, H. and Halas, J. (1990) Timing for animation. London u.a.: Focal Pr.
Williams, R. (2009) The animator’s survival kit. London: Faber and Faber.