Animal and Creature Animation Assignment - Dog Catching Ball Performance
Animal and Creature Animation Assignment
Performance Animation Sequence : Dog Catching Ball
29/03/24
Introduction
This animation was to respond to the assignment we had been set to submit a 5 - 11 second shot that shows the planning and development process. The assignment is a little confusing as it also wants us to submit our animation loops that we have been working on throughout the module - this is confusing because a loop would cycle a few times and there are 12 units in the module, which would make the video significantly longer than 5 - 11 seconds. I asked for clarification and the tutor responding saying that it should be a short shot that is inspired by research and should have a story telling element. This sounds like I should be taking the concepts I have learnt from the units and applying them to a unique shot that I have planned and produced. I will need to seek further clarification on what I should submit in the movie file as I will have all the loops I have worked on in addition to this performance shot with storytelling elements, however, this made the most sense to me at this point.
I knew pretty early that I wanted to create an animation of a dog performance storytelling sequence for a few reasons. Firstly, I have a dog so I could capture first hand reference which I feel would be an extremely powerful skill. This would enable me to construct a completely unique animation that I have directed, analysed and produced. Secondly, this would be a quadruped animation, which would challenge me. I love dinosaurs and it was tempting to opt for this, however, I didn’t feel this would stretch my skills as this animation was a lot easier to produce. Finally, I’d been animating a lot of quadruped herbivores so it would be good to study a carnivore and produce an animation of a different type of 4 legged creature.
Whilst this was the intention I knew that I would have some limitations, namely, the rig acquisition. If I couldn’t acquire a good rig that performed well and matched similar proportions to my dog then I wouldn’t be able to go down this road. I had seen a few dog rigs online so I was pretty confident that I’d be able to source an effective rig. People like dogs so surely there’s a good Maya rig out there somewhere!
Project Management
Just like all other aspects of this module I used Trello to keep myself organised. I’ve created a card with a checklist that breaks down my process. As you can see rig acquisition is top of the list. Without that rig the plan for this project would fall apart so I wanted to dedicate enough time to finding and testing the rig. I then set up a fairly linear production pipeline from pre-production to production and post-production to guide me through the process. I separated elements like tail and head animations to allow me to focus on the legs and body motions first and once I was happy with these I could then add this animation on top. As always the checklist system allows me to keep track of where I am and easily make tweaks as I progress through the project.
Rig Acquisition
This was challenging! I found a few images of rigs that would be good such as the Wolf Dog and the Cody rig, however, I couldn’t find any links to actually download these. A lot of these rigs lived on High End 3D, which hasn’t been working for some time now so access was limited. I’d seen animations with both these rigs so I was confident that SOMEWHERE on the internet they must exist. My approach changed from broad search terms to specific search terms. I was looking at images and the sources of the images to see what information I could gather. I could find more information on the Wofd Dog rig so I focused my efforts here. I came across the creator’s name through their ArtStation site, Jeffrey DuPont (DuPont, 2019) , which is a great piece of key information that I could search. Eventually I came across a download link on a fairly random website (CadNav, no date). I downloaded it and it worked!
Now that I had the rig it was time to test how functional it was in terms of controls and how stable the file itself was. I was really happy with the full setup of this rig after testing a range of poses. There were additional foot controls to change the roll or tilt on various aspects of the rig and it also had a great range of face controls. One aspect I didn’t like was that the chest was parented to the hips. This meant that I couldn’t as easily create offset motions through translation and would need to opt more for rotation. This seemed a minor issue and I was happy to go ahead with this and start planning my performance sequence with the intention of using my dog as reference.
The above image shows my dog Yoshi. Yoshi and the rig have almost similar proportions, however, the Wolf Dog rig is a little more stylised with longer legs and skinnier body. This might be challenging with matching foot placement and weight distribution, however, I was hoping that I could use my own creative judgement to use the reference I would capture to drive the animation rather than match it frame for frame.
Therefore, this phase of the project I felt was successful. I’d sourced an effective rig with minor limitations that I could use to create my animation sequence. Now that I was confident I had a viable rig I could begin exploring preproduction in more detail to plan and gather reference for the sequence itself.
Research, Secondary Reference and Ideas Development
To gain some initial ideas I began broadly searching for reference footage of dogs on YouTube. I was less interested in locomotion and more interested in dog behaviour that incorporated locomotion. Whilst I was looking I was thinking about what I would be able to capture with Yoshi too. I came across the below two videos that centred around catching a ball or other toy. I thought this would be a great idea as it is something my dog loves doing and I’d be able to easily capture. I also liked the storytelling element of this as it gives the dog a clear purpose and with Yoshi being a Labrador Retreiver he is likely to catch the ball and bring it back, often being very happy with himself in the process. This would mean The animation could go from focussed and watching the ball; preparing to catch it; catching it; recoil and reset to the happy return loop. This also seemed like an achievable idea within the time frame to show a short story.
This first video (Dog Jumping to Catch Ball ~ Animation Reference, 2021) showed some great dexterity in the dogs poses and the power in their leaps which I thought would create some interesting poses. There are also changes in speed pre-catch and post-catch. I also liked some of the times that the dogs didn’t catch the ball and how they reacted afterwards as this showed a change in emotion that could be interesting. This was a really good source of inspiration for me to drive my shooting session to capture primary reference with Yoshi.
This second video (A dog Sits in side view and catches a Red Rubber Ball, 2022) was a nice clear shot of a dog catching a ball from sitting. I liked the look on the dog’s face as it prepared for catch and the little rotation as it jumps to catch the ball. It’s less active than the previous ones so I felt this approach would be less interesting as a storytelling sequence. Regardless of this fact there were still some good poses shown in this.
Theory Study
Next I wanted to study some theory of quadruped and dog locomotion in general. I wanted to ensure I had a strong underlying knowledge base that I could use to inform me when posing my character for my shots. This knowledge and understanding has massively helped me other this module so I wanted to give the same level of study and analysis to this animation, particularly as I’m working with a slightly different animal.
I revisited one of Alex William’s theory lecturers (Animal Anatomy for Animators, 2023) from early on in this module to revisit the core theory. There are some really interesting thumbnails of a dog presented from Glenn Keane that show how squash and stretch can work in a dog’s body - definitely something I could use when deforming my rig as the dog squashes and stretches through a jump. Alex discusses the flexibility of the spine and the differences between herbivore’s and carnivores, with carnivore’s being much more flexible. This would mean I would have a lot more free reign to exaggerate this in my animation due to a dog being a carnivore and therefore a more flexible spine.
I came across this theory video from Felix Sputnik (quadruped locomotion, 2023) that analyses dog locomotion in detail. This is particularly useful as it allows me to understand the breakdown of key poses across the three main locomotive states : walk, trot and gallop. The key things i picked out were that there is a slight overlap in the hips and chest coming down compared to the feet and the elbows and knees will allow for this to happen with their flexibility. It showed how the contact poses are arranged so that the centre of gravity is supported with the foot patterns. In a walk the hips and chest are offset from one another; in a trot they are in sync and in a gallop they are overlapped again. The head and tail will move in an overlapped fashion from the relevant part they are connected to. In the gallop the contact poses are much closer together with the front legs acting as stability and the rear legs acting as the driving force to propel the animal forward.
These thumbnails and underlying theory would be really useful in understanding the different locomotive states Yoshi might enter and use throughout the reference I would film. I could then pair this theory with my own observations to create believable and realistic poses. Also where my reference might be obscured, for example in a turn or directly facing the camera, I would be able to use these thumbnails to fill in the gaps so to speak.
This next video (It's time to walk the dog - How to Animate a Quadruped, 2022) was an interesting breakdown discussion of the thumbnails and theory presented in the Animator’s Survival kit. It reflected some of the theory already discussed with a little more analysis on the spine from the top down perspective to reinforce the flexibility of carnivore spines I’ve been discussing. There is a breakdown of the timing between contact poses being very quick and snappy - 2 frames difference - that I found interesting. This was linked to the transfer of weight as the legs are frantically working to maintain balance as it moves itself forward. It also discussed the difference in flexibility in exaggeration of poses between different breeds and builds of dogs. For example a larger, heavier dog like a St. Bernard wouldn’t look good with a bouncy, springy walk that might work on a smaller breed like a pug or chihuahua. Therefore, the build of the dog is paramount to conveying believable motions. Another interesting thought was that the rear should have more movement in the hips as this is the lightest part of the dog with the most powerful limbs. This is due to all the vital organs and weight is in the front half of the dog and therefore will be heavier than the rear leading to that increase range of motion in the hips, particularly when springing up and down! The lecturer also stressed the importance of studying reference directly from nature to understand these poses - which is of course my plan!
Lastly I found a highly detailed breakdown masterclass of the underlying theory of animating quadrupeds (Intro To Quadruped Animation Masterclass, 2022). There is a breakdown of skeletons and how this affects the motion. I found the breakdown of different foot types in comparison to humans really interesting - with dogs their feet are classed as Digitigrades where their heel is permanently lifted off the ground and in their rear legs the distance between their ‘heel’ and ‘ball of foot’ is much longer. This helps to understand how their skeletons should move in relation to regular bipedal leg movement.
A more detailed breakdown and reinforcement of the difference between herbivores and carnivores, supporting the theory I have already explored. The lecturer then goes on to show the difference between carnivores and herbivores side by side which was super useful to understand and visualise the difference between these clearly. Another interesting point was the rotation of the hips as the legs move forward and back with some popping on the hip raise as the leg takes the points. Similarly it showed the forward and backward motion of the scapular motions as the legs move back and forward. It is explored that the upper and lower limb bones tend to stay in parallel with one another to support the weight - this was something I learnt on an earlier animation and its good to see it reiterated here. The head should be reacting to the impacts and transfer of weight through swinging toward the leg that has just landed amongst some other subtle motions. It was also shown how the chest moves slightly to the side it’s just landed on.
This video was absolutely incredible. The level of detail and analysis was both highly useful and overwhelming at the same time. I plan to incorporate as much as I can into this to make my movements believable, however, I understand that I will be limited itted by the rig for some of the more subtle or dexterous movements. Regardless of this, if I can include theory from this my locomotion is going to look a lot stronger. The rig I had was pretty cartoony so there would be a lot of flexibility for stylisation when interpreting this theory.
Off the back of the depth of study of the skeleton I wanted to source an image of a dog skeleton that I could refer to and help understand the underlying structure a little further (TheDragonofDoom, 2013). It shows how the scapular plates sit and where other sockets are joined to help understand the points of rotation. You can also see the flexible carnivore spine that I have been studying.
Next I wanted to explore if any thumbnails by Edweard Muybridge existed as these had been useful in the past at studying real key poses in nature rather than animation thumbnails. Of course there were some Muybridge thumbnails! I found this first set that were good ant showing natural motion, although the angle was on a three quarter view which obscured some of the rear legs a little more (Muybridge,1885).
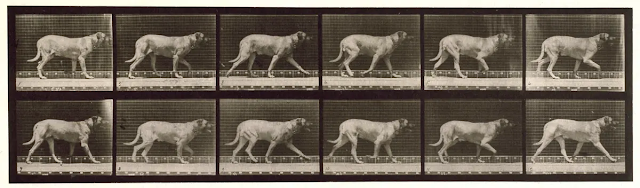
These below images (Muybridge,1885) were really strong as they were from the side angle and broke down a natural trot cycle. This links heavily to the theory research I did above but shows a realistic breakdown of the poses I could use to construct a walk in association with my own reference study. My goal was to find examples of walk, trot and gallop from Muybridge to help study the key poses I could use in my animation sequence.
Lastly I found a gallop to complete the set (Muybridge,1887). Gallops are particularly interesting as they are less symmetrical than walks and trots so having this reference would help me see the breakdown of poses in this gallop.
Next I turned to my copy of the Animators Survival Kit (Williams, 2009) to further study thumbnails. These had actually be explored and discussed in one of the earlier videos but I wanted to grab the thumbnails for use of reference. These are beautifully presented with different colours making the key poses and breakdowns really clear throughout the cycles. Below shows the breakdown of a dog walking with a clear breakdown of the offsets explored in the theory earlier.
Next I’d found a breakdown of a gallop (Williams, 2009). What I particularly liked about these thumbnails were the circles that represented the hips and the chest. You can clearly see how these offset from one another in a gallop and the much increased range of motion on the hips compared to the chest as the animal propels itself forward.
There wasn’t a breakdown of a trot so I grabbed the thumbnails of the horse trot from the same book (Williams, 2009). It has been explored from multiple sources that whilst there are distinct differences between how different quadrupeds trot the underlying theory is similar. I feel I have studied the locomotive theory of a dog in detail so I would be able to use that theory in conjunction with these thumbnails and my reference to support the posing of the dog in my animation.
Next I saved this gif (IWSMT, no date) as I found it a nice representation of key poses at different speeds from a walk to a run. It was really useful to see this all in one place and I particularly like the stretching that you can see on the gallop animation as well as the comparison of how much the chest and hips are moving across the different speeds. It seemed useful for these reasons so I thought I would save it as a reference to support me.
Lastly I came across this article by McFarlane (2013) that presented an anatomical breakdown of dog locomotion with illustrations. It focused heavily on trots and highlighted the synchronisation of the leg movements as the images below show. It attributes this motion to optimal use of energy and balance across the run. This was really interesting and was a key element I could incorporate into any trots I were to animate.
The article also presented some trot thumbnails that I felt could also be a useful reference so I thought I would include it on my blog to support me with posing. (McFarlane, 2013)
Primary Reference Capture
I felt like I had a really strong theory base to understand the locomotion of a dog so it was time to move onto the next phase of the project and capture some primary reference with Yoshi. My plan was to take a ball out and just play with him in the park. I set up my GoPro on a bench so that it was raised slightly and mounted on a tripod. In terms of settings I captured at 4k at 60 fps to try and get as much detailed information as possible when studying the reference. I set my GoPro lens to a linear angle to reduce the distorted fish eye effect you can get from wide angled lenses.
I would then use my phone to tell it to start and stop recording. I faced the camera towards a relatively flat concrete section as I knew that the grass could obscure foot placement and make it harder to study the key poses. I had the camera angled facing up slightly as I wanted to capture the object in the sky, however, upon reflection it might have been better to angle it more flat as the some footage captured did cut off some of his legs.
You can see a photo of the reference capture set up below along with my glamorous assistant.
I captured a lot of reference as shown below. I wanted to take a lot of different takes for different options to give me as much choice as possible when I got the footage back to the computer to review it. You can see I have highlighted some of the videos that I felt were more useful than others to help filter the number of reference files down further.
The first bit of use able footage is shown below. I felt this was useful as it shows Yoshi doing a gallop chasing after an object. Therefore, I would be able to use this as reference for how he gallops and study the key poses directly here rather than solely relying on thumbnails sourced from theory. Although this was good the action happened very quickly and Yoshi goes out of frame very fast so I felt the storytelling aspect was a bit more limited to use this solely as the base.
The next video below was pretty interesting as Yoshi goes from a patient and anticipating sit to a hop and then into a run. The problem here is that he exits the screen therefore I have no reference for how the turn would work and this would no doubt be challenging. I did really like the subtle motions of him jolting when anticipating the ball - I felt this added a lot of character. Yoshi is a young Labrador and likes to do everything immediate so I felt this reflected his personality well!
The next video below was potentially useable, however, it was a little bit slow. I liked the walk into the shot; the hop and the super wagging tail. I really loved how happy this made him and how he showed it through his tail - this is definitely something I’d like to include in my final animation to really show his excitable character. I was plagued with some similar issues with Yoshi going out of shot so I felt although I was heading in the right direction I didn’t have that perfect piece of reference yet.
The next video, shown below, was from a different angle. He stays in shot for longer but it is very quick and I don’t think the poses would be very easy to analyse. This also showed a fail on catching the ball which could be interesting but the whole speed of this shot felt too fast.
This next shot, shown below, went pretty well. Yoshi canters in; alters direction; catches; loops around and runs out of shot. I felt like this was starting to build the type of sequence I wanted to show locomotion, performance and a small aspect of storytelling. The angle on the catch was a little awkward as we were facing his rear so I thought this might be difficult to study. I wanted to try and capture a similar shot but hopefully as he was moving horizontally across the frame.
After a few more attempts I managed to capture the reference below. I was really happy with this as the line of motion was much smoother. Yoshi comes in from the left and catches the ball moving right which would be very useable in animation. I also really liked the loop Yoshi does as he returns towards the camera - I felt this would be an interesting challenge animating the character moving in all three dimensions across the X, Y and Z axis. I liked the story telling aspect of Yoshi running and jumping for the ball, he’s also got the super happy wagging tail on the way back showing a lot of his character.
This footage felt as close to perfect as I was likely to get. I later noticed that the camera is rotated slightly so that Yoshi isn’t perfectly moving from left to right on the first catch and instead slightly away from the camera. However, I also felt that this might help me construct my own animation through studying the reference rather than directly copying it, so it was a flaw I was willing to live with. The important thing was that he stays in frame and is seen from clear angles for the majority of the shot. I could almost see this animation working in Maya in my head as a finished animation which I felt was a good sign and I was happy to get started!
Lastly I created a 24 frames per second version at 1080p so that I could import it easily into Maya on an Image plane.
30/03/24
Thumbnailing
Now that I felt I had good reference I wanted to study this in depth. I’d watched this video (Animation Blocking + Finding Key Poses w/ Reference, 2020) quite a few times before and was looking for a good project to apply this theory to. He shows how he goes through the reference and picks out particular key poses with simple annotations to help understand what poses can be used to block out the animation in Maya. I’d found that my animation skill had improved massively the more I’d studied theory and reference so this was a good chance to study my own reference to drive the creation of a unique animation.
I experimented using Synch Sketch that was advertised in the video, however, I felt I could get better results from ProCreate Dreams which felt a very natural approach to annotating video. Below shows a shot of the annotations that I was creating. You can see that I am sketching over key poses in addition to studying the key changes in motion across the video. In addition to sketching poses and paths of motion I was annotating particular frame numbers, particular key pose names or direction of travel to help me gain as much understanding of the motion as possible when animating.
This first video shows all annotations:
This next video shows just the key poses and breakdowns :
I’d grouped the annotations into separate groups with the video of exporting these separately and then compositing them together in Maya - almost like cel animation. I felt this would give me the most flexibility with understanding the reference. When everything is on it is a little overwhelming so having the ability to turn on and off the different elements that I needed would be powerful. This method would rely on being able to export transparent images so that when they overlay one another it shows the previous one through.
Overall I was really happy with this process, I’ve quite scientifically broken down all the key poses that would be needed. I’ve broken it down per element with colour coding too to understand where each limb or body part should be at any given time. I’ve analyses that we go from a gallop to two hops to the catch to the recoil and slow blending into a trot. My study of theory helped me analyse this as I could pick out the key poses and identify how elements moved together such as the hips and chest in sync on the trot as shown by the arrows. The frame ranges I’ve identified for these will be really useful points to help me block out the animation.
31/03/24
Maya Scene Setup
Next I needed to set up the reference within Maya and my first port of call was to see whether I could export transparent videos from ProCreate Dreams. I came across the below video (how to export transparent backgrounds in procreate Dreams, 2023) that shows whilst you can’t get transparent videos I can export transparent image sequences. I would need to convert all video to a image sequence to get it into Maya as an image plane anyways so this was fine!
I exported out the 24fps video; the thumbnails of the key poses and the larger path of motion analysis as three separate image sequences, as shown below. I’ve exported them to the Images folder of the Maya project I set up to keep everything neat and easy to transport / re link in case of any issues. I made sub folders so there weren’t loads of images all in one project, just to keep it a little tidier.
Here you can see the setup of the image planes in Maya. I have exaggerated the distance between the image planes slightly to illustrate the cel animation style effect I used for the reference. This meant I could add each reference plane to a layer and turn them on and off as I saw fit! This really enabled me to get the most readability out of my reference in Maya whilst also being able to turn off layers to remove clutter - even turning off all annotations to focus on the raw video itself so that I could study nature closely in the moment of animating.
Here shows the set up of my display layers in order to give me the ease of flexibility I described above.
This shows the settings I used to import the videos onto the image plane. A particular point of note is that I’m using the frame offset to offset the video starting by 101 frames. This means I have some spare frames at the beginning of the animation to extend it further. I was contemplating on adding a gallop here but it would be a stretch goal. I was having a slight issue where my annotation videos were out of sync from my video which was super frustrating. It took me a little bit but I noticed that the video started on frame 0 (exported from Premiere Pro) and the annotations started at frame 1 (Exported from ProCreate Dreams). This meant I just needed an additional frame of offset to bring them both into sync with one another. This was incredibly satisfying to solve as I was beginning to worry there was some frame rate issues with the video files which would have been more challenging to solve.
04/04/24
Animation
I took a few days out of work for a break in the lakes, which turned out to be not so relaxing! I managed to slip on the 'Old Man of Coniston' mountain and dislocate and fracture my shoulder. This was super worrying as I essentially had one arm out of action. Whilst awaiting treatment I wanted to make as much progress as I could with the animation in case I needed any extensions after treatment.
I had some additional buttons on my mouse so I looked into the hotkey editor and macros using branded mouse software to see if I could map all core motions to my mouse so that I could animate one handed! I used the below video (Maya - Setting up Hotkeys and Mouse Macros, 2020) to see whether this would be possible.
Below you can see the macros I set up to allow me to map the thumb button to alt so that I can move and navigate the camera and 3d space without the need for my left hand on alt. I then mapped the key transform tools to the other buttons so that I could switch between these more easily. I felt I was going to be slower but this seemed like a good solution to help make progress where I could so not to get too far behind.
Next I set up a motion curve in Maya that would act as reference for the path that would be taken by the character. I potentially could attach the all mover to this, however, I felt I would get a lot of foot sliding and the keying of positions along the curve might be more fiddly to do. I mainly wanted this curve to act as a point of reference for the path the dog would take.
I also spent a lot of time tweaking the scale of the reference plans so that it matched the size of the dog as closely as it could. I knew I couldn’t get this exact as my rig had very long legs in relation to the body and compared to Yoshi. However, as I was using the reference to inspire the animation rather than completely match move everything this shouldn’t be too much of an issue.
The next decision was whether to use the all-mover for the position or whether to leave it in the centre and animate the rig independently of this. The benefit of using the all mover would be that it would be easier to block out the path of motion, however, foot slide would be considerably more challenging. If I leave the all mover in the centre and just animate the rig I would easily get foot planting, however, creating a smooth curve of motion across the 360 turn would be a lot more challenging. I decided to opt for the latter as there were a lot of steps taking place and I felt like I would constantly run into issues with foot slide that would be frustrating to fix. Getting the smooth motion of the hips would be challenging, but it should be a lot easier to tweak.
05/04/23
When I opened my Maya file the next day and looked at my reference footage again I felt the scale of the footage and the motion path weren’t quite accurate. The motion path felt very narrow and didn’t give enough room to complete a full turn. This was just for reference but none the less I tweaked both to try and make them more accurate to match the footage.
The video below shows the result of my initial posing. I was directly using the video as reference to help lay out my animation as well as match the timing. Generally things were going well, however, it did feel like it wasn’t quite bouncy enough in the rear and would need exaggerating. It was also going to become apparent how complex this scene would be to animate due to the sheer number of poses and changes in locomotion. It was also pretty difficult using Maya mostly one handed at this point as I was a lot slower than I would have been, but none-the-less I was making some progress which is better than no progress!
06/04/23
A quick review of my project management shows that I’m in the initial posing phase to layout the animation. This was going to be an extremely long phase given the length of the animation. I hadn’t given myself any deadlines at this point - partly as it was a scheduled study break and partly because of the strange state my life was in with my broken arm and being unsure where I was heading with this from a health perspective. I was loosely aiming at finishing this animation within the Easter break and be back in synch with the 3 remaining tasks that would be released on the canvas platform.
I continued to develop the poses that i had analysed through my thumb nailing process. This was the point where I realised quite how tricky this animation would be particularly around the 360 turn. I was trying to match the poses, however, I felt the motion was becoming extremely jerky and awkward looking. I was wondering whether I had made the wrong choice and should have animated using the all mover, however, the amount of foot steps even up to this point would have been extremely difficult to manage to stop them from sliding.
So I decided to adopt a greater pose to pose approach to help improve the positions of the body across the curved motion it was taking. By setting beginning middle and end points I would then be able to alter the curves of the translation to help me get a nice smooth curve moving at a constant rate. After I’d blocked out these key parts I would go back and in-between to get the full range of foot motion. This felt like a good approach that would solve most of the challenges I was facing and allow me to progress.
This next review below shows an update of the inbetweening progress to get the legs moving and propelling the body. I was pretty happy with this progress as the initial block of these poses was looking good and matching the reference I was studying. It absolutely needed refining with the graph editor, however, as well as still in the lay out phase of the animation to create the initial poses I was happy that this was giving me a good foundation that I could refine later.
This next iteration, shown below, shows some minor tweaks to the curves in the graph editor on the main hips translation to round off the path motion and create a more circular path. It shows some adjustments made to the feet to ensure their placement is returned to a point that could support the weight of the creature. I wasn’t completely happy with the steps after the hop and catch but for now it was more important to complete the layout as I would be able to tweak these later or add more breakdown poses if required to improve the planting of feet.
The next steps would be :
Start the trot to complete the full sequence and end the layout phase.
Begin refining all curves in the graph editor to improve clarity and fluidity of motion.
This would start with the hips as the top of the hierarchy; then move onto the chest and then the feet.
The goal would be to analyse what curves exist and smooth their motion to remove jerks and make motion more fluid and flowing into one another.
07/04/24
I reviewed my project management, I wasn't entirely happy with the tasks I had set up so I rejigged them slightly upon reflection of my current progress and how I planned to progress and submit this animation. I'm constantly reflecting on my trajectory and what is important - translating this to my project management ensures that I can easily stay on track and remind myself of what is coming next.
The below video shows a little more refinement in the graph editor of the first part of the animation. I wanted to make sure that the initial motion of this curve was as good as it possibly could be to prevent me from making larger tweaks later. I'd also polished the feet motion a little to make sure that the placement was largely correct - any tweak to the hips also meant tweaking to the feet so this was a bit of a tender balance.
Next I started on the trot portion of this sequence and I was finding the turning motion really challenging. This is because I'm trying to find harmony between the translate X and Z curves to create that circular motion. You can see that the start of the trot feels super awkward and I was worried that I wouldn't be able to get the speed of this right. I began some quite drastic measure to improve this. I decimated a lot of the keys on the translate X and Z curves so that I could create more continuous curves that should create less harsh spikes in the speed across the curve. I would then use the pose to pose method again to complete the trot translation and then go back to create the in-betweens to ensure the full locomotion was created.
It was at this point when I returned to my theory study, in conjunction with my primary reference, to create the trot. I knew Yoshi was in a trot so I could almost treat this a little bit separately whilst I was blocking it out. This would be a lot easier than trying to match move to the video and also Yoshi was coming almost directly at the camera so there was a lot of obscuring.
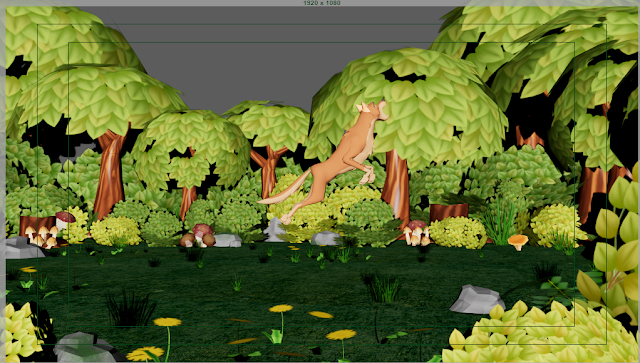
This next video shows a range of things. Firstly it shows some subtle camera animation. I wanted to set up the final shot so that I could understand when the dog was off screen to prevent me from animating more than I needed to. I added a slight Y rotation and a subtle zoom using the focal length. I was pretty happy with this motion as it was subtle enough to not detract from the animation, however, a completely static camera tends to look quite odd. When you study films very few camera shots are completely static so this helps it feel a bit more natural.
Secondly I started adding the environment. Now that I had camera motion I knew where I needed the environment to be and where I didn't. I wanted to create a little bit of depth to the environment and use some depth of field on the camera to help with the framing so I place some bushes close to the camera in the bottom corners that would be later blurred. I knew I'd be able to tweak this environment more later, however, it was good to start blocking in what the final shot was going to look like whilst I was still working on the animation.
Lastly, this video shows the full trot development and completion of the full layout phase of the complete animation. It was still quite rough and ready in terms of quality, however, I now had something I could spend time perfecting as it had already taken quite a long time to get to this point. There was still a few speed issues with the overall movement of the dog that needed to be fixed and the transition between the poses on the trot felt a little jerky. However, I was happy that all the key poses were blocked in and I could focus my efforts on polishing - which I knew would take some time!
3D Scene Development
I'm going to breakdown the scene development a little. I sourced an asset pack by Juju Princess (2021) so that I could construct my own environment. I downloaded this as a GLTF; imported to Blender 3D; exported an FBX with embedded textures and imported into Maya. This was the pipeline that I'd learnt when working with some of the other scenes from the module.
I thought that a forest scene would work well solely because it was green and my main subject was orange; two colours on opposite sides of the colour wheel. This mean that I was using a little bit of complementary colours and it should make my subject stand out. During my horse rearing animation all of the colours in the scene were warm so the horse felt a little lost so I wanted to avoid this in this animation. I was a little worried about how noisy the environment might be and how that might detract from the animation, however, I'd planned to use depth of field focused on the dog so I hoped this in conjunction with the complementary colours would make it stand out.
This image below shows the composition from above. I've layered trees with bushes to create a sort of forest feeling. As you get further back I'm increasing the size of asserts to try and create a bit of depth to the shot. Placing large bushes also blocks the horizon line which will be important to complete the immersion of the environment to make it feel complete. For the ground I'm using a simple plane with a grass texture I found by Efe_madrid (no date). I've simply repeated it by manipulating the plane's UVs. Later I could duplicate some of the grass blade assets around to make it feel less flat.
The below image shows the composition through the camera. I was trying to create the feeling of this being a gap in the trees in the woods. This hopefully would support my storytelling through eluding to someone taking their dog for a walk in the woods and playing with a ball with them in an opening. The bushes in the foreground really helped sell this illusion as a complete environment and the the camera was completely amongst them. I left a little bit of an opening for the sky to show through - the plan was to use a Arnold 'skydome' light and plug in a HDR 360 image to use as the lighting. I wanted a blue sky to further add to the complementary colours used in this shot. Things were going well and I could almost envision this looking really strong as final render - particularly as a small storytelling shot!
Next I wanted to gather the HDRI of the sky and came across this beautiful sky by Guest & Majboroda (2023). I looked through a few for one that included both clouds and a bright blue sky and this one really fit the bill. I could add some slight animation rotation to this to give the illusion of the clouds in motion rather than completely static.
I'd actually never worked with HDRIs before and wasn't completely sure how to work with them in Maya. I didn't imagine it would be too challenging and expected I would just be plugging the image into the colour property on the 'skydome' light, however, I wanted to do a little bit of research in case there were any other settings that I should experiment with. I came across the below video (HDRI Lighting in Arnold for Maya - 60 second Maya Tutorials, 2021) which confirmed what I was expecting and showed me some of the results that I should expect from the HDRI. I was happy with this and plugged my HDRI in - ready to experiment with rendering tomorrow.
08/04/24
I had a few issues when rendering this scene. I had actually been fearing this a little as a lot of the assets were using transparency textures that weren't rendering in Arnold and instead were showing as complete polygons rather than cut out. This is super common for foliage and it is a really common technique to use transparency/opacity maps when working with assets like foliage in order to cut down on polycounts for complex assets. As such I had been meaning to research into how to make transparency/opacity maps work in Arnold and I was confident that I'd be able to find a way.
I did some research and came across the below video (Understanding Opacity vs Transmission in Maya 2023, 2022) that showed a whole range of techniques for how to work with transparency. The main key points were that you needed to set the meshes themselves to be not opaque by unchecking a check box in the attribute editor and to also use an actual opacity map. I tried to avoid making the opacity map and was hoping that I could use the alpha channel from the PNG texture files to plug into the transparency or opacity channels, however, it just wasn't working.
So I opened up the Textures in Photoshop to create my own opacity map. This is a really easy process of making the image black and white; crushing the levels to make the shapes completely black; running an invert and finally placing a black background underneath. This created the image shown below. The way this works when used in the opacity channel in Maya is that anything black will be completely transparent and everything white will be completely opaque. You can actually use greyscale values too to make things partly transparent - the same technique is used in lots of aspects of 3D such as controlling how metal or rough a surface is.
Once the opacity map was plugged in all my problems were solved as shown below! All the assets were working nicely with the opacity maps to create the cut out effect that was intended. The HDRI lighting was also looking really good and as such I was happy with the overall quality of the render as you can see the subject clearly standing out which will be improved further when I added the depth of field affect. I was worried that I would run into issues I couldn't solve with the transparency and that I might need to consider a completely different environment, however, I was glad my research got it all working. I was really loving the storytelling aspect of the animation paired with this scene and it felt like everything was starting to come together. Next steps would be to perfect and polish the animation!
This next video shows a full polish pass across all key rig elements (hips, chest and feet) and all translations. Things are now starting to look a lot smoother. The overall speed of the animation feels better and more consistent as I was worried before there were stark changes in speed that didn't look natural. I was trying to create the speed of my reference video that had clear transitions in speed throughout but obviously felt natural. It was super hard to get this feeling natural as I was battling both the X and Z translations and would have been much easier with the all mover to create consistent flowing speed. However, I was making good progress little by little and I was confident that I could achieve a strong rotation that would show a lot of skill with animating a character across a 360 turn.
Some of the leg and foot positions felt a little off, especially as I kept tweaking the hips translation so this is something that I would focus on next as an animation pass.
09/04/24
The video below shows my next developments focusing on the foot motion and placement alongside the knee angles. One of the key things I was doing here was to get foot placement feeling solid as they planted the ground so in the Y stranslation curves I was breaking the tangents to allow linear motion of the foot coming down create a solid plant rather than a soft plant. The knee alignment was all over the place so this was a case of simply focusing on all the keys for one knee throughout the animation and correcting it so that it was facing the right way and allowed the legs to flow from one pose to the next. I still had some popping on some of the legs with over stretched IKs which is something I would need to action next.
The Ball and the Catch
I'd worked with characters picking up and releasing objects before and it was always a concept that was harder than it sounded. I'd found solutions in the past but they didn't feel very flexible and I knew there would be better solutions so I wanted to do some research. I came across this video below which was super useful as it showed a range of methods that would work well for different or any situation. The method I'd used in the past was using duplicates of the object and animated the transparency to swap between one that was in world space and one that was parented and local to the elements that was 'picking it up'. The issue with this was that if you needed to make any tweaks to the animation then you had to make the same tweaks to both of the balls and it was super cumbersome. So I hoped I could find a better solution in this research.
I learnt a lot by watching this video (How to Make Characters Grab Objects - Parenting Constraints, 2018) and knew that it would be something I would come back to depending on the need I had. It showed that the best solution that would work in any situation was :
Create a group the object
Centre pivot of the group
Create a locator
Move the locator to the target position
Parent the locator to the attach point physically
Parent constraint the object that is moving between two spaces to the locator
Key the object
Animate the parent constraint off at the time of attachment
Select the constraint and in the attribute editor under the constrain attributes tab; Disable : Enable rest position
Create another locator
Parent it main parent object
Constrain the object group to the parent object
Animate this parent constraint on and off at the correct points.
This sounded pretty complicated but essentially it was ensuring that you were constraining nulls (locators/groups) rather than the object itself. Essentially what this means is that when you animate the actually object itself it isn't interfering with any of the positional constraints that the constraint applies, which makes the process a lot more flexible.
I used this method on the ball and it seemed to work extremely well, as shown below. Rather than using a group or a locator I could use the all mover of the ball rig. My need for constraining was also fairly minimal as I didn't need to transfer from world to local space and back again I just needed to go from world space to local space so the process would be easier. I started by positioning the ball at the part it would be caught and worked backwards from there. I wanted the ball to come into the frame before the dog to create a little bit of anticipation so I had it create one bounce and maintained the dog's gaze on this. I also create a really nice amount of squash and stretch on the ball that helped create some motion blur as a smear frame which was incredibly satisfying to watch. There is a minor amount of squash and stretch on the ball, however, probably difficult to see. Regardless its often the small subtle motions that help contribute to the overall believability and quality of an animation.
I continued to progress with polishing the animation as shown in the next playblast below. First I was focused on tweaks to the hips and chest rotation as the dog turned to help smooth this out using the graph editor to create smooth transitions. This created the need for some tweaks to the feet as well where positions had moved slightly. Next I added some slight rotation to hips in local space so that as the legs came forward the rotation on the hips followed that. This was one of the elements that was discussed as being very important from my study of theory. I applied a simple approach to the front legs so that the movement of the upper scapular plates had some motion forward and backward reflective of the motion. Next I focused on the head animation to create some smoother motions and keep the head focused on where it was looking.
Lastly I worked on the tail, which was probably the most challenging aspect of this animation pass. I started by decimating all the key frames and starting fresh. My goal was to take inspiration from the reference but to also ensure that I had clear overlapping action to the hips. I also needed to make the tail look alive and like the dog was in control of it rather than it being a floppy appendage, so this would be a tender balance to strike. The goal was to block out the frames and then offset all the controllers along the tail to create the successive breaking of joints. This largely worked well, however, it looked better after the jump than before and I knew I'd need to make some improvements to this part.
Currently I really liked how when the dog returns towards where it's human would be it goes from recoil from hop into a happy swish as it returns on the hop. There is a lovely point where it seemingly gets happy and whips it into a bigger swish, which I feel adds a lot of character to the animation. On the flip side I didn't like the beginning parts as some bits looked too stiff and rigid and other parts way too floppy so this would need balancing.
10/04/24
In addition to tweaking the tail, next I wanted to work on other animation to the head, such as ear bounce and blinking, to help with the believability. In order to understand how dogs blink I found this video as useful reference (Why Do Dogs Wink? What Does It Mean Exactly?, 2021) as it showed close up shots of dog's eyes. I noticed that the brows and skin around the socket moves in addition to the lids blinking in a slightly diagonal pattern so this is something I wanted to include in my animation. Adding blinks often makes the rig feel more lifelike and without it it can feel very tiff and robotic so this small detail would help bring this creature to life.
The below video shows a range of tweaks and polish to the animation. It includes the blinking animation as discussed above. I added a few blinks across the animation at points where I felt it would be most natural, such as after landing and at a couple of random points on the return to mimic natural eye cleansing actions. I was studying my reference to see if there were any other facial animations I could add, however, Yoshi looked pretty serious throughout the animation and the facial poses were reflective of that so I was happy to leave this as it was. The dog's face was also turned away and small for most of the animation so it didn't make sense to spend any more time on even subtler animation.
Next I worked on refining the beginning motion of the tail and was a lot more happy with the outcome. I'd gone into the graph editor to simplify some of the range of motion to reflect the dog having more control of the tail and using it to balance itself as it prepared for the jump. I did this whilst also having more motion at the end of the tail to suggest that it was more flexible. I was also thinking about how it should flow behind and follow the path of motion of the hips, similar but not as extreme as how squirrel tails follow their motion. To achieve this I often was flipping the direction of rotation and removing keyframes to simplify the motion and add less erratic behavior which actually made it look more natural.
I made a range of tweaks to the feet to improve their placement and motion in general. In the graph editor I notice some odd parts so I smoothed these out. I also had some parts where the foot was only planted for once frame so I extended this placement to ground the feet a little more even if it was only holding the plant for an additional frame or too. This made the feet feel less floaty in places. The feet and leg movement after the hop felt a little stiff so I worked on the poses here to make them flow a little better and match the reference as close as possible. This was pretty tricky and I wasn't completely happy with this but I thought I could focus on it a little bit more later.
Next I added the ear bounce throughout the animation taking a very similar approach to animating the tail. These ears were a lot stiffer due to the cartilage structure of them compared to Yoshi's floppy ears so I would need to take a different approach. They wouldn't move as much due to this more rigid structure but they would bounce a little and I could exaggerate this slightly for the purposes of the animation. I exaggerated the motion more in areas where there was more motion like the hop and less so in areas where the force was less like on the return trot. This was another small subtle touch that again makes everything feel more natural and lifelike and I was happy with this little bounce I'd added.
I shared the above video with my peers from the course looking for some feedback of ways I could improve it further or anything that I was blind to given how often I was watching the sequence. Feedback was generally positive, however, somebody highlighted that the landing didn't look quite right but couldn't articulate how. I felt similar, however, I did feel it was reflective of the reference. None-the-less I was confident that I could improve this through a polish pass on the landing area specifically.
I'd remembered earlier from my theory study that the rear end should move more and be a lot more flexible so I thought that I could exaggerate this motion further. I went into the graph editor and studied mainly the Y translation and X rotation to smooth it out and create some exaggerations to increase the range of motion. I also wanted the range of motion to reduce on the subsequent bounces to show that Yoshi was steadying himself. It was a little frustrating that the chest controller was parented to the hips as it made the spine a little more rigid. To counter this I also refined the rotation on the chest to improve the flexibility in the spine.
The outcome of this was looking pretty good and there was a lot more energy in the landing that made it a little more engaging and hopefully realistic. With the tweaks to the hips and chest I also worked on the foot placement to make them flow better. I was studying the reference but also thinking about the balance and centre of gravity in addition to the transition between the key poses. I felt the feet were looking a lot better as they flowed from step to step and steadied the weight - after all this was the point of the animation where Yoshi was slowing himself after the hop before he speeds up on the return trot.
12/04/24
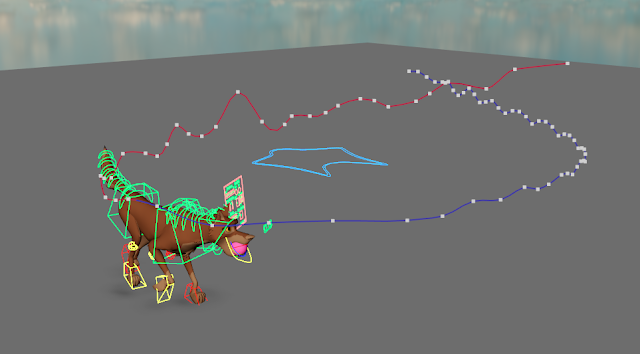
I was nearing the end of the animation, at least the things that I thought I could do to improve it. Something still felt a little off in some of the motion so I thought I would use some motion paths on the hips to help visualise the the path of motion a little further. It wasn't too bad, however, some parts in the top right of the image below weren't as rounded as they could be. I altered the points on the motion path in an attempt to round off this path and make it more fluid and circular.
The below two images show the tweaks made to the motion path and a couple of different angles that show the height of the motion path too. The path was feeling a lot more rounded on the turn, however, this also meant that my foot placement was now off again and would need tweaking. Luckily this was quite easy to do by altering the translate X and Z values in the graph editor to place the feet back in the right places to support the centre of gravity. Another issue that occurred was that I'd introduced some spacing issues that meant it looked like there was a little section where it moved quicker than it should. This was frustrating as the path was smoother but the timing was now off. I actually used the motion path again to ensure the spacing between the points on the curve were more even and this improved the timing again.
The video below shows the tweaks that I just explained. I also added a little more bias to the up poses on the return trot to make it feel a little more bouncy. The tweaks to the path were extremely fiddly and I probably should have done them a lot sooner as it was very fiddly to re-tweak the feet, however, I felt like this massively improved the overall timing and path that the dog took. The motion felt believable and each stage of locomotion transitioned into the next smoothly which was my ultimate goal! I was now a the point where I felt like the animation was done and it was time to focus on rendering and presenting the animation.
I updated my project management as shown below. This had probably taken a lot longer than expected as we were nearing the end of the my Easter break from work, however, since this was the animation I would be submitting for the assignment I wanted to be flexible with timing and give it as much time as it needed. I was also in and out of hospital at this point so I'd had a lot of delays and I didn't want to be too harsh on myself. There was another task that had dropped on the Canvas site to explore scorpion animation - this felt like a lesser priority at this point and something that I could come back to to fully complete the module.
Rendering
I first wanted to render the animation itself without the background. This would be faster and would also provide a less distracting version that focused on the raw animation itself. I duplicated the lighting setup and ground plane; turned off the 'skydome' visibility in the camera and applied an 'AIShadowMat' material to the ground plane so that it would receive the shadow but not render the ground plane. This would mean that I would be able to render a complete animation of just the subjects with a transparent background using a PNG image sequence. The image below shows a test render to check that everything was looking good before I set my computer off rendering. This render would also take a lot less time than rendering the full environment with depth of field.
Below shows the outcome of this render. This was created in Premiere Pro with a simple composition with a background colour to make this animation look like it was taking place in an infinite space. I love how simple but great this looks and how you can just focus on the end product. I realised that I should have composited my reference footage into this to present what I had used - I thought I'd do this for the complete module showreel and for the final presentation of this project including the environment render. I shared the video to a few friends and received really positive feedback so I was happy with my efforts!
Next I moved onto rendering the environment. This actually took longer than expected to prepare and even longer to render, however, it was important to check the quality of renders and optimise render times before setting off a large render job to prevent the need to re-render.
Below is the first render that I did - shown earlier in the project.
This next image showed the depth of field and current render quality. I wasn't very happy with this. The depth of field was very speckled and there was generally a lot of noise in the image. It was also taking a super long time to render, over 4 minutes which just wasn't practical. I had 190 frames and I wanted to reach a render time per frame of around 1-2 minutes, which would give me a manageable render time of 3 - 6 hours.
I did a little bit of research to see if there was anything I was missing or if I could optimise my depth of field and render settings any further. I came across the below video (Depth Of Field in Maya (Arnold Renderer), 2023) that had some super useful information in it.
As shown in the image below, I learnt that you can experiment with Imagers in the render settings. There wasn't a great deal of explanation in these, however, I understood them as denoise filters and they seemed like they could be useful to experiment. The author added all 3 imagers and discussed that merely having them is going to help post-process the noise in your renders which was the main issue I was having, particularly linked to depth of field but also throughout the whole render. He also discussed increasing the number of samples on the lights directly to improve the quality of lighting and shadows.
Below is the outcome of the same frame but with the imager filters. It was significantly better and smoothed the noise in the image to a point that made my blur smooth but my main elements crisper. The imagers were not adding much render time and vastly improving the quality of my final renders which was fantastic. As such I experimented with the number of samples I was working to and found that 5 camera samples was working best from a visual point of view and a render time point of view, averaging a render time of 2 minutes. I was super happy with the render time and the quality of renders.
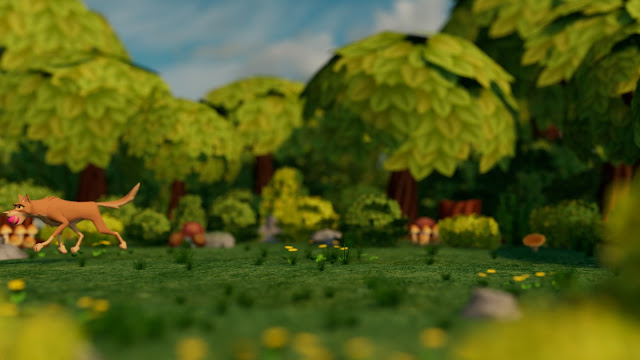
My next steps were to check the quality of renders at various points in the animation to make sure that all positions the dog was in looked good. I was animating the focus distance on the camera so I needed to make sure that there was no point where the dog blurred as I wanted the animation to be clear throughout. The below images shows a range of positions that the dog was in to test the lighting and render quality at various points in the animation. I also experimented with the amount of the area in focus as I largely wanted the background environment to be blurred, foreground and background, so that it focused on the dog.
I was really happy with the overall quality. The image had a real element of charm to it by looking stylised and cartoony. It almost felt like this was a realistic set made of paper or plastic elements. I actually removed a lot of the tufts of grass too as I felt these were just unnecessary noise and the last image shows what it looks like without these. I felt it looked a lot cleaner and simpler. Initially I was worried just a flat texture on the ground would look too flat for grass, however, with the depth of field blur It actually looks great and small yellow flower detail is more than enough to vary the ground. I was really excited to see what the final outcome would look like as a full video!
Final Render
The final outcome is shown above! I've included the rendered full scene with environment first with the no environment and with added reference composition second. I feel the presentation of this looks great! I love the full story driven performance first with the clean, no environment version second that helps you focus on the pure animation. The addition of the reference shows a little bit of my process that my blog breaks down to a strong degree of depth.
Conclusion
I am extremely happy with the overall quality of my animation! I feel I had a really strong process throughout this project that shows how I've studied theory, planned a shot, produced a shot and rendered to a high quality. Although a somewhat simple shot I feel I have shown some high quality and challenging skills. In particular the 360 turn to animate a creature moving through a scene was a lot more challenging than I thought it would be and I feel I made significant improvements to the quality over time. This adds a lot of depth to the animation as sometimes when you're working on a simple loop you're only focusing on 2 of the core axis so utilising all 3 dimensions for this animation I feel shows a lot of skill. I'm also really happy with animating a sequence that goes through multiple locomotive states. There is the gallop to hop to recoil and slow into the final return trot. It took a lot of time and effort to get this feeling seamless and I'm really happy with how I've managed to make the animation flow and transition from one state to another.
The story telling elements are working extremely well with this performance sequence. The dog is focused on the ball, catches it and then returns to where the ball was thrown from where it's human would be. I love how I've animated the tail throughout to feel flexible but also also as a tool to show emotion. About half way through you see the tail change into a happy swish as it trots back towards screen left where the human would be and I really love how this shows how happy with himself the dog is. Yoshi loves to parade objects and is always very pleased with himself so I'm pleased to be able to include this in the animation. The environment also works really well to further support storytelling. We walk Yoshi in the woods all the time and would use an opening in the trees as a good place to throw a ball around and I feel this is reflected in the final shot. The colours are working extremely well to make the dog stand out
This was a great project that I feel shows how much I've learnt about animation as a whole from animating quadruped to planning and creating a storytelling performance sequence to technical aspects of Maya and rendering to produce a professional final outcome. To reflect on achievement of the learning outcomes :
I have demonstrated systematic knowledge and understanding of specialist approaches, processes and techniques of 3D animal and creature animation through my study theory across multiple units in this module and highlighting relevant theory in this particular animation project. I have also further studied specific theory relevant to animating dogs to understand the nuances of how they should move. I have also filmed and studied primary reference to understand how a particular dog moves and used this to support my outcomes.
I have demonstrated a systematic knowledge and understanding of enquiry, methods, practices and theories in 3D animal and creature animation and its interrelationship with other relevant disciplines such as zoology and comparative anatomy through my in-depth study of theory to understand how skeletons should move to support the underlying structure of a creature. I have studied a broad array of research from photography, to secondary research to primary research and breakdown of theory to build a strong knowledge base of how quadrupeds should move and used this to support my animation outcomes.
I have analysed and problem solved in unpredictable and complex contexts applying advanced creative and specialist techniques in animal and creature animation through my utilisation of Maya to create animations, environment compositions, material set up, camera settings and animation, lighting, rendering, constraints video editing, pipeline challenges and more. I have presented this across my blog and evidenced my research used to support my learning and development throughout.
I have developed and critically evaluate their work with informed reference to theory and current practice in 3D animal and creature animation through constant reflection on my practical iterations across the journey of this project. I have shared my work with peers and implemented feedback to further raise the quality of my outcomes. I take a highly reflective approach to steer the development of my project over time and use project management to keep myself organised and evaluate progress over time.
I have effectively employed animal and creature animation techniques to communicate narratives or information and evoke emotive responses in audiences throughout the full development of this performance sequence. I wanted to create something real using primary reference. The goal was to show shot with a dog playing and catching a ball with their human but focusing on the dog themselves. I have planned this from the beginning through capturing a range of primary reference and reflecting on the outcomes. Multiple iterations helped me reach a reference shot that was most suitable for animation. I then set up an environment to further support storytelling to create a relevant environment for this animation to take place in. All of these elements helped build a simple but effective narrative leading to a high quality and well presented outcome.
I have shown a critical awareness of current practices, structures, audiences and registers of communication in 3D animal and creature animation and adopt a reflective, informed approach to creative development through my constant reflection and documentation of progress throughout this project. I've selected a range of research and theory used to support development to communicate the 3d animal animation. I've reflected on challenges faced throughout and shown a range of work in progress points to show how I have worked to raise quality over time. I've used some advanced rendering techniques to produce a high quality outcome that feels cinematics - particularly with the use of depth of field across the foreground and background to present a cinematic shot.
Overall I am incredibly happy with the quality of work and progress I have made as an animator. I am particularly happy with my depth of study of creature locomotion theory and application to my final outcome. I'm also really happy with my pipeline, by using primary reference I was able to construct a completely unique animation sequence to gather effective reference to drive the creation of a unique animation. This meant I was free of the constraints of searching for suitable reference online and meant I could capture my own reference set up in a way that was most useable for animation. Lastly, I am very happy with the overall quality of the animation and finished outcome. I feel I have struck a perfect balance between realistic and cartoony stylisation to create an engaging animation that has been beautifully rendered!
Learning Outcomes
Knowledge and Understanding :
Demonstrate a systematic knowledge and understanding of specialist approaches, processes, and techniques of 3D animal and creature animation.
Demonstrate a systematic knowledge and understanding of enquiry, methods, practices and theories in 3D animal and creature animation and its interrelationship with other relevant disciplines such as zoology and comparative anatomy.
Intellectual, Practical and Transferable Skills :
Analyse and problem solve in unpredictable and complex contexts applying advanced creative and specialist techniques in animal and creature animation.
Develop and critically evaluate their work with informed reference to theory and current practice in 3D animal and creature animation.
Effectively employ animal and creature animation techniques to communicate narratives or information and evoke emotive responses in audiences.
Show a critical awareness of current practices, structures, audiences and registers of communication in 3D animal and creature animation and adopt a reflective, informed approach to creative development.
Project Management Update
Lastly to reflect on where I am in terms of project management. The below image shows my full project task card completed and I just need to prep the reference PDF document for submission.
In terms of the wider project - I am a little behind, however, with my accident and hospital appointments this is to be expected. I've been communicating with the course leader to arrange an extension to ensure that I have ample time to complete the full module to the standard I am capable of. Below shows my current tasks that need to be completed for the full module. I am roughly 1 week behind with my assignment animation complete but the Scorpion unit 10 not yet started. I'm likely to get a bit further behind with the upcoming surgery I am scheduled to have and the recovery time after, however, I am hoping that I will be able to catch up ahead of the extended deadline. All in all, things are generally going well, however, I hate being behind but I need to ensure that I'm taking my health seriously too and not over stretch myself at this stressful time.
Reference List
A dog Sits in side view and catches a Red Rubber Ball (2022) YouTube video, added by CG Reference [Online]. https://www.youtube.com/watch?v=Vuy044fKQ2c [Accessed 14 April 2024].
Animal Anatomy for Animators (2023) YouTube video, added by Alexander Williams [Online]. https://www.youtube.com/watch?v=35YbvW-FSnE [Accessed 14 April 2024].
Animation Blocking + Finding Key Poses w/ Reference (2020) YouTube video, added by Sir Wade Neistadt [Online]. https://www.youtube.com/watch?v=0CQJkeLfono [Accessed 14 April 2024].
CadNav (no date) Wolf Dog Rig 3D Model, no date [CadNav]. Available at https://www.cadnav.com/3d-models/model-40669.html [Accessed 14 April 2024].
Depth Of Field in Maya (Arnold Renderer) (2023) YouTube video, added by Alan Balodi – 3D Tutorials [Online]. https://www.youtube.com/watch?v=gBtxuRlo8TM [Accessed 14 April 2024].
Dog Jumping to Catch Ball ~ Animation Reference (2021) YouTube video, added by Animation References [Online]. https://www.youtube.com/watch?v=KsrFJOS_Eb4 [Accessed 14 April 2024].
DuPont, J. (2019) Dog Quadruped Rig, October 31 [ArtStation]. Available at https://jurrey.artstation.com/projects/OylRwJ [Accessed 14 April 2024].
Efe_madrid (no date) Green testure Closeup, no date [FreePik]. Available at https://www.freepik.com/free-photo/green-texture-closeup_6066501.htm#query=seamless%20grass%20texture&position=47&from_view=keyword&track=ais&uuid=d364cae0-e4fd-4189-af6c-ff239b5bb2cd [Accessed 14 April 2024].
Guest, J. & Majboroda S. (2023) Sunflowers (Pure Sky), February 12th [Poly Haven]. Available at https://polyhaven.com/a/sunflowers_puresky [Accessed 14 April 2024].
HDRI Lighting in Arnold for Maya - 60 second Maya Tutorials (2021) YouTube video, added by Holly’s Maya Tutorial [Online]. https://www.youtube.com/watch?v=5af3oAWef9E [Accessed 14 April 2024].
how to export transparent backgrounds in procreate Dreams (2023) YouTube video, added by Celso Teixeira [Online]. https://www.youtube.com/watch?v=nx1J1-tsz2Q [Accessed 14 April 2024].
How to Make Characters Grab Objects - Parenting Constraints (2018) YouTube video, added by Sir Wade Neistadt [Online]. https://www.youtube.com/watch?v=U8JXO39aAqY [Accessed 14 April 2024].
Intro To Quadruped Animation Masterclass (2022) YouTube video, added by Agora.Community [Online]. https://www.youtube.com/watch?v=KJY6u-vQk8Q [Accessed 14 April 2024].
It's time to walk the dog - How to Animate a Quadruped (2022) YouTube video, added by AnimSchool [Online]. https://www.youtube.com/watch?v=e5mn7WxjMZg [Accessed 14 April 2024].
IWSMT (no date) ANIMAL GAITS, no date [IWSMT]. Available at https://www.iwastesomuchtime.com/VariedDustBargain [Accessed 14 April 2024].
Juju Princess (2021) low poly forest pack, low poly environment pack, November 3rd [SketchFab]. Available at https://sketchfab.com/3d-models/low-poly-forest-pack-low-poly-environment-pack-47b2cb567d1b437fb86d2897353079ab [Accessed 14 April 2024].
Maya - Setting up Hotkeys and Mouse Macros (2020) YouTube video, added by Leon Cabrera [Online]. https://www.youtube.com/watch?v=53CE41FFjF0 [Accessed 14 April 2024].
McFarlane, J. (2013) Part Six: Movement, Drentsche Patrijshond Club of North America. Available at: https://www.dpcna.org/uploads/1/6/2/4/16248196/l1part6_movement_1.pdf (Accessed: 14 April 2024).
Muybridge, E. (1885) Dog; trotting; mastiff, Dread, [Online] https://www.royalacademy.org.uk/art-artists/work-of-art/dog-trotting-mastiff-dread [Accessed 14 April 2024].
Muybridge, E. (1885) Dog; Walking; Mastiff, [Online] https://sillydragon.com/muybridge/Plate_0704.html [Accessed 14 April 2024].
Muybridge, E. (1887) "Dread" galloping [Online] https://www.rijksmuseum.nl/nl/collectie/RP-F-F00635 [Accessed 14 April 2024].
quadruped locomotion (2023) YouTube video, added by MSC Art [Online]. https://www.youtube.com/watch?v=tLrRlXxM5Yw [Accessed 14 April 2024].
TheDragonofDoom (2013) Dog Skeleton Anatomy, December 26 [Deviant Art]. Available at https://www.deviantart.com/thedragonofdoom/art/Dog-Skeleton-Anatomy-422441481 [Accessed 14 April 2024].
Understanding Opacity vs Transmission in Maya 2023 (2022) YouTube video, added by Academic Phoenix P [Online]. https://www.youtube.com/watch?v=j9jjmyk-ins [Accessed 14 April 2024].
Why Do Dogs Wink? What Does It Mean Exactly? (2021) YouTube video, added by Little Paws Training [Online]. https://www.youtube.com/watch?v=Zl-irM9OpoA [Accessed 14 April 2024].
Williams, R. (2009) The animator’s survival kit. London: Faber and Faber.