Graduate Portfolio - Character 3D Modelling - Head
Character 3D Modelling - Head
28/05/25 - 14/06/25
Introduction
It is time to start modelling! Concept development has been good and provided a real solid base to bring this character to life. I have an array of good modelling skills with strengths in technical knowledge and understanding of the pipeline and core workflows. Despite this, my practical experience of modelling is less explored compared to more developed experience with animating. Despite this I'm really motived to create a high quality and polish character that looks professional. I've invested a lot of time in the creative back story to this character so creating a bespoke character will be a real highlight of this project - if I can pull it off!
Developing a strong concept is extremely rewarding, however, also adds pressure on the modelling pipeline to keep up these same high standards. It is necessary to have a strong concept to create a strong 3D model of a character. Similarly, creating a visually impressive and technically sound 3d asset that can be integrated into a game engine and deform well. So the pressure is absolutely on, however, I'm really keen to approach this challenge.
The technical approach I plan to take is :
Research technical pipelines to confirm my planned approach is correct.
Gather anatomical reference to inform skeletal and muscle structures to make sure my stylised concept is grounded in reality. (Even if this is stylised further after core structures are established)
Dive straight into sculpting, starting with the head. This is taking a very artistic approach. I will be using Blender because I'm most confident with this software and don't want to introduce new software to learn with the likes of ZBrush.
Once the high poly is sculpted, move onto retopologising to create a lower poly, game ready mesh. I will need to research approaches and either use a Blender based method or utilise the Quad Draw tool in Maya.
UV unwrap the retopologised mesh, most likely in Maya since I am very comfortable with the tools here.
Bake the meshes together and problem solve related baking issues and artefacts.
Texture the asset using Substance Painter. It will be important to take colours from my concept, however, I'm keen to ensure the skin feels alive so I will use reference images to create a skin material that shows the blood or redness under the green skin. This simulates subsurface scattering that is harder to achieve in real time compared to rendering single frames in a renderer like Arnold.
The next stages in the pipeline would be to rig, however, I'd be keen to integrate the character into Unreal engine at this point so that materials are setup and organised. This can be later replaced with the rigged and skinned asset.
A really strong starting base here. My biggest challenge is going to be time and exploring less explored skills, however, the pay off will be immense to make this fully unique character. Time will be challenging due to my commitments with the exam board I work for happening across June, a busy end to my teaching role at the end of the academic year and working on my masters! However, despite these time commitments I will also have some time off work over Summer which will mean I can sink some more time in, which should balance things out! I always manage to make it work, so let's dive right in!
Project Management
Below shows my Trello board to keep everything organised. Its fairly basic at this point in time, I've created simple cards for all the core phases and added checklists inside them for the sub tasks. I've also added freelance work that I'm balancing alongside my studies so that I can track everything that I'm doing outside of my day job. Similarly, I'm going to take an Agile approach to managing this project and adapt time and schedules where needed so that I can deliver on this module. Creating the character is a little bit of an unknown so this may take longer than expected. This will help me stay on track and manage my stresses of working on this project!
The image below shows the checklist that breaks down the modelling card. This is a simplified version of the pipeline I described in my introduction. It also shows the order I will produce the character's body parts/clothing in.
The image below shows my production schedule - the core goal is to finish making the character by the end of June. This may be ambitious but it gives me something to aim for.
I will regularly refer to, review, reflect on and update these materials across this module in order to help me meet the deadlines I set myself. This will be key for this larger scale project so that it stays on track. As I mentioned previously, this will be challenging but the pay off will be significant. Demonstrating these modelling skills, along side technical animation and animation will make some impressive additions to my portfolio.
Technical Research
I had a good idea of the pipeline I wanted to follow but I wanted to explore a few professional videos from trusted sources to recap my memory. This would confirm the viability that the technical pipeline I had planned whilst also taking a deeper look into techniques and approaches I could take.
The video below is by FlippedNormals (2022) who are a content creator and online course provider that I trust and respect. Their content primarily focusses on 3D art development for the games, animation and VFX industries and is produced by professionals with years of experience and multiple projects under their belt. I looked directly for a character video and found a summary video that looked at the full pipeline. This suits my experience level well, as I don’t need a basic step-by-step tutorial, an advanced approach is more beneficial to me.
My learnings from the video above (FlippedNormals, 2022) are:
Start with a really simple base mesh start establishes the direction the character is facing.
No detailed mesh is needed because you can hop straight into sculpting to create forms and detail.
Establishing the direction the character is facing keeps everything oriented professionally and makes sure that mirroring systems are easy to access. This removes the need to rotate and fix transforms later. Essentially starting off on the right foot!
Create a rough sculpt that establishes the anatomy that helps ground the character in reality.
Once the previous step is complete, you can build smaller details to characterise the design and ensure the appeal is strong.
Add adittional details such as horns or elements that go beyond the regular anatomy. This helps complete the character.
Retopology is the next step!
This will help create a game ready mesh.
Retopoflow was mentioned as a good addon to improve processes, but can be done manually.
The manual method shown helps establish the core flow of the topology so it follows the shape of the mesh while aligning with other areas for easier connections. Once that is in place, you can connect everything and add extra loops to increase the resolution, allowing the model to deform properly and maintain the silhouette.
If you go too complicated and detailed too fast then you will be making it more challenging for yourself.
Fix nGons last and use 'pole patterns/redirects' to help turn nGons back into quads.
UV Mapping is next, taking a seam based approach. This means cutting the seams and then unfolding. This is similar to how clothes are created out of multiple pieces of fabric and joined together by seams.
They comment that Blender is not strong at UV mapping, which reflects my experience and confirms that using the tools I'm comfortable with in Maya will be the best option.
They also explore using UDIMS to create multiple high resolution texture sets. I will explore these to separate out my model, however, because it is designed to be a game character I don't want to have too many texture sets. Multiple texture sets will increase draw calls which can hinder performance.
Smaller details like pores can be done in the sculpt at this point or in the texturing method. I'm likely to use the texture based approach so that the model doesn't become too high poly and demanding.
Texturing is next and layering is used to slowly build up the layers of colour and texture to create complex skin textures. For example, skin variation, sub surface scattering, blood underneath the skin etc.
Procedural textures allow us to get more variation to help it feel more real quickly through easy variation and randomness that procedural textures allow.
Use simple roughness to adjust how the light reflects from the model. This is painted simply and needs you to look at how the mesh deforms and responds to light so you can adjust the shininess accordingly.
Test textures in your end point renderer because they may respond differently so you may need to tweak elements of the texture maps. For me I will need to establish the pipeline to Unreal so that I can see how this model will look in it's end destination.
The video then looks deeper into refining, rendering and presenting the outcome, which is less relevant to my project.
Overall, this has been a valuable study and confirms that my technical pipeline is well-structured and aligned with industry-standard workflows. I will need to look a little deeper into the 'Retopflow' Blender addon as this could support my retopology process.
Next I found the below video playlist by SpeedChar (2022a) that shows the process of creating a character in Blender from scratch. They are a professional character artist and this series studies the in depth creation of a character asset that will be used in a video game. As such, this is an incredibly good source that I will be able to listen to whilst sculpting to see understand professional processes and techniques.
The key findings from this video (SpeedChar, 2022a) are:
Following a concept artistically, rather than using reference plane modelling. Reference plane modelling is good but your own artistic eye is good too.
Use a remesh pipeline opposed to Dynotopo tools. This pipeline follows the process of slowly moving up subdivisions levels but keeping it as low as possible for as long as possible.
Start with the head! A lot of the character and personality will be here so it is incredibly important to get right. It also enables you to visualise the character when you create the rest of the character. E.g. the body!
Using the grab tool to block out and manipulate the model to get the core forms blocked in.
Use masking to help pull out ears.
I really like how they take a care-free approach to get core forms, rather than adding too much detail to fast.
Constantly rotate and review the model from multiple angles to review the forms. You're essentially 'finding the forms' through experimentation and refining over time.
Create the mouth open so that this can be rigged and animated.
Knowledge of anatomy and facial structures are key - anatomical reference is really important here! This is essentially beyond the core concept to ensure its grounded in reality.
Grab also enables you to manipulate later if you need to alter forms.
Staying close to the concept is great, however, you may need to adapt or change when sculpting so that it works well in 3D. This means the concept is a guide. Depending on the project, more or less flexibility may be allowed.
Using separate meshes to add teeth and hair.
Speed is key to get the core concepts quickly and refine later. The more you work on the asset the better it will become as you reflect and refine your outcome.
Alt + Q enables you to switch between meshes when sculpting!
He also reinforces that practise makes perfect and the more you practise the more confident and proficient you will become - a great mantra to live by!
This video (SpeedChar, 2022a) is particularly good because it takes a very artistic approach. I already understand how the tools work so this helps me understand how to apply technical concepts creatively. It challenges me to consider how something should be done and why this is important opposed to following a tutorial driven pipeline. I can then use these concepts as guidelines to inform my approach to creating my character.
Lastly I did a little research into the retopology addon in Blender called 'RetopoFlow' (Orange Turbine, 2025) to gain some initial understanding of what this is and how it could work. I found this video demonstration below by FlippedNormals (2020) that shows the process. I will analyse this when I reach this pipeline, however, the video shows a range of flexible retopology tools that make it easier to curve polygons around a model. This will be useful in speeding up the retopology process and making it generally easier.
3D Development
30/05/25
A strong support base has been established from the creative and technical research. This section will show a series of progress images and reflections to show an insight into my decision making process throughout. The first two images below shows the development of initial forms to block in the core structures before adding detail. I'm building out the larger muzzle, starting to sink the eyes in and generally forming the head shape. Keeping it low poly is making this process of establishing the silhouette significantly easier. Previously when I've sculpted I've always gone really high res as quick as possible and this has made things challenging. I've also been adopting the more care-free attitude that SpeedChar (2022a) discusses and this is also helping my productivity so that I'm not obsessing too much over tiny details at this stage.
Next I'm further building in the major forms. Simple ears, defined brows, cheeks and detail to the nose are blocked in. The character I designed in my concept is really starting to come to life despite the lack of detail. Its refreshing to just focus on the core shapes and worry about the detail later. As I'm sculpting its feeling easily moldable to define the shapes that I want and tweak them, enabling the process to be very fluid. It's worth noting that I'm using a graphics tablet whilst sculpting to take advantage of pressure settings and take a more artistic fluid approach. This makes the process feel closer to drawing in 3D, which feels very artistic.
I'm slowly increasing the subdivision levels whilst sculpting, making sure not to add too much detail too quickly. I'm adding just enough to add the type of detail and developments that I'm focussing on. In this next image I'm adding details like the ear forms, mouth, eyes, eyelids and nostrils. At this point it's starting to look a little weird! I've moved from the more abstract, larger shapes to more recognisable detail. However, the recognisable detail isn't looking quite right which makes the whole anatomy of the sculpt feel off. I've also got some lumpiness to some of the forms that need smoothing out. To fix both these issues I could step the resolution of the mesh down slightly, smooth the forms, redefine the core shapes and then slowly go back up again.
The next image below shows the results of stepping down some subdivision levels, correcting forms and moving back up. Core shapes of the ears are looking much better with thicker rims - these now need the inner details adding. The nostrils are sitting in a better location - I've positioned them where the holes in the skull would sit. I've also opened the mouth slightly - I think this is the right thing to do, however, I may need to do some research. I want to animate the mouth therefore I need a mouth cavity and I need to be able to bake the lips without a cut off. This may require some further research to understand whether this is the correct method.
The character's silhouette is looking great from the side, closely resembling the concept, however, from the front it is looking a little off. the curved ears aren't matching the concept and this feels like a little too much detail in the silhouette - I plan to straighten these out to match the concept more closely. The overall structure of the skull, such as the cheeks and muzzle, is looking a little un natural too and this needs simplifying so that it smoothly flows forward with some definition. The lower jaw is starting to take shape but overall is a little thin and needs smoothing out to reflect the stylised forms in the concept. It is absolutely making good progress, however, I need to keep refining and tweaking to help it stay true to the concept whilst maintaining anatomical correctness.
Another element that is looking a little odd is the amount of definition and folds in the skin paired with the lack of teeth is making them look quite old rather than younger as they are in the concept. Similarly the hair is absent, which is a key element to the silhouette. I'm spending a lot of time trying to get the anatomy correct, however, it might be time to simply block in these elements so that the design as a whole can be reviewed. This is the process that SpeedChar (2022a) takes by quickly iterating through all the core elements so that they exist and then refining later. This helps save time because you're not obsessing over small parts and helps you see the bigger picture. Therefore, next I'm going to start blocking in these missing elements.
The biggest missing part of the silhouette was definitely the hair! I've added a separate object and blocked in the core shapes so that it flows towards the back. Instantly this is bringing the concept closer to the concept again, which helps pull the design together. At this point, the hair is fine, however, it feels a little lumpy and not like the big chunky strands that I designed in the concept. It is likely to be better to redesign this later with a little bit of research into other approaches for hair to achieve the chunky-strand look I was going for. Despite this it still helps the character look a lot closer to the my artistic vision, which enables me to prioritise the next areas for development.
Critical Reflection
Taking a step back to look at the overall progress is critical. The technical pipeline I'm following is very strong and I'm finding the approach of keeping things as low resolution as possible for as long as possible is really helping my artistic workflow. I'm using a real minimal number of brushes and tools which also helps my artistic workflow, I find that trying to use too many tools complicates matters and you can often achieve the same or better results with fewer tools. Taking this care-free and simplistic approach is enabling me to be a lot more flexible in applying my artistic vision, which in turn is yielding stronger visual results much easier than I have ever experienced before.
The overall look of the character is good and resembles the concept which is good. I've shared this progress with my peers and some commented that the sculpt looks closer to a realistic art style than the stylised one from the concept. This is definitely true and I want to reduce some detail in places so that it does appear more stylised. However, I am also keen to keep anatomy at the core of this character so that it feels grounded in reality. Furthermore, my 3D skills will have some limitations due to my lack of experience compared to my animation skills. Therefore, I am okay if the sculpt does not look identical to concept because my concept is still steering the sculpting process. The mesh is definitely a little bumpy though so I need to smooth out these elements which will make it appear a lot more stylised, which should help this issue.
Next I need to add other missing elements like the teeth, however, I need to really research whether the mouth open approach is the right approach to take. Particularly when I'm planning to animate the face and achieve a good technical bake! Therefore, I will next research this to see if I can gain any further insight to recommended approaches!
Further Technical Research - Sculpting The Mouth with Animation in Mind!
As previously referenced, I was at a point where I wasn't completely confident the right approach to sculpting the mouth, bearing animation in mind. I found this video by SpeedChar (2023), a source I already trusted, which was very insightful. The key parts were that you should open the mouth slightly so that you can get a good bake around the lips, however, the mouth cavity doesn't need to be too big because you can create this in the low poly. Due to my character's larger muzzle I'm going to keep the mouth cavity larger to match the larger mouth. This is reassuring and means that the approach I've currently taken is the right one!
Further Modelling Development
Diving right back into modelling I wanted to try and soften some of the lumpiness and over exaggerated anatomy my peers pointed out, which was making look a bit too real. I took the same approach of reducing the resolution of the full mesh before going back up again because it was getting difficult to remove the bumpiness. This technique was really empowering and enabled me to reach the outcomes I wanted a lot quicker. I was primarily focussed on how the cheek bones and muzzle crease was looking. I wanted to streamline the forms so that they flowed forward a little more smoothly. This was working well, however, the process did lose some detail in the ear. This was okay because I needed to study the ear forms a little closer anyways so that they were grounded in anatomical correctness.
The image below shows the smoother and more rounded muzzle from the front view. The front view in general is looking a lot better than when I commented on it previously. It is definitely heading in a more stylised direction now whilst still maintaining the anatomical structure, which is good. This helps me achieve my sculpting goals whilst still keeping the design as close to the concept as possible!
Next I've spent a little bit of time polishing the jaw to create a little bit of a chin and also work on refining the jaw line a little further. These are minor tweaks, however, is slowly pushing the model towards a more completed status. I've added in a slight hint of an Adam's apple and neck tendons to refine the neck a little more. At this point I'm falling into the trap of making too many minor refinements to this area without adding one of the major elements - the teeth! I need to stop sculpting and tweaking the jaw and muzzle and get some teeth blocked in to help review the overall design and how this makes this area look.
03/06/25
Before starting to model the teeth I needed to gather some reference to use whilst sculpting. At this point I wanted to pool a lot of my references together in one place rather than looking at images in isolation. Using PureRef I gathered my concept, AI visualisations of the concept in 3D, some male head angles and teeth images from multiple angles. Exaggerated humanoid teeth would work well for this concept, I could just take the core shapes and exaggerate these as I sculpted them. They would serve as a rough guide rather than an exact blueprint for my sculpt because my character is stylised.
The 3D AI visualisations are also useful to understand how forms could look. I'm loosely using these, however, the generation process of these introduces a lot of errors and anomalies. Therefore, they definitely serve as a guiding idea rather than a reference sheet. All these references together and open on another monitor will make it significantly easier to study and implement as I'm sculpting on my main monitor.
I stared to question whether my head was definitely the correct shape and whether it maintain general laws of anatomy despite being alien. I was studying the forms of the head in my reference image to check for things like where the jaw ends and whether my jaw ended in the right place. I felt it was good but wasn't sure if it was spot on. As such I thought I'd do a little research into head sculpting.
My research lead me to the below video by SpeedChar (2022b). The video itself focussed on common mistakes artists make when sculpting the head. I thought this would be useful because it was highly likely I'd already made some of these mistakes and I could rectify them by reflecting on my own model.
The key findings from the video (SpeedChar, 2022b) were:
The head should have an egg-like shape when viewed from above
The skull is not a perfect sphere and should reflect natural asymmetry
Avoid sculpting the nose too narrowly; it should have realistic width and structure
Neck muscles should be sculpted with balance, neither overly defined nor completely absent
The ears should be slightly recessed into the face rather than protruding unnaturally
The lips typically form an ‘M’ shape, which should be subtly reflected in the sculpt
Eyeballs should be proportionate and not oversized relative to the face
Eyelids should have realistic thickness, avoiding a too-thin appearance
When I reflected on my model I learnt that :
My head was a bit too spherical when viewed from above and I could also tweak the asymmetry slightly.
My nose is the most alien part and was very chunky so I was happy that this matched the advice.
I hadn't done much work on the neck so I needed to refine the key anatomical elements like the Adam's apple and the tendons.
My ears did need to be sunk into the head a little as they were coming out of the edge of the silhouette rather than being sunk in.
My lips weren't too defined but did look stylised. They had the 'M' shape, however, my mouth structure due to the larger muzzle is much more alien therefore the advice on the lips doesn't apply. I'm also largely happy with the progress I made with these previously.
My eyeballs are extremely large, however, because my character is more stylised this suits the character a lot more. This is really common is cartoons where the eyes are typically exaggerated so I'm confident that the larger eyes will work with my design!
There was a decent amount of thickness to the eyelids on my sculpt so I was happy with this.
Therefore, the core things that I wanted to develop was tweaking the skull's shape to be more egg shaped and asymmetrical. Whilst doing these skull tweaks I needed to sink the base of the ear into the skull a little. This should be relatively easy to achieve through using a large grab brush to reproportion elements. The image below show the outcome of these tweaks. This looks significantly more natural now, particularly the ears. Although these tweaks were minor it has a great impact on grounding this character in reality which helps the overall design.
Now that I'd reformed the head slightly I did some detailing on the ear to add some definition. I also worked on the cheeks a little to drop them down slightly and soften the flow. Both additions helped and it was really starting to feel like the character was taking shape. It has been a lot of iterations up to this point, and there will no doubt be more, but now I felt like I could move on. I'd wanted to move onto the teeth for a while but the head shape felt a little off and I was starting to obsess over refining this and finding the problem. Thankfully I felt all these little tweaks had made a big impact over time and when I scroll up through this blog its clear that the quality has significantly increased as a result of my efforts.
Finally we start the teeth! This should complete the core elements of the head and stop the character looking old and gummy. I wanted to create these fairly quickly because they will be mostly unseen. I used my reference and began sculpting the teeth, starting with the upper teeth, as shown in the images below.
These need a tiny bit more smoothing and defining, however, when they are set into the character's head they start to complete the look of this character. They're currently not smooth shaded and I think this will improve their overall look. I'm not too worried about the gums because its unlikely they will be seen too much!
I duplicated and flipped the upper teeth to create the lower ones along with some minor tweaking. I used the grab brush to manipulate the circumference so that it fell alongside the lips. This was now looking really good - it helps complete the face and make it feel like a real character. This actually now makes the placeholder hair stand out as unpolished and will be the next area to target. Overall progress is good and the images below show the head from multiple angles.
11/06/25
Next on the improvement hit list was the hair. All I'd currently done with the hair was roughly sculpt a polygon into the loose shape. I knew there would be a million great tricks for creating hair in Blender, some of which likely wouldn't use sculpting to create smoother, chunky hair which is exactly what I need for this concept. I came across the video below (ItsPaulTodd, 2024) that was really useful but I couldn't shake the fact that I recognised the voice! When I looked at the username I realised it was my friend Paul Todd who currently works for Two Point. This was a lovely moment because Paul is a self taught 3D artist that I used to help as he was learning 3D and now he was helping me!
The video (ItsPaulTodd, 2024) showed how you can create a path curve, add a circle curve and then use the circle curve as a bevel using an object on the path curve. This essentially fills out the path as a 3D shape that takes the shape of the circle. You can then extrude the path points to extend is and use alt +s to scale the path points to make it wider or narrower. Furthermore, you can modify the circle curve to add detail and change the shape of your hair strands.
The image below shows my experimentation with this. As you can see I've changed the circles into rounded diamonds and added additional detail to make it bumpy. I've then shaped the mohawk with multiple strands that flow backwards and created 3 variations so that each strand of hair looks unique. Overall this is looking pretty good and is working a lot better than my previous sculpted solution. However, the detail I added to the circles is looking a little harsh and I'm not entirely happy with this.
14/06/25
To address the reflections from my first experimentation with ItsPaulTodd's (2024) hair technique I modified the target circle curves to create less indents and instead a more janky silhouette with tight tangents on each of the points. You can see the curves in the image below.
The two images below show close ups of this hair, which I'm significantly happier with. The detail looks more stylised and less harsh. My initial thoughts were that if I had little indents it would look like strand detail, however, this approach of a angled silhouette has yielded much better results. This looks a lot more stylised than all previous attempts and matches the concept I developed. I thought about sculpting on top of this but I feel this would be unnecessary and add too much realism or lumpiness to the model. Therefore, this is where I will leave the hair for now!
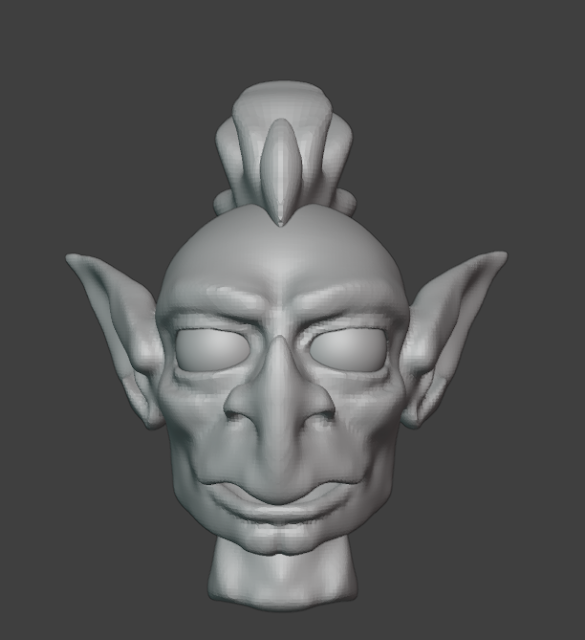
Final Head and Conclusion
Overall I've reached a good point with the head that feels good to stop. I've learned a lot throughout the process, particularly from SpeedChar (2022a) which has empowered me to take an artistic care free approach to sculpting. It has definitely taken a lot longer than I wanted to create this part of the character, however, I feel the results are looking professional with the design being rooted in the concept art. I will likely polish this or add smaller details a little later, however, getting the body started is more important so that the character takes more of a completed form. It's been really fun to get my teeth into sculpting and whilst this is taking a significant amount of time it will be rewarding to create a fully bespoke character for this module!
Reference List
ItsPaulTodd (2024) How to create FAST Stylized Hair/Fur in Blender 4.0. 12 January. Available at: https://youtu.be/ethg2nYSjqg (Accessed: 19 June 2025).
FlippedNormals (2022) How to Create a Full Character in 3D – Workflow Explained. 27 October. Available at: https://www.youtube.com/watch?v=BUVMW-vdp4A (Accessed: 17 June 2025).
SpeedChar (2022b) 10 Most common head sculpting mistakes that even experienced artists make. 11 October. Available at: https://youtu.be/L5i6SM07DHk (Accessed: 19 June 2025).
SpeedChar (2023) Open the 3D character mouth in 3D. 27 September. Available at: https://youtu.be/HZbfjHJeiMk (Accessed: 18 June 2025).