Scorpion Locomotion - [Animal and Creature Animation - Unit 10]

Scorpion Locomotion

15/04/24

Introduction

The next task in the series was to animate a scorpion! I felt like this was going to be similar to the spider as their anatomy was similar in terms of leg structure with the lack of dexterous feet, however, we have claws and a tail which will vary the locomotion. This will be really interesting to explore as the scorpions are almost alien-like in terms of anatomy therefore exploring this animation could form the basis for more elaborate alien-like motion. I knew the rig for this animation was a robot scorpion so it would be good to search for a more post-apocalyptic style environment to support the story telling of this animation further, something akin to Terminator, to present it for my module showreel.

Project Management

I updated my Trello board to organise my current workload. I created a task card for the Scorpion but also added some additional tasks that I wanted to do now that we were heading towards the end of the module that I wanted to action before submission. I'd just finished preparing my storytelling animation and I really like how I composited in the live action footage so I wanted to update my showreel and do this to the 'Horse Rearing' animation that used live action reference heavily too. I also knew that I hadn't updated the descriptions of my public YouTube videos to reference all the resources I'd used in a little bit. So I needed to remember to go back and update these so that the authors of the resources present in my animations were properly credited. Finally I had been tweaking the module page of the blog that had been linking to all the individual blog elements and was placing a lot of placeholder text here that I wanted to update closer to submission so I created a task in the backlog to remind myself to think about the presentation of this page and ensure that it directs the audience to all the work I have created in a clear and logical manner.


The below image shows the task card for this week's task - the scorpion locomotion! It is a fairly standard pipeline of preproduction to production to post production with the blog and showreel to be updated afterwards too. I find this helps me easily visualise how far through the mini-project that I am so that I constantly feel like I am making progress. This will not be quite as in depth as my dog animation as it is more of an exploratory unit where I am looking to understand the core concepts of scorpion locomotion, however, none-the-less I want to explore it to a good degree of depth so that it is worthwhile and leads to a high quality outcome.


Time was a little bit tricky at this point as I was scheduled for surgery on the Thursday of this week to fix my shoulder and I was worried about how I'd feel or what I'd be able to do after the surgery. My goal was to complete this task before I went in for surgery to leave just 2 practical tasks (FX animation and jellyfish locomotion) to complete the module. I had finished the storytelling performance sequence which I felt was the main goal of this module so although life was challenging I felt I was still in a good place to complete this module.

Rig Acquisition and Testing

I grabbed the Scorpion rig that was provided by the University and created by Figgins (no date), as shown below, and began experimenting with it. 


The rig itself was pretty nice as there were a good amount of controls to animate all the key parts easily without it being over complicated. There were a few slight oddities with the rig. The first being that the legs were fixed to the body in a slightly awkward place which meant they tended to clip with the main body quite frequently. This tends to annoy me, however, I noticed Alex Williams from the lectures ignoring this somewhat in favour for more realistic animation so I thought it was something I could ignore a little too. The next thing I didn't like quite as much was that the tail wasn't properly connected visually and there were gaps between the tail segments - like Rayman! Again, this is pretty minor and is probably something that annoys me more than it would other people.  


The last issue I was facing was almost a deal breaker for me as I was worried I wouldn't be able to render the animation or that it would render poorly. The issue is shown in the image below, all the right limbs are showing as black. I managed to fix some of this issue by selecting the geometry, unlocking the normals and then flipping the normals, however, there were a few pieces of geometery that then went see through. This was very frustrating. I also managed to find one file that worked and displayed correctly (Shown above), however, sometimes when I openeded it or referenced it into a scene I would get the same issue shown below happening.


I was a little frustrated by this and wondered if I could find a non-mechanical scorpion rig online that might work better out of the box. There wasn't an awful lot of free or paid rigs available that looked viable, however, I did come across this scorpion-like alien rig by Kirk and Munoz (no date) that might be useable. The rig was pretty good but it was a lot more complex. It also had a lot of dynamic driven elements such as the tail and the antennae that were set up to work dynamically in the scene with additional manual control. This issue was that the dynamics weren't working in my version of Maya and the manual controls were not working well and sometimes not at all. This factor alone essentially ruled out this option.


I returned to the original scorpion by Figgins (no date) and I did actually manage to fix this issue finally! I did this by going to the viewport lighting menu and setting the lighting to 'Two Sided Lighting'. This instantly fixed the issue in all cases which was awesome. This meant I felt confident I could stop wasting time searching for viable rigs online and move forward with this rig to create the walk animation.

Research

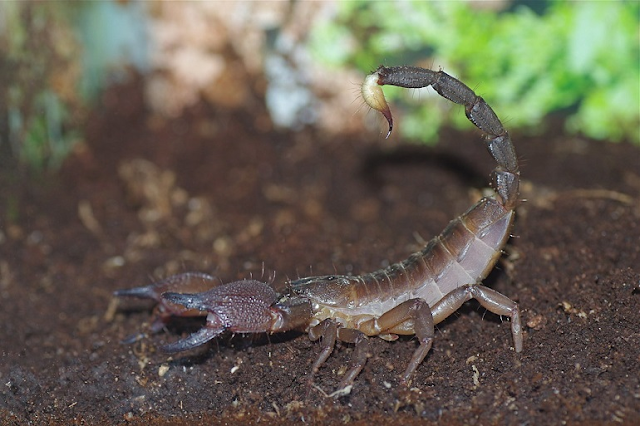
The build a solid base of theory and understanding for scorpion locomotion I wanted to explore a range of theory and reference videos. I started with the video lectures, How to animate a scorpion in motion (2012), by Alex Williams, which was super good at confirming that the scorpion is almost identical to the spider locomotion in terms of how the legs move to support the body's weight. This means that the front two legs on each side are offset from one another, the next row back are the same but offset from the one in front and so on and so forth until you reach the back legs. The cycle will be a 16 frame cycle. The final aspects will be offsetting the body motion from the legs and then offsetting the tail and arm motion from the body to create overlapping action. This was a really solid starting point that I would be able to use as scaffolding to construct my animation.


Next I wanted to gain a greater understanding of anatomy so I could understand how a scorpion should move from a more biological perspective. The video below was really useful to understand all the core elements and include a range of useful reference clips. I learnt that scorpions belong to the Arachnida class that spiders also belong to, so it makes sense that their locomotive animation theory is largely similar as it was with mammal based quadrupeds. There is a whole host of sizes for scorpion from very small to the largest emperor scorpion - this would mean that smaller scorpions are likely to move faster and larger ones slower. As the rig I have is a robot it is likely to be closer to the emperor scorpion in terms of timing. 

The video below, Scorpion Anatomy: Fascinating Insights 🦂⭐️⭐️⭐️ (2024), also breaks down all the different key parts such as the front carapace where the head is and the legs are attached alongside the rear thorax or abdomen where the tail attaches. This is important as this will affect the way I use overlapping action, likely wit the carapace overlapping the thorax/abdomen and then the appendages attached to them also overlapping. 

The next video I found, Scorpions Are Predators With a Sensitive Side | Deep Look (2021) shown below, useful from a purely visual point of view. It had a ton of different shots of real scorpions moving which the above video was lacking. I was able to study a lot of different translations in movement from standard forward walking to sideways motion as well. A lot of the best shots were from above, which was a little tricky to see all the motion clearly so I hoped to keep searching to find even stronger reference.


Next I tweaked my search terms slightly to look for emperor scorpion locomotion. I did this because as I learnt these were the largest and likely closer to the size of the rig I was working with I thought I might be able to find some better reference there. I came across the below video, Giant Black Scorpion - Wildlife Thailand (2013), that seemed really useful. I really liked the camera angles and the range of motion that was seen. When more passive the scorpion keeps its tail down and straight out whereas when challenged or threatened it adopts a more aggressive and strong stance through its leg positioning and tail raised. You can also see the abdomen raise up at the rear almost create a 'C' like shape with its body and tail. It was good to see the scorpion walking and moving in both these states.


The above video, Giant Black Scorpion - Wildlife Thailand (2013), linked me to the below video, World's Deadliest Scorpion | National Geographic (2013), which I also found useful. Whilst I didn't particularly learn anything new there were a greater range of camera angles and movement speeds that I found really interesting to further review and re-watch to support the animation development.


This next video below, Seeing a real Scorpion walking (2018), showed a particularly nice side on angled of a scorpion walk. You can also see the relatively relaxed tail position as it is flattened out and stinger recoiled. The leg motion is really clear in this video compared to some of the others, therefore I found it useful to review.


Similar to the previous video above, Seeing a real Scorpion walking (2018), this video below, A scorpion walks (2021), demonstrates some good emperor scorpion locomotion. I particularly liked this video as it shows the scorpion traversing a rocky terrain and you can see how the legs interact with the ground and how this affects the body rotation and centre of gravity.


I felt like I had enough reference at this point, however, I came across this last video below, Amazing!! Asian Bullfrog With Big Black Scorpion! Warning Live Feeding (2021), that I had to include. Whilst the situation is a little unnatural it shows how a scorpion moves when threatened by a predator. I really like the more aggressive poses the scorpions adopted with their bodies and claws in addition to studying how they moved when in this situation. I thought this would be useful as I found the pose a lot more interesting than the passive, tail down  pose I'd seen in other videos. This mechanical scorpion I was working with was likely to be an aggressor therefore I wanted to adopt a more aggressive pose in my scorpion animation.


Now that I’d explored a range of video reference I wanted to gather a few images of static poses for the scorpion. I primarily wanted to do this so that I could create a strong initial pose that I could then build the animation from. As discussed earlier, I wanted a slightly more aggressive and aggravated pose during this walk because the rig itself was a little more aggressive looking so I thought this would fit the animation well. This first image I found (Manner, 2023) seen below, captured the pose that I wanted. One thing that I really noticed was the fully curved nature of the body - we have an almost ‘C’ shape as the rear of the body curls up into the tail with the stinger poised for action. The claws are also poised and ready for attack - slightly retracted so that they can strike forward.


The next image (Facty, 2020) had similar qualities that I was looking for but wasn’t quite as aggressive. What I did like about this was that it could be used as a more neutral and relaxed pose. Therefore, if I were to develop this animation further into a longer sequence I could blend between these two poses. Both are taken from a side angle too, which allows me to really easily see where everything is position when I’m working with the digital rig. These static images are also clear in terms of quality and are easier to work with when creating the initial posing compared to the video, which I would have had to have paused. A lot of the video reference were taken from above too - another reason why these static references were useful!


Over the course of this module, I’ve learnt that the majority of walk cycles can have their theory broken down and compared to a human walk in terms of the poses that would exist. There are then clear differences and relations depending on the animal and its anatomy, however, the underlying theory of motion has similarities. Therefore, using regular walk theory can provide a useful point of reference still. In our case, the front of the scorpion will somewhat act as a normal walk, (Williams, 2009), therefore, the up and down portions of where the legs attach will reflect the up and down poses of a human walk. However, since our scorpion doesn’t have as dexterous feet as a human there is much less detail in the poses needed. This actually simplifies the animation a lot despite there being so many legs!


I also looked at the quadruped walking theory from the Animator’s Survival Kit (Williams, 2009) because the legs behind the front legs leg to move in an offset pattern to the front. This was discussed in the theory video by Alex Williams (How to animate a scorpion in motion, 2012) for the spider, however, what I was really looking for was the rotation in the hips compared to the shoulder and how I could incorporate that into my scorpion to get this robot feeling less mechanical and more flexible - like a predator!

Animation

16/04/24

I’d gathered more than enough reference now so it was time to start animating this mechanical scorpion! I started off using reference to create a strong starting pose that felt aggressive - this involved getting the legs and body arched upwards with the tail curling forward so that the stinger would strike. Next I wanted to get the leg motion working perfectly before I touched anything else. An issue that I had on the spider was that the range of forward and backward motion on the legs was too great and I got a lot of intersection that was challenging to fix. This time I experimented with strong initial posing with distance between the legs and experimented with offsetting the legs early so that they didn’t overlap. This meant I got to a stronger visual result much quicker than before. I used the graph editor to offset the curves and in some place used copying and pasting of keys to ensure that the forward and backward motion was the same for each leg. This is important to ensure that there is no foot slide when the creature animates moving forward. I also introduced a slight 1 frame offset of the legs that mirrored each other so to help make it feel even more natural.

The video below shows the outcome of the work on the legs. I was happy with the progress here - there was no intersection happening and it felt very insect-like in its motion, which as good! The next steps would be to create the body motion to help with the transfer of weight and reaction to step impact.


This next play shows the developments to the body, arms and tail motion. I animated all axis of rotation on the head, body, rear and tail to get this feeling very loose and powerful. I thought as this might be quite heavy there would be a good amount of swing and power to the motion so I thought this could look good. I perhaps exaggerated this a little too much as the tail really swings, a lot more than the reference, and this is something that Alex Williams picked up in some feedback that he did for me. However, I did like the energy in this animation but if I were to come back to this animation I’d definitely tone it down a little more. I used a lot of offsetting in this animation so that each body part down the chain of the hierarchy lags behind the one its attached to by at least 1 frame, which makes it look even looser.

Scene Development

At this point, I was happy with this core loop of the animation and felt like it was time to place it into a scene to present it. I started by looking for a desert scene HDRI to get some realistic lighting. This was actually even more important for this animation because my plan was to modify the materials to be simple but reflective metal Arnold shaders, therefore the HDRI would reflect in the material and accentuate the ‘chrome-like’ effect on the Scorpion. I came across this HDRI (Guest and Savva, 2022) that was perfect for the job!


I took the HDRI into Maya and plugged it into the Arnold Skydome lighting. Then I assigned an aiStandardSurface material to the full scorpion - I’d experimented with the metalness, roughness and colour values to get the appearance of a shiny metal robot as shown in the image below. I was happy with this, I felt the colour made it look a little more interesting rather than going for pure chrome.


Next I needed to find a desert or post-apocalyptic scene to place the scorpion into - this also ideally needed to match the lighting HDRI that I’d found. I came across this great photogrammetry scanned scene on Sketchfab by Balabanian (2019). I loved the abandoned and graffitied aeroplane that I though would be a great sport for the scorpion to walk along and suit the story I was try to tell. One thing that is an annoying about photogrammetry scanned scenes is that most of the information is in the colour texture rather than metal-ness and roughness, therefore the lighting doesn’t always support these materials. Another challenge is that the shadows seen in the image below are also baked into the texture itself, therefore, no matter where I would need to adjust the lighting angle to match. These were both fairly minor issues too as I was planning to use depth of field to obscure the background slightly so the smaller details would not matter as much!


The image below is a screenshot of the same scene from Sketchfab (Balabanian,2019) but shows a potential angle that I could use for the shot.


The below image shows the scene successfully integrated into Maya and the actual shot angle that I used. In order to get it into Maya I used the same process as other scenes. I downloaded the GLTF file from Sketchfab; Imported to Blender; packed the textures and finally exported a FBX file with embedded textures. I had a few issues initially where the FBX wasn’t packing the textures, however, I redownloaded the file and repeated the discussed steps and this fixed the issue.

I had changed the shot angle from my initial idea shown above to the angle shown on the left of the image shown below. I really liked the motel-like sign and felt it added a bit of depth to the scene. I also liked the composition of the plane taking up the left two thirds and the wing stretching out to the screen right. I felt like this composition was well balanced and aesthetically pleasing so I moved ahead with this. I added some really subtle camera motion so that it didn’t feel too static, something I didn’t like about my horse rearing render which had a static camera.


The below image shows the render of the scene with the scorpion and the depth of field applied. I really liked this render! Although we have a mechanical scorpion I feel the quality of the image feels very realistic. The HDRI lighting is adding a lot to the scene as the light and colours reflect on the chrome material of the scorpion, which I feel looks great! There is some great depth in the image with the layered assets and the depth of field draws the attention instantly to our main subject - the scorpion.


I wasn’t sure if I liked the pinky, purple metal so I thought I’d try a more traditional chrome like material using a bluey-grey colour. I actually preferred this a lot more - I feel the lighting from the HDRI stands out further and it makes the shot feel more realistic again. The colours throughout are more relatable to common metal like properties so I feel this was a better choice to move forward with!


I noticed a slight problem at this point, which I was kind of anticipating, because this is a photogrammetry scan the ground itself wasn’t flat. This meant that when the legs hit the ground they might go through it slightly or not make contact with it. I had a couple of options for fixing this, firstly I could go through the animation to correct the foot impact to ensure it hits the ground or I could physically flatten the ground. I chose to experiment with the second idea as this was much less time consuming. I was also using depth of field so it was unlikely that any major deformations to the mesh would be noticeable. I selected the verts across the path of this scorpion, flattened them using the scale tool and then raised them to meet the feet of the scorpion. This made a few slight dips in the ground, however, it was minimal and barely noticeable as the modification was minor. I was really happy with the results as it solved my problem and it is extremely unlikely, unless you read this blog, that anyone would even be able to notice!


Using the current render settings I was getting a render time of about 1 minute per frame which was acceptable and manageable to output the full sequence in a good amount of time. As discussed throughout I was really happy with the quality of the render and I felt I had resolved any issues that had arose throughout the development of this scene. The playblast below shows the full shot before I was about to render it - everything was looking good and I was excited to see the completed shot as the renders were looking awesome!


I also set up another Maya scene to render the scorpion from different angles and present the animation in line with how I had rendered other animations for my showreel. I used the same method with an aiShadowMatte material on a plane to act as a ‘shadow receiver’ but rendering with alpha so that my render only includes the scorpion and shadow, making it easy to composite. This image below shows a test render with the alpha transparency turn on essentially meaning it isn’t rendering the background.

Final Render

17/04/24


The above video shows the rendered outcome of this module including the animation of the scorpion moving through the scene and the multiple angles of the locomotion loop itself. I easily composited everything together in Premiere Pro to consistently match the other animations. I had some trouble with the quality of the renders being a lot brighter than the test renders and I think this is due to the colour space that is being used. Since doing the render I found an additional option to manipulate this which is leading to stronger results. However, for this animation I ran so simple colour correction in post-production to bring the colour in line with test renders I was doing. I felt like this went really well and hopefully you’d not have noticed that there were any difference between the test renders and the videos unless you read this blog or compared them side by side!

Conclusion

Overall I was really happy with this little animation. I felt that compared to the time I spent on it I created a high quality outcome with lots of stylisation and implementation of creature locomotive theory. I’d been very efficient with time and used my learnings across the production pipeline from throughout the module to take an optimised approach. The final outcome itself looks great and the render quality and final presentation is particularly nice. I love the way the chrome reflect the environment and HDRI based lighting to feel real. The subtle camera motion and depth of field draws attention to the main element. The environment, even though it’s blurred, helps develop the story telling aspect of this scene. Perhaps the world has fell into ruin and mechanical beasts have overthrown humanity and are patrolling the earth to ensure that humans are annihilated!

The animation and motion itself works well. I do agree with Alex William’s comments that the tail is a little too exaggerated in how it swishes and I could have toned down this exaggeration a little. This is something I struggle with as I need to create contrast in the exaggeration so that not all elements of the sequence are exaggerated. This is a little more challenging in a loop as the motion is being repeated, however, what I could have done was extended the loop so that it repeated a few times and then varied the range of motion slightly. Despite this I feel other elements are working well, I love how the body rotates as the legs propel it forward - there is a real sense of force and power here!

I have achieved the learning outcomes because I have :
  1. Analysed a range of theory and scorpion reference to understand the creatures anatomy, motion and posing with particular reference to a more aggressive walk cycle. I’ve also compared this to the arachnid theory that I explored as part of the spider animation within this module.

  2. I’ve explored the rig provided to understand how it works and functions. It definitely isn’t my favourite rig due to some of the limitations I explored in this blog post, however, it enabled me to implement and exercise my understanding of scorpion animation theory. I’ve brought the rig to life using a range of skills learnt and explored across the module with the support of theory and study of reference as described in this blog post.

  3. I’ve shown the ability to produce a high quality animation using optimised techniques and reflection of previous errors to create the animation efficiently and within a good timeframe. There are areas of the animation I could improve further, however, I have been limited a little with time and the injury I sustained to my shoulder.

  4. I’ve developed the animation into a scene to provide a high quality render that makes use of PBR materials, HDRI lighting and an appropriate 3D scene to support a post-apocalyptical like environment. The outcome visually looked appealing due to the composition and render quality I achieved that was informed by previous practises and experimentation within this scene.
Learning Outcomes
  1. Decoding Scorpion Locomotion: Examine the fundamental principles of scorpion movement. Explore the nuances of their creeping and crawling, uncovering the key elements that define these arachnids.

  2. Introduction to the Freeware Scorpion Rig: Familiarise yourself with the freeware scorpion rig, designed to simplify the animation process while capturing the essence of scorpion locomotion. Learn where to find and download the rig, and explore its features and controls to optimise your animation workflow.

  3. Simplified Animation Techniques: Explore techniques to make scorpion animation as simple as possible. Break down the intricate movements into manageable steps, focusing on a systematic approach that ensures efficiency without compromising on the realism of scorpion motion.

  4. Hands-on Tutorial – Scorpion Animation: A hands-on tutorial where you'll animate a scorpion in motion. Begin by understanding the basic principles of scorpion locomotion, starting with a single leg. Discover the art of copying and pasting curves to efficiently replicate movements across all legs, bringing your animated scorpion to life.
Reference List
  1. A scorpion walks (2021) YouTube video, added by Nature Magnified [Online]. https://www.youtube.com/watch?v=Wsq6mxsJslo [Accessed 6th May 2024].
  2. Amazing!! Asian Bullfrog With Big Black Scorpion! Warning Live Feeding (2021) YouTube video, added by MR LuckyFrog [Online]. https://www.youtube.com/watch?v=KMUitO-vSzw [Accessed 6th May 2024].
  3. Balabanian, A. (2019) Plane Crash by a Brothel in Nevada, February 13th [SketchFab]. Available at https://sketchfab.com/3d-models/plane-crash-by-a-brothel-in-nevada-9931703442a14a3db2cd53c368706c64 [Accessed 6th May 2024].
  4. Facty (2020) The World's Most Dangerous Scorpions. Available at: https://facty.com/network/answers/the-worlds-most-dangerous-scorpions/ (Accessed 6th May 2024).
  5. Figgins, K. (no date) Free Rigs. Available at: https://3dfiggins.com/Resources/FreeRigs/index.html [Accessed 6th May 2024].
  6. Giant Black Scorpion - Wildlife Thailand (2013) YouTube video, added by Wild Vision [Online]. https://www.youtube.com/watch?v=GjMI4u8wVBU [Accessed 6th May 2024].
  7. Guest, J. and Savva D. (2022) Fouriesburg Mountain Midday, June 20th [Poly Haven]. Available at https://polyhaven.com/a/fouriesburg_mountain_midday [Accessed 6th May 2024].
  8. How to animate a scorpion in motion (2012) YouTube video, added by Alexander Williams [Online]. https://www.youtube.com/watch?v=YyMCCw_lPA4 [Accessed 6th May 2024].
  9. Kirk J. and Munoz E. (no date) Scorpion Creature Rig 3D Model, no date [CadNav]. Available at https://www.cadnav.com/3d-models/model-44107.html [Accessed 6th May 2024].
  10. Manner, C. (2023) Because We Focused On The Snakes, We Missed The Scorpion!. Available at: https://worldanimalfoundation.org/animal_encyclopedia/params/category/173368/item/994190/ (Accessed 6th May 2024).
  11. Scorpion Anatomy: Fascinating Insights 🦂⭐️⭐️⭐️ (2024) YouTube video, added by EXPLANATION-AVENUE – 3D Animationen Oliver Ende [Online]. https://www.youtube.com/watch?v=PabnkHwn_KU [Accessed 6th May 2024].
  12. Scorpions Are Predators With a Sensitive Side | Deep Look (2021) YouTube video, added by Deep Look [Online]. https://www.youtube.com/watch?v=3jtm9BdnE1U [Accessed 6th May 2024].
  13. Seeing a real Scorpion walking (2018) YouTube video, added by Tommy Eide [Online]. https://www.youtube.com/watch?v=LMHmDEuEEZ0 [Accessed 6th May 2024].
  14. Williams, R. (2009) The animator’s survival kit. London: Faber and Faber.
  15. World's Deadliest Scorpion | National Geographic (2013) YouTube video, added by National Geographic [Online]. https://www.youtube.com/watch?v=gzszFCxFKNo [Accessed 6th May 2024].

Comments