Animate a Horse Rearing Using Live Action [Animal and Creature Animation - Unit07]
Animate a Horse Rearing
04/03/24
Introduction
I had seen this task on the schedule for this module and I’d thought this would be a tough one - but a good one! On one hand I was really excited to explore more of a sequence of actions opposed to a loop but on the other hand this means that you will have a lot more unique poses to perfect across the sequence. I thought It would be challenging to get the house looking realistic and believable, however, at the same time this excited me as it would be the perfect exercise to challenge my skills and create an awesome outcome I could be proud of.
I’d learnt a lot about horse locomotion theory and this would be a great exercise to implement that into a sequence rather than a loop. This would mean that rather than animating the horse on the spot, as I did for the loops, I would be moving the horse forward through space. This would mean that foot slide would not be an issue and would give me experience of animating an animal in the scene and would be closer to what might happen in an animation for film or television rather than games.
In this task I’d also be studying reference intently. This was something that I did to inform my previous animations, however, for this exercise I’d be directly using the reference to drive the whole animation. I’ve been using thumbnail studies and reference much greater than I ever have before and I feel it is really driving forward the overall quality of my animation, therefore, to try and replicate the motion of a reference through animation would help further progress my understanding of horse locomotion and animating to reference.
I’d watched the theory lecturers at this point by Alex Williams and the core concept was essentially around matching the poses in the reference using a video imported to Maya on an image plane - nothing too difficult hopefully! Through matching the poses you would result in an animation that was incredibly lifelike and actually not too far from motion capture animation. Once thing I really liked was the spacing between the key frames - Alex was working to animating on 4’s, however, would vary this based on the actions that were happening to allow for flexibility to effectively match the motion. For example, he would look out for key poses such as passing or contact poses and adapt the spacing of key frames to effectively match these instead. This approach to flexibility was intriguing and I was starting to see how this process could lead to an in-depth study of reference material and realistic and natural motion.
Another key aspect was actually finding quality reference footage that was useable for animation. He’d shown shaky footage that he needed to stabilise so that the camera wasn’t constantly moving. The footage Alex was using was from a side angle too and the motion moved from one side of the screen to the other. Therefore, I knew that I needed to find footage that was from the side angle and ideally on a tripod. This does really highlight how powerful reference can be, however, if you can source your own and direct your own subjects then you can make it much easier for yourself to make effective animation.
In addition to this I’ll recap the key theory I’ve learnt about quadruped locomotion from previous lectures and highlight any differences of application for this sequence based animation :
Overlapping action in numerous parts of the horse :
For a walk and gallop the chest and hips will offset each other; as one goes down then the other goes up. For a trot we would see the hips and chest working in sync with one another
The appendages and other body parts attached to the hips and chest would also move in the opposite direction to that which they were attached. E.g. When the hips move up then the tail would move down.
In the loops I’d been fairly free to exaggerate the overlapping motion as I interpreted the thumbnail studies and relevant video reference, however, this exercise would be about matching the motion as close as possible so that it felt realistic and believable.
The rear legs are the drivers and the front legs are the support and steering limbs. This means that our back legs push the horse through space to drive the motion. In turn, the front legs would need to remain straight when planted on the ground to support the weight of the body.
This would be crucial in this animation to ensure that I maintain the straightness of the front legs - I should see this clearly when studying the reference footage.
As horses are herbivore’s their spines should have very little flexibility in them meaning there should be limited squash and stretch.
I should observe this through the study of the reference. As this will be a horse rearing there are little to be some extreme poses that have a small amount of squash and stretch to really sell the motion.
I’d studied a lot of foot placement and air time across numerous locomotion cycles so I should see this happening in action, however, I expect it to be less uniform and less perfect to that which you would achieve in a looped cycle. This might mean that the timing is slightly different and the spacing between foot placements will vary.
Project Management
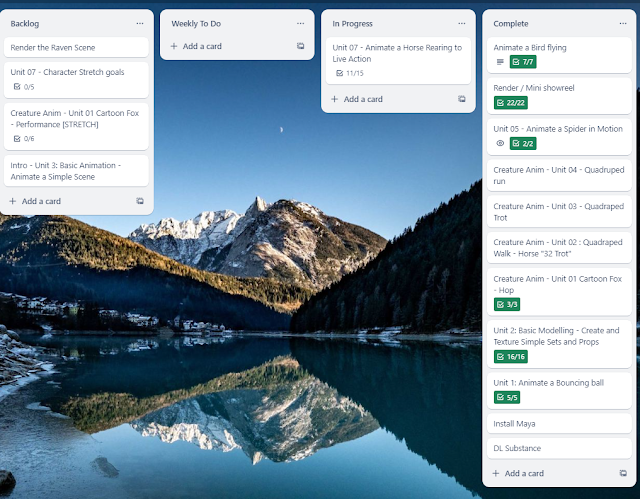
I’ve organised my Kanban board on Trello to reflect where I am currently at. I’m bang on schedule, however, my partner is away this week and I have a family event to attend on the weekend so I will need to be focussed with the time that I have available to make as much progress as possible. The following weekend I have free meaning that I should have the time and space to catch up and overhang of work from this week to the next week where the next task will drop. All in all at this point of time I am completely on track and I am happy with the way that I am balance time and quality in all aspects of my life.
Below shows my break down of tasks involved. These are ordered in the order that I currently plan to tackle the in. This gives me a nice easy flow to tick off my production pipeline and make it easy to hop back in on with whatever time I have available to dedicate to this animation. I’ve added rough estimates of the days I plan to tackle tasks on to further organise the production pipeline and highlight if I’m falling behind at any point. I’d update this as I went to monitor progress but also ensure that I was delivering high quality outcomes. You’ll notice that I’m actually expecting this to take slightly longer than a week which might set me a little behind, however, this does look to be one of the larger and more challenging tasks of the module so far. Therefore, I was happy to allow it to run over a little in the interest of giving this task the time it deserved. Furthermore, who knows, it might actually take less time than I think (but hopefully not more!)
You’ll also notice that I’ve added a stretch goals section to this task card. This is because the piece of reference I had found by this point (detailed below) included a person interacting with a horse. I thought that although not necessary if I could add a person to this scene and study their motions as I did the horse it would make the whole scene and sequence more engaging. However, the intent of this task and module is focussed on animal and creature animation, therefore, I didn’t want to sink too much time into exploring the human animation if it caused me to get further behind.
The Search for Quality Reference Footage
As I highlighted previously, the search for good reference was going to be paramount to laying the ground work for this animation. I was excited to see what I could find, however, also worried that it might be difficult to find that perfect piece of reference that showed a horse rearing. I didn’t want to use the footage Alex used as I wanted to take a complete fresh approach and make my animation its own. I knew that YouTube would likely be the best source, however, I had hoped that perhaps I could find a reference bank website where there might be some stock footage.
The first piece of potentially useable footage was Bucking Horse with Female Rider (2008). The horse motion was quite complex, quick and moved in 360 degrees - this would be pretty fun to animate, however, definitely would have its challenges. The camera wasn’t static but also was quite shaky so this would need stabilising in AfterEffects. I had access to this but was trying to avoid needing to use it if I could get away with it so that I could focus my time on the animation. I was hopefully that I’d be able to find some quality reference that didn’t need stabilising. Another worry with this is that it was quite long at 17 seconds and I was worried the impact this would have on the time it would take to produce and polish in the time that I had available. Furthermore, the horse didn’t really rear up on it’s back legs and was more bucking around wildly so potentially this might not hit the core understanding of this project.
This next video (Horse Rearing Extreme, 2010) shows as ‘unavailable’, however, if you click it - it will work fine on YouTube.
This video Horse Rearing Extreme (2010) has more clear motion from the horse and shows the horse rearing a couple of times and also from the side angle. The footage is hand held again, therefore would need stabilising - something I could do but was trying to avoid! The footage was also a slow motion video and would need speeding up - I was less worried about this as this is super easy to do. The video was also around a minute, which I estimate would be around 15 seconds when sped up to normal speed, so again was a little on the longer side but perfectly tackle-able. All in all this footage was better than the last one due to a stronger capture of a horse rearing but would require the clean up in AfterEffects. I wanted to continue looking until I’d exhausted all my options.
Next I wanted to see what I could find through google searches and potentially some stock footage websites. I thought there surely must be some reference sites that animators or film editors might use that might give me some high quality reference - even if I had to pay for it! I looked through a few websites like Shutterstock, however, there wasn’t really anything like what I wanted. There was the horse rearing you can see in the bottom left of the below image but this was pretty uninspiring and lacked the energy the previous two I’d found.
I decided to go back through YouTube but vary my search terms a little more e.g. ‘Horse Rear’, ‘Horse Rear reference’, ‘Horse Bucking’ to see if I could find anything better. I came across the reference footage below (Horse rearing on commnad, 2018) and to be honest it was pretty perfect! The camera was side on with a good view of the subjects and it was mounted on a tripod so there was no need for stabilisation at all. There were a few different takes that I could use although the first one did look the best. The length of the takes was also a lot more manageable than the previous ones meaning that I could really hone in on the quality of the animation rather than focusing on quantity.
I was really happy with this therefore I decided that I would move forward with this reference and create my animation from it! At this point I’d spent at least a couple of hours searching for the perfect piece of reference and I wanted to move on. This time was well spent as finding the best piece of reference was paramount to driving the whole outcome I’d produce so I didn’t want to rush this phase. I’d also actually found the reference Alex used, which was Horse rearing (rider falls off) (2011), but as indicated earlier I wanted to find my own reference as part of this process so that the full pipeline was my own.
Importing Video Reference to Maya
The first key implementation of theory was to get the video reference into Maya so that I could use it to create my key poses and match the natural motions. I’d seen that it was possible to bring the footage right into Maya as a video so I downloaded the clip directly from YouTube and tried to import the video as shown below. It didn’t work! I’d saw that Alex had said it needed to be a .mov file, however, this is traditionally a Mac file type and I knew Alex was using Mac OS so I’d hoped that an MP4 might work on a PC - it didn’t! I converted the file to a .mov, however, this also didn’t work! I had done this in Maya before but I’d used an image sequence instead, I’d also seen this used in the technical lecturers and I knew this would work so this was my next plan of action.
Below shows a small snippet of the image sequence exported to show the individual frames. I did this through Premiere - super easy just exporting as a JPEG sequence to reduce file sizes and ensuring that there was enough padding on the frame numbers so that there was always a 0 at the front. This keeps all the frame numbers in order and prevents the images getting out of seuquence. E.g. ensuring ‘Frame1’ doesn’t get confused with ‘Frame10’ and play out of sequence.
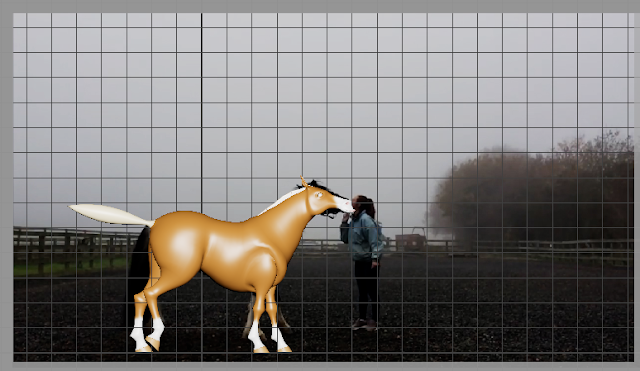
This imported into Maya completely fine. I did this through creating a ‘Free Image Plane’ and loading the file as an image sequence. Maya seems to have a weird quirk where it unticks image sequence after you load it but if you re-tick this it loads the video into the scene on the image plane. Next it was time to line up the footage with the rig - I used the same rig by Joel I used before as I was familiar with this and knew it was easy to pose and animate. I spent a bit of time getting the right scale and settled on the scale seen below. One slight challenge is that although this is a side view it is in perspective therefore it wouldn’t match perfectly in orthographic. I did stress over this a little, however, realised that what was really important was using the reference to drive and inspire the animation therefore if it wasn’t ‘perfect’ then it didn’t really matter!
Animation
I had everything set up to follow this approach for animation so it was time to start posing the horse! The below image shows one of the first poses I created to match the movements, one of the first challenges I faced was the slight perspective on the camera angle versus this orthographic side view I was using to check the pose for the horse. The issue was that the legs wouldn’t perfectly match as the left front leg would appear ‘higher’ than the front right leg in the reference compared to the orthographic side view. One idea I had would be to attach the image plane to a camera and add a slight tilt downwards to the camera to match the angle further. However, another thought I had was questioning how much of a difference this would really make? Did I really need the angle to be perfect and match the movements absolutely? I realised that I didn’t! I felt the point of this was using the reference to drive the animation, however, the animation was its own thing and eventually I would be turning the reference off and no one would know. Therefore regardless of what I actually did, so long as the end animation looked good then that was all that mattered!
Other challenges I noticed were that the horse in the reference wasn’t perfectly aligned to the camera and made some movements, particularly in the head, that either moved or rotated away from the camera generally on the Y axis but sometimes the Z too. I thought that this might be important to the animation, however, it felt like something I might tackle later in the animation as a pass over the full animation and focus on one axis of rotation. Getting everything working correctly in this side view first would be easier and allow me to make more progress rapidly rather than worrying about these finer elements that I could refine later.
The actual process of posing the horse was good. I was achieve what I had hoped I would and was using the reference to further learn about creature animation. This was vastly different to learning the core theory that I explored earlier as I was looking at more realistic motions of what was actually happening rather than patterned behaviour and defined rules for how things would work. This means I was studying finer subtleties in the posing and timing of this particular horse, which was extremely interesting. I’d been working with this horse rig for a while and felt like this depth of study of reference was really allowing me to understand how horses move. This helped me build empathy with the discussions Alex Williams explored in his lecturers where he referred to his work with horse when working on ‘Spirit: Stallion of the Cimarron’ in addition to other animators working with animals such as those who worked on ‘The Lion King’. It would be exciting to see what I could achieve following this process.
I was using the theory of working on 4’s for most of the animation, however, I knew this wouldn’t work for the full animation and that I would need to vary the spacing between poses, particularly if I wanted to achieve fluid animation. Below are two screen shots showing some particularly quick foot steps that were animated on 3s. I was looking for key poses in the animation common to walk cycles. The first image below is a ‘down’ pose where the front of the horse is lower than the rear and the left front leg is preparing to move up. The second image shows a ‘passing pose’ on the rear right leg as it passes the rear left leg. In the reference, these poses I identified didn’t match the initial rhythm of 4s so I needed to adapt in order to achieve the dexterity in the poses and achieve this natural motion.
Although this process kind of feels like cheating as you’re matching your motions to the reference, without the knowledge and theory I gained on animating the horse walk I don’t think I’d have been able to achieve the level of quality in this animation. Although I was studying the motion of the reference I was studying it under a particular lens with a desire outcome of making a fluid animation so I knew to look out for these poses. This would then make my graph editor refinement pass much more smooth as I could focus on the transition between the poses knowing that the poses themselves were high quality.
Just following on from this discussion around studying key poses, it reminded me of the video below (Animation Blocking + Finding Key Poses w/ Reference, 2020) that I’d been studying recently that looked at studying reference to inform your blocking pass to pick out key poses, in-betweens and extremes. I’ve said it before but although I feel I’ve always been a good animator that has used reference I don’t think I’d ever explored this level of in-depth study - really trying to understand the theory of key poses in particular motions and look out for them in quality reference. I feel that the more attention I’m paying to reference the greater improvements in quality I am seeing in my work. Rather than trying to reach a functional outcome quickly I’m spending more time to study reference in different ways which is resulting in higher quality outcomes - something I hope to continue to build.
I’d now animated 34 frames and felt that this would be a good point for a work in progress playblast. I was perhaps a fifth of the way through the process of blocking out the animation but I could already see the benefits of this process. The motion was looking very natural in timing and posing; the way the foot matches the reference and plants the floor feels extremely believable - as it should! Another challenge I was noticing was that as I was moving the horse off of the ‘master’ control and moving through the scene the rear and the chest of the horse would move independently of one another. This was a challenge because I knew that horses as herbivores shouldn’t squash and stretch and I was a little worried this method if followed poorly could cause a stretchy spine. Luckily at this point int time it wasn’t feeling unnatural and I knew that I needed to trust in the process of matching and perfecting the poses throughout the animation.
It is also worth noting that I had chosen to ignore the tail at this point too. I would instead focus on posing of the body and later go back and animate the tail through matching the motion and implementing overlapping action. The tail on my rig was more ‘solid’ that the tail in the reference which was longer and looser through the long hair attached to it - this would mean that even if I match the motion it might not look believeable on this rig. Therefore, I might need to blend matching the motion with theory of overlapping action on tails in relation to the hips. However, again something I would tackle later!
So far the quality was looking good! The process felt like it was working and I was happy with the subtleties in motion that were already happening. Particularly for a blocking pass the outcome was feeling high quality for the amount of time I’d put into it already. There would undoubtedly be clean up and improvements in the motion from the graph editor later on, however, I quickly grew an appreciation for this method of animation. I knew that once I’d created the full animation I would be able to exaggerate the motion further if I wanted to sell the movements from an animation perspective, however, I also valued the almost motion-capture like subtle movements I was getting. I’d continue to develop the animation over time and experiment , paired with reflections to result in an animation I was happy with.
The below playblast shows another work in progress video with 48 frames matched to the reference footage. I was really enjoying the foot placement here, particularly the timing. As the horse moves towards the human it leans into the walk being lead by its head - the motivation here being the food the human is using as a reward to train and execute the rear. This is almost a kin to cartoon character being lured by their nose to a irresistible meal as the 1941 Disney production of ‘Mickey Mouse : The Little Whirlwind’ accessed via YouTube (The Little Whirlwind | A Classic Mickey Short | Have A Laugh, 2017) which shows and many other have taken inspiration from after. The motion that leads a character movement is so important and affect how the character responds - typically in a horse the rear legs are the driving factor, however, they are actually the last to move in the case. The nose leans the horse forward and the front legs ‘catch’ the body and prevent it from falling until it cannot stretch any further and the rear legs need to move. This is an example of where traditional theory of horse locomotion doesn’t apply and the motivations of the character are the main driving factor opposed to what you would traditionally think.
I wanted to showcase timing and spacing a little more to show some of the quick movements that were happening. You can see that there is generally even spacing at the beginning working on 4’s where there are more controlled motions in the horse, however, you can also see the variation of quicker frames to match the motion more effectively within this shot at around 50 frames. This also shows how I was using my Maya workspace set up to animate this motion with orthographic side on the left and perspective on the right. This gave me the flexibility to select controls, review motion, review the reference in isolation and generally build the animation. As the animation developed I felt myself getting into a rhythm of producing the animation that felt very pipeline driven and was achieving good results.
The below pose was a really exciting pose to study! It was the start of the rearing action where both back legs are off the ground and the full weight of the horse is supported by the back legs. The horse is about to act as a seesaw where the force of the rear legs landing will allow the horse to propel its upper body in the air; creating some beautiful overlapping action! We are also seeing a squash pose as the horse anticipates to leap into the air, which again accentuates and helps sell the power of this motion. One thing that might need tweaking later would be the overlapping action on foot placement as at the moment both rear feet are looking like they will hit the ground at the same time, however, a 1 frame overlap is likely to look more natural.
In the below image we see the extreme pose of the horse rearing into the air and punching its front legs forward, as typical of rear actions I’d seen in other reference videos. It’s really interesting to study the distribution of the horse’s weight in this pose as it gracefully holds its upper body in this raised pose. The strong rear legs are solidly planted on the ground as the horse sits it’s weight into it’s hind legs.
The below playblast shows these previous poses in motion. It’s looking really good - timing in particular feels very punchy and realistic, however, this should be the catch as I’m matching the timing exactly to the motions int he video. When animating less closely to reference you tend to spend a lot of time experimenting with the timing, however, this process essentially gives it to you on a plate. I’m also really liking the foot placement again, you see a very natural motion on the front right leg as it lifts it for the next step before it then hesitates and plants it backwards. This is something that could be easily missed without this depth of study into reference and again pulls this process closer to motion capture animation. Motions like this add a lot of character to the horse and help sell it as a real horse rather than an impression of a horse - essentially really bringing it to life.
The image below shows a particularly tricky pose for the front legs. The horse raises its legs to a very extreme pose and a pose that the rig will barely ever be in. I was struggling to get the natural dexterity of the front leg raising so high to match the reference whilst also maintaining the skinning of the mesh in the shoulder. I was also trying to implement the theory of the shoulder being rotated in the same way as the lower leg bone as it should be in nature. I reached the pose below that I was happy enough with, the skinning looked a little twisted, however, I felt that it wouldn’t hold in this pose for very long so it was unlikely to be detectable by the eye and therefore not worth over worrying about. To achieve this pose I experimented with rotation on other axis and translating it away from the body slightly which helped maintain more realistic deformation.
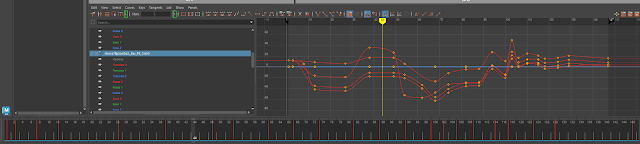
The below image shows an update on the timing and spacing between the key poses across the full animation. Generally I would work on 4s unless the motion became quicker then I would work on 3’s and in rare occasions 2’s in order to effectively match the key poses to the reference. There is even a period at the end where the horse moves slower between key poses and I could leave an even greater gap between the key poses in the interest of keeping a smoother transition. Another worry I had with matching the motion in this almost ‘straight ahead’ approach to key posing this animation is that I would achieve jerky animation that might be difficult to smooth, therefore, wherever possible I was looking to pick out the gap between key poses and represent that through effective spacing and allow Maya to support the process through in-betweening.
This now brings us to the end of day 1 working on this project and the first pass of animation. I focussed on the core blocking of the animation to create all the key poses with no graph editor or polishing of movements. The below videos showcase the outcomes of my efforts and this complete animation pass from various angles and inclusion or omission of the reference footage in the interest of showcasing the animation!
Side View with Reference Video
Side View without Reference Video
Perspective View with Reference Video
Perspective View without Reference Video
The quality of these outcomes felt good and was showing me the range of techniques you could use to animate complex motion. I highlighted at the beginning that I felt like this was going to be a challenging animation and it was, however, the approach I was taking here showed me how complex motions could be achieved. I knew that this could be used in conjunction with stylisation and exaggeration to create engaging and complex animations in a more methodical and support way. There was a great feeling of weight throughout the animation from the steps and transfer of weight as it moves across the ground to the raising of the chest and head in the rearing action. The rear feels heavy as it pushes its immense weight away from gravity and has lovely spring as it returns to the ground. I also love the quick sprig of the rear legs jumping forward to force its front end into the air.
There were some aspects that needed further work, however, on the whole the motion did feel strong. I had some slight quirks with the front shoulders and some popping on the front legs that I would need to improve, however, I hoped that my graph editor pass would correct a lot of this. I also wanted to break the tangents on the foot placement to get this a little more snappy and remove the ease out that key framing typically creates when animating in Maya. This was all in line with my plan and pipeline that I’d set out in my project management so I was happy enough with the level of quality I’d achieved by this point.
Now that I’d blocked out the full animation my next major step would be to study and refine the animation curves on all the key controls that I animated. Then I would focus on the tail, jaw and ear animation and refine those through the graph editor too. I’d then experiment with some exaggeration of some key poses possibly using animation layers to preserve the core motion. Then I’d have a final polish pass to make sure I was happy with this as an animation piece and if there was time then I’d add the human animation which was a stretch goal for me. I had a pretty busy week ahead of me with an evening blocked out for a social event and the weekend completely filled with my uncle’s wedding so I was feeling a little bit of pressure. Despite this the following weekend was completely free so even if I needed to use the following Monday to complete this animation then I could use the following weekend to catch up again. It was feeling tight but achievable!
06/03/24
Graph Editor Tweaks
The following two videos show my refinement of my animation through the graph editor. This was a process I wanted to be careful with - if I smoothed curves too drastically then I would lose a lot of the natural motion so I needed to make sure my tweaks were relatively minimal. When I looked at the curves I was actually expecting them to be super messy, however, on the whole they were very fluid. This made it quite easy to refine the motions - I mainly focussed on making the curves move continuously so that ease ins and ease outs were smooth and gradual as they lost energy over time.
Another thing that I knew I needed to keep an eye on was the front legs, particularly as I was tweaking the chest animation. I needed to retain the straight posing of these whilst they were planted on the ground. The tweaks I made did create some bends and pops in places so I adjusted the posing on the upper leg/ shoulder controller to correct this. I’d also removed some of the popping and rotation on the legs that made this look more natural.
This was an incredibly powerful pass and really helped raise the quality of the animation. I feel I achieved my initial goal of smoothing out the curves but retaining the natural motion that this process enabled me to achieve. Overall the motion was feeling really lively - the tweaks I made to the foot planting through breaking the tangents so that they impacted the ground rather than easing out really helped make this feel believable. Generally all motions flowed together to a much greater degree which helps the feeling of weight throughout this animation. I still wasn’t quite happy with some of the popping in places, however, I was going to do a final polish pass and felt that I could address this then.
Animating The Tail
The previous animation pass of refining the animation curves took a lot less time than I was expecting so I was able to start on the tail animation, which felt like the next logical step to progress the animation. This phase was actually the toughest phase of animation and took me ages to get it right! I started by matching the tail poses to the existing timing and spacing of key poses to the body and to be honest I think this was a mistake. The tail essentially moved on it’s own and I should have ignored the existing key frames and instead focussed on finding key poses and breakdowns within the tail motion itself.
The above video shows my first pass of animation on the tail and it was okay! There were some nice subtle motions, however, overall it felt a little lifeless and felt like it needed a lot of exaggeration. The design of the tail on this horse was drastically different to that in my reference so this could be one factor for why it didn’t feel quite right! I tried to offset the key frames but this made it worse! The reason this work on a loop is because I animate all the controllers up or down and then offset the keys to get the overlapping action. This doesn’t work with this process as I am posing the tail in already overlapped poses.
The above two videos show further tweaks to the tail through the graph editor and comparison to footage in an attempt to improve the motion. It did make it somewhat better - there are some particularly nice flicks, however, again it feels quite heavy and constrained and I feel it doesn’t work with the force of the animation. I still think it needs to be reworked and potentially exaggerated further. These videos also show a little bit of jaw animation to mark key points I feel the jaw would open as it might make audible ‘neigh’s’ throughout the animation. I also made some further tweaks to the front legs to prevent popping and keep them straight, which helped raise the quality of the motion further.
I needed to leave it here for the night as it was getting late, however, my plan for the next day was to improve the tail through greater exaggeration. I also wanted to tweak the timing and spacing of the tail to give me more freedom of motion and hope that this helps me improve the timing and overall believability of this motion.
07/03/24
The plan of action for tonight was to improve the tail by reaching a point I was happy with! The below videos show the tail refinement where I was predominantly working on tweaking the animation curves but also removing keyframes to get stronger flow and transitions between the key frames. I was playing a lot with exageration here so that it didn’t look so stiff and controlled and instead felt more light and flow-y. In my experimentation I did run into some issues where the tail would clip into the body due to the overlapping action and exaggeration, however, in time I would be able to fix this.
I’ve included an array of views for these improvements with and without the reference to act as a point of comparison to the source footage but also to review this as an animation in it’s own right!
This was feeling a lot better now! I had a much greater range of motion that felt more reflective of the motions this horse was making. I really liked the flicking actions I had working and how I’d created the overlapping action along the tail as the motion passed through it. As you can see in the videos that include the reference, the range of motion is much greater in the animation compared to the reference, however, again I still feel that this suits the animation much better. The end of the animation had some slightly odd timing and felt a little too floaty and slow in places. Technically it still looked like it matched the footage but something really wasn’t right here and would need to be addressed so that the tail came to a natural stop based on force and muscle input.
As I was uploading the previous two videos - I thought I was happy with them but as I waited for them to upload I played the animation again and I still wasn’t completely convinced. I experimented with further tweaks to tail through exaggerating both posing and curves. This actually helps the timing because if something feels too slow and I increase the distance it needs to travel it will actually make that feel faster.
I was now at a point where I felt I was happy with the motion. It was continuous and I felt I’d improve the timing and posing compared to my first attempt. The part at the end where the tail settles I focussed on a lot in these final tweaks and am now happy that the timing feels better and that the tail comes to a more natural stop over time. This was definitely the hardest part of the animation so far and I think this was due to my initial approach to posing and timing. As soon as I started working on the tail’s timing independently from the rest of the horse’s timing things improved drastically. Therefore, when I approach the ears I plan to animate these in isolation of the rest of the keys in the hope that this makes things easier!
It was now the end of the week where I’d be able to work on the animation so I thought it would be a good idea to update my project management. I would have Sunday evening from when I returned from the trip away and it was looking likely I’d need Monday daytime at least too. This would mean I wouldn’t be able to completely start the next task on Monday, however, I’d rather not rush things and achieve a quality I was happy with. Furthermore, I had more flexibility in the next week so I was confident I’d be able to catch up.
As you can see in the above and below images I decided to split the stretch goal out of the task card and into its own card. This actually aligns more closely with the principles of Kanban by visualising the work more clearly. Although it would be great to add the human, it is not the core intent of this task or module where I am studying creature animation. Therefore, if I get some time perhaps at the end of the module it would be good to explore this, however, it is not as urgent as completing this animation and moving onto the next.
The below image shows my current task card. I updated the days I planned to work on the tasks, which now include the Monday. I felt that the quality of my work was good but also that it wouldn’t be wise to rush this animation and ruin it. Therefore, dedicating my time on Monday to this would enable me to give this animation the attention it needs and allow me to prepare it professionally for my showreel. I planned to maximise my time away to squeeze in some time to blog writing to reflect on my processes over the development of the animation. This would aid the completion of the blog post at the end of Monday.
11/03/24
Final Animation Passes
I started with animations the ears. The below image shows the spacing of key frames where I was looking for key poses and movements in the ears rather than working on the same key frames as the rest of the rig. I was doing this due to what I learnt about the tail and how difficult this was.
The image above shows the curves and spacing on the ears compared to the image below which shows the regular spacing I used to pose the body and tail.
This was significantly easier and I’d planned to experiment with offsetting the ear controllers by a few frames further down the chain. It was actually a little difficult to pose the ears as the head of the horse would sometimes rotate at a few points. Therefore, I’d planned to do this after I’d experimented with animating the Y rotation on the neck and head to match the footage more closely. Once I’d added this rotation on the neck and head I could adjust the ear poses to match the footage more closely and then I’d grab a playblast.
The below image shows the curves and points of rotation on the head as the horse turns away from the camera at a few points over the animation. I deleted key frames here to try and aid the smoothing of actions based on the movements that were happening in the footage.
The playblasts below show the developments to the ears, neck and head that I discussed above. The subtle motions here are really nice and help add a little bit of three dimensionality to the animation. The ear animation has a good base layer of animation and I particularly like the jolt on the ears as the horse lands after the rear. I feel I still need to improve the overlapping action on the ears and some of the poses to replicate some of the twitching like motions I see in the reference, however, this is good for now and I would develop it further based on these reflections.
The below playblasts show further developments and tweaks including offsetting of the ear controllers to create more overlapping action and rotation to the base of ears to more closely match the posing seen in the reference. The ears are really starting to take shape now - I particularly like the flick of the left ear at the end where a sound has clearly caught the horse’s attention before refocusing on the human. This subtle motion again helps sell the natural, lifelike motion that I’ve been exploring in this animation. I also have a lot less ‘twinning’ on the ears happening now which helps make it loose more engaging and less robotic too!
The below playblasts show the final tweaks made to improve the motion on the jaw and remove some twinning on the rear feet as the horse springs forward to start the rearing motion. I’ve experimented with the jaw curves to prevent it from looking ‘flappy’ and mechanical and instead my intention was to make it look like it was making audible, slightly distressed sounds. So I wanted the jaw to stay open for longer but perhaps wobble a little as it screeched it’s neigh! Although a subtle motion I feel this helps add a lot of character to the animation and helps make it feel more alive. Secondly, I really simply offset the rear feet impact on the spring so that the rear left leg hits the ground 1 frame after the rear right leg. This gives me some more overlapping action and again hopefully makes it look more natural by being less perfect.
I was now happy with the animation as a whole - I felt like I’d achieved my goal of making a natural and realistic animation sequence through the level of polish I’ve gone to throughout the development. I’ll reflect a little more deeply on quality in the conclusion, however, next I planned to render the animation, which will essentially be the same, however, visually look higher quality! I did actually experiment with animation layers and exaggerating the motions, however, this didn’t look good and I felt like I was losing the quality and charm of the animation I’d spent so long trying to perfect. Therefore, I decided to kill this task and progress on with the render.
First a quick project management update! I was about half way through my Monday and I’d completed the animation focussed tasks. All that remained was the render tasks and completing the write up on this blog post. Due to having a little more time than I thought available I added a different task to explore rendering this horse rearing animation in a scene. Whilst my project was rendering I would also be able to devote time to reflecting on this rather length blog post!
Another small point of note I moved the stretch goal I separated out earlier into my backlog in the interest of visualising my work load more clearly again. I wasn’t going to tackle this task this week and in the grand scheme of things it was extremely low priority, therefore I wanted to reflect this in my Kanban board. I added another task to render the raven scene animation as I felt this would add to the quality of my showreel and portfolio for this module, however, again fairly low priority.
Rendering
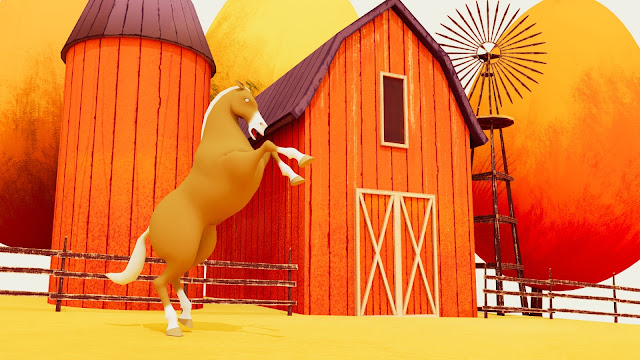
Firstly I started off through searching for a small 3D scene that I could use to place my horse in. I felt a farm would make the most sense and I came across this charming piece of 3D art by Sempai_Desu (2022).
I downloaded the FBX and explored a test render using a single directional light and an Arnold skydome. There were a few issues with the transparency maps, I actually had the same thing with the raven scene, and this is something that I need to research further into. I know its going to be something along the lines of converting the shaders to Arnold shaders which will allow me to set the opaque/transparency type of the shader, which in turn should communicate with the render more effectively. However, in the interest of time it was easier to delete any faces or objects with transparency maps so that I could progress.
This test render looks great and the lack of transparency really isn’t noticeable. I love the slightly quirky style of the buildings and the painterly textures creating an overall stylised outcome. The scene is a little ‘red’ on the whole, however, I felt the horse stood out enough to progress with the render. Perhaps I could have experimented with altering the colour of the horse to help it stand out a little more. It was a little bit difficult to place the horse in the scene as the ground was slanted, however, after some experimentation I managed to achieve a result I felt was acceptable with some minor, likely unnoticeable, clipping between the feet and the ground.
Below shows the outcome of the rendered scene and a standard side view render of this animation. For the side view I imported lighting from another horse animation Maya file, however, it didn’t look the same and I wasn’t sure why. I played around with the lighting settings and angles and reached a point I was happy enough to progress. I also set up a shadow shader on the ground so that it would render the shadow on the ground but not the ground itself. I really love this effect as it helps ground the character in an essentially infinite space. When compositing this in Premiere Pro I experimented with some basic colour grading settings to try to more closely match the colours from previous renders to help keep the style consistent.
Overall, I was happy with the quality of the renders. The hose looks particularly good in the scene, however, I wish I added a slight bit of camera animation to this to help get a greater feeling of the horse existing in 3D space in a 3D scene. I would need to look into why the lighting appeared different between the horse scenes in the future to help improve the consistency of my renders.
Now that the renders were complete I could update my project management to conclude this task card and set it to complete! Even though I was technically behind schedule by a day I had the time during the coming week to dedicate to making another quality animation, therefore, I was not worried about the extra time I’d spent on this animation.
I find this method of project management highly useful, particularly with how busy my life is. I find that estimating task sizes and breaking them down into manageable chunks allow me to make consistent and effective process. It also makes it super easy for me to pick up where I left off. Similarly my approach to blogging and recording progress as I go further helps this as I am highlighting my next steps through the areas I identify to develop.
Conclusion
Wow - that was definitely the hardest animation yet, however, I’m very happy with the results. The process of matching movements to the reference enabled me to study the reference in depth and observe the myriad of subtle motions the horse was making. It also helped me create an animation that was natural and realistic using a process that I hadn’t explored before, which was good. I feel the quality of animation was good due to the level of depth I went into studying the motions and effort I placed in achieving them. Although the motion is driven by the reference I have combined an approach of matching poses, taking inspiration from poses and exaggerating poses to achieve a finished outcome that works as an animation in its own right.
The rendering has gone well, however, I feel I could investigate why the lighting wasn’t identical to the other animations to improve the consistency. The scene animation works well, however, I think a subtle zoom on the camera or slight rotation would have helped make this even more engaging.
I feel I have achieved the learning outcomes, listed below, because I have :
I had sourced and studied the reference in depth to understand the key poses and subtleties in motion that I created through my animation. I took an approach of creating lifelike natural motions that helped me study the poses and range of motions horses adopt when they rear up. This helped me understand the nuances in the motions and study how the weight is distributed and transferred between the different legs.
I’ve successfully imported the reference footage into Maya on a free image plane using an image sequence. This has enabled me to use a range of camera set ups to both study and match poses across this sequence. This is a new process for me, however, I have quickly understood the power of this and the benefit of using this to further understand the movements and locomotion of a horse, with a focus on the more subtle actions and behaviour that occurs across a sequence compared to a looped cycle.
I’ve not used the Mothman TD Horse rig, however, I have found the horse rig by Joel Anderson to be extremely powerful. I also wanted to use this to maintain consistency in animation over the course of the module.
I’ve completed the hands on tutorial using footage I have sourced to create my own unique outcome. I’m really happy with the intricacies of motion I have achieved, particularly the way the legs are places and how the ears twitch between poses. Overall, I’m very happy with the natural and lifelike motions I’ve achieved through this process, however, also happy with the exaggerated motions of the tail that I’ve integrated into the process to improve the overall quality of this sequence as an animation.
Learning Objectives
Understanding Live Action Reference: Explore the art of using live action reference to infuse your animations with authenticity and lifelike motion. Learn how observing real-world movement enhances your understanding of weight, balance, and nuanced expressions in animation.
Importing Live Action Reference in Autodesk Maya: Unlock the secrets of seamlessly importing live action reference into Autodesk Maya. Explore techniques to sync live footage with your animation workspace, laying the foundation for a more intuitive and realistic animation process.
Introduction to the Mothman TD Horse Rig: Familiarise yourself with the Mothman TD horse rig, a versatile and free resource that enables you to animate horses with unparalleled realism. Learn how to download and navigate the rig's features.
Hands-on Tutorial – Horse Rearing Animation: A practical tutorial where you'll bring a horse to life through a dynamic rearing animation. Explore the intricacies of using live action reference in Maya, from importing and syncing footage to translating the motions onto the Mothman TD rig.
Reference List
Animation Blocking + Finding Key Poses w/ Reference (2020) YouTube video, added by Sir Wade Neistadt [Online]. https://www.youtube.com/watch?v=0CQJkeLfono [Accessed 29 March 2024].
Bucking Horse with Female Rider (2008) YouTube video, added by Christina Tseu [Online]. https://www.youtube.com/watch?v=KjDsNnA02IY [Accessed 29 March 2024].
Horse rearing (rider falls off) (2011) YouTube video, added by Alexandra Gretscher [Online]. https://www.youtube.com/watch?v=V-hZ3NFGNdI [Accessed 29 March 2024].
Horse Rearing Extreme (2010) YouTube video, added by Science of Motion [Online]. https://www.youtube.com/watch?v=Ud7gjTcf0as [Accessed 29 March 2024].
Horse rearing on commnad (2018) YouTube video, added by Miss_Crazie_Maisie [Online]. https://www.youtube.com/watch?v=6wyschH6K3o [Accessed 29 March 2024].
Sempai_Desu (2022) [Free] Farm, May 16th [Sketchfab]. Available at https://sketchfab.com/3d-models/free-farm-7162850a4f0d4bc3a49f3a03f8f87cfe [Accessed 29 March 2024].
The Little Whirlwind | A Classic Mickey Short | Have A Laugh (2017) YouTube video, added by Mickey Mouse [Online]. https://www.youtube.com/watch?v=REHJ1lz_HLQ [Accessed 29 March 2024].