
Animate a Dinosaur in Motion [Animal and Creature Animation - Unit08]
Animate a Dinosaur in Motion
12/03/24

Introduction
I absolutely love dinosaurs so I was pretty excited to explore bringing one to life! One of the key differences here was going to be the fact that this dinosaur will be walking on two legs rather than one. This should in theory make the process of animating easier as there is less foot placements in relation to each other. One of the key challenges was going to be the fact that there will be no existing reference, therefore, we will be relying on the closest living relative which would be large flightless birds such as ostriches. I would also be able to research from films, however, this is not actual reference and instead is another creative’s interpretation. In this case I think it would be good to study the work of others to try and understand how they have interpreted the motion and then I can compare this to the real life reference of large flightless birds.
Project Management
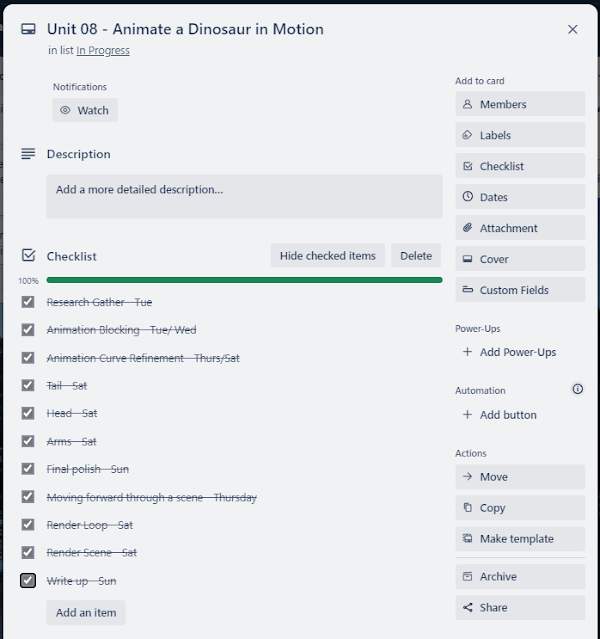
I updated my Kanban board to reflect my current tasks and keep myself organised throughout the week. I’ve created a card for this week’s task including a checklist that is also shown below. I also added a task card for rendering the raven scene I’d produced to raise the quality of my portfolio in general. I probably should also add a task for re-rendering the horse rearing scene as I wasn’t happy with the static camera and the colour was also a little tricky to balance.

I broke the checklist down into core tasks and assigned days to these to understand how the tasks would be spread across the week. I was slightly behind as I’d used the full Monday of this week to focus on finishing the horse rearing animation, however, I had the following weekend free so this allowed enough time to dedicate to this task across the week. I didn’t feel particularly pressured at this point so on the whole I feel on track and this organisation helps me to see how I’m going to achieve the task.

Rig Acquisition
Firstly I wanted to make sure that I had a suitable rig that was useable and didn’t have any performance issues. I sourced the ‘dinoRig v2.0’ by Harry Gladwin-Geoghegan through the rigs the University provided especially as the High End 3D website was still down. I played around with the rig to test the controllers and understand how it worked and was happy enough with the viability of this rig.

I did really like the look of the below rig as it looked a little mean and evil, which I quite liked. I also felt the texturing and overall finish was a lot higher quality and more appealing than the previous one, however, there was a cost to this rig. Since I was focusing on animation and movement the overall visual quality of the texturing and such was less important so I decided to move forward with Harry’s rig, which was still perfectly good! I did want to save this alternative rig for later in case I wanted to use it for a future animation (Truong, no date) . I wanted my blog to be a reflective experience of my journey through mastering animation so that I could look back on the skills I learnt and workflows I followed, therefore saving this rig could be useful for future-Matt!

Research and Reference
Next I wanted to gather and study a range of reference that would be useful in supporting my practical development with bringing this dinosaur to life. I started by analysing large, flightless birds, starting specifically with ostriches as these are likely to have a similar locomotion to what raptors would have had.
The below video Ostrich walking in Serengeti National Park, Tanzania (2015) was particularly useful for a number of reasons. Firstly the camera angle was good. We have a side on camera angle with the subject clearly in frame for the full duration. You can see how the bird places its feet as it traverses the ground. It lifts its leg up with its foot rolling back slightly before rotating forward as it is about to plant. You can see the offset rotation in the body as it rotates forward and backward slightly with each foot placement. You can then see further offset overlapping action on the neck and tail as these rotate and react to the placement of the feet and transfer of weight.
One key difference I thought the raptor might have is that it might be heavier than the ostrich and therefore have a greater amount of force coming down. I did a little research on this and actually found out that they might be similar! National Geographic shows Ostriches are around 220 - 350 pounds (National Geographic Kids, 2020) and then it goes on to show that velociraptors are around 100 pounds (McKeever, 2020) , which is very surprising! In my animation, which will be slight cartoon-ified, I do plan to exaggerate it to make the raptor look a little larger and heavier - something perhaps in between a raptor and a T-Rex as I feel this will make a more engaging and fierce loop that will suit the model well.
The below video Ostrich Gives the Performance of His Life | The Mating Game | BBC Earth (2021) was really interesting as it showed a range of ostrich behavior, which I thought could be useful when developing a performance animation or understanding small quirks about how it moved. I particularly liked the way it raised its body and head high as it moved when it was very alert or interested in something. This would translate well to the raptor as i could mimic poses seen in this. There was also a myriad of other small head quirk as the ostrich looks around and takes in it’s surroundings through small head jerks that could again be useful sources of inspiration.
The below video Ostrich Walking (2020) I found useful as it was again another clearly shot video from a side angle, however, in this walk the bird was looking around as if to investigate its surroundings. This was interesting as you could again see the subtle head motions and jerks as it moved around. It also changed direction slightly so you can see how it places its feet and body when it does this. Lastly, this is slower than the first video I found which showed different timing and how the ostrich moved at a slower pace.
Next I came across a related video showing an emu walking (Old Man Emu Walking, 2015). I really loved the slow, controlled and determined walk. This was interesting as the bird had a much smaller neck and was more comparable to the dinosaur rig than the ostrich’s long gangly neck. This was important as I felt the ostrich neck moved in quite a unique way that wasn’t as applicable to the raptor. Therefore this video showed me how the neck and head might move more clearly than the ostrich would.
Finally I came across some Cassowary reference (Cassowary walking on a beach, 2020) - a bird I had never heard of! However, this bird even looks a little more dinosaur like than an ostrich in its head. This reference had good timing to it with another slow but determined walk that felt a little bit more mean and predatory than the ostrich reference did.
I also wanted to explore some reference from films to look at how other creatives brought these creatures to life. I was particularly interested in how they posed the arms as this was something I’m not as easily able to see in real life reference of flightless birds as their anatomy is different.
I started with the classic scene in the kitchen from Jurassic Park 1 where the raptors are searching for the children in the kitchen (Jurassic Park (1993) - Raptors in the Kitchen Scene | Movieclips, 2022). This is. An iconic scene and it’s interesting to look at the motion, however, it probably isn’t the best reference as we are using more cinematic camera angles rather than clear ones that I have found above. It also is using a lot of animatronic models which is a little limited in terms of getting the most realistic footage. None-the-less, it is interesting to see how these were brought to life and I’d planned to look at increasingly more modern Jurassic Park films to see how the quality of their motion changed over time.
I looked next at Jurassic Park 3 as it was the end of the original trilogy and appears to use a combination of animatronic and CGI raptors. I found this clip montage (Jurassic Park 3 [2001]: Velociraptors Screen-Time, 2020) that had all the velociraptor scenes in which enabled me to look at the interpretation of their behavior. At around 55 seconds in you can see a great example of bouncy stylisation of the trot forward. I found this really interesting as the raptor felt loose and flexible with tones of energy in it - something I wanted to incorporate into my animation. At around 1:05 you can see a strong stride in the raptor’s walk and the thighs show how exaggerated the down motion on the body is. I really like this as it makes the raptor look strong and heavy; a force to be reckoned with! There are also other examples of interpretation of raptor behavior here in their facial expressions and movements through the scene. It also shows the pack mentality and co-ordination that the creatives have explore which is very interesting.
Lastly, I looked at the iconic raptor scene in the first Jurassic World film (Jurassic World (2015) - Stand Down Scene (1/10) | Movieclips, 2022). There are some beautifully clear shots of these raptors and an extremely interesting behaviour and personality that has been captured by the creatives. I love the interest and movement in the tails here and how flexible these look as they swish around. I imagine they would have been inspired by Komodo dragons or other lizard in addition to other tailed creatures to inspire this motion. There is also some fierce and intimidated walk cycles shown here as the raptors move around feeling strong and heavy - again this is something I’d like to take inspiration from in my animation.
Off the back of my speculation around how they might have gained inspiration for the tails I started researching Komodo dragons to see if I could find any good reference of their tail. I actually came across the below video of a Monitor Lizard that shows some extraordinary flexibility in its tail as it whips a predator (Leopard Cub Gets Slapped Around by Lizard, 2018). I felt this was useful as it showed the flexibility and dexterity of lizard tails which I could use as inspiration for my animation.
Next I thought I’d see if Edweard Muybridge had any studies of large flightless birds and lo and behold I found a study he had done of ostrich locomotion (Muybridge, 1887). This as always is incredibly useful as it provides me with a strong analysis of the poses this creature takes when it walks and from multiple angles. I particularly liked the rotation and sway in the body as it walks through the scene, I thought I’d be able to take this to get the raptor feeling nice and loose. These thumbnails would absolutely be useful when I come to posing my character.

Furthermore, I found 2 videos of somebody who had taken Muybridge’s photos and turned them into an animation. I’ve included 2 as the first (muybridge ostrich animation, 2013) shows a nice simple loop of the side on perspective, however, the second (1887 - Ostrich Walking - Eadweard Muybridge, 2022) also includes the front perspective. The second video does have some annoying useless content at the beginning. This is useful as it helps to visualise this broken down motion further from these almost orthographic perspectives which will be useful when posing the character from these perspectives.
Next I thought it would be good to take a little look at raptor skeletons as although we cannot get any real video reference of raptors we can study their skeletons to understand how they might have moved. You can see the key rotation points of the bones to understand this underlying structure. You can see the vast amount of joints in the tail to allow the flexibility I was studying earlier. It also shows the structure and length of the neck which is useful. Lastly, the posing and bone placement of the arms is useful to understand how these might have been held when the raptor was moving (Batycka, 2022).

I grabbed the thumbnail’s from Alex William’s theory lecturers for the 32 frame walk cycle. These were good to see, however, I felt weren’t as useful as drawings of any of the other references I had sourced already. It was, however, good to see the key poses and names of poses that would be needed to support me in creating the key poses - even if I didn’t use these as a base.

It was mentioned that as these are bipeds then we can actually use human walk cycle theory to further understand the key poses so I opened up my copy of the ‘Animator’s Survival Kit’ (Williams, 2009). This page shows natural core theory of a realistic walk, something that would need to be exaggerated in animation to look more appealing. This is useful as I can use this to understand the key poses that the raptor’s feet would take throughout the steps, however, I would obviously need to pose the body differently as they are drastically different.

This was interesting as it showed women and men having different foot placement. Looking at my reference videos and imagery, you can see that the ostrich walk is actually a little closer to the women’s walk with the feet closer together. This is something I could take inspiration from, however, I might want to keep them a little wider as I want to get that heavy strength and weight in my walk cycle. (Williams, 2009)

These next pages were incredibly useful to pick out the core theory of the poses in the step. The contact, down, passing up and Contact poses that are then repeated for the other leg. It also shows the theory of timing in the tempo of the walk. It says that people walk on 12s, half a second per step, however, also explores that its difficult to divide up so they use a key pose every 3 frames which means the character could take a step on 16s or 8s if the poses are 2 frames apart. This shows that this is easier to do so that the spacing is more uniform as the bottom images show. This is the theory that Alex is using in the theory lecturers with exploring that this is a 32 frame walk cycle with 16 frames for each step. (Williams, 2009)

At this point I felt like I had sufficiently developed my knowledge and gained enough reference material to support me through animating. Through exploring the theory of timing and spacing of poses from the ‘Animator’s Survival Kit’ it was a real lightbulb moment for me in understanding why different speeds of walks, jogs and runs were done. I was super excited to put all this theory and learning into practise and bring to life my raptor walk that included that heavy, strong and determined walk with a good degree of flexibility for this carnivore.
Animation
I started off by animating the hips to start getting the weight feeling heavy for this creature. You can see how I achieved this through the graph editor to create a little bit of a hang in the translate Y so that the downward motion of the hips is faster as the steep curve shows. This should give it that feeling of weight.

I paid close attention to the Z translation on the feet to prevent foot slide. I’d learnt this on an earlier animation and if I could get this right early on then the rest of the animation would be much easier. You can see the long, linear and consistent movement as the foot is passing underneath the body which makes the movement of the foot consistent and therefore, when I animate the master control moving forward then it will keep the foot securely planted on the ground. I added a slight ease in and ease out on the motion as it leaves the ground and is about to be planted which will help create a bit of an arc to the foot as well as soft the motion through the acceleration and deceleration.

Below shows the Y translation on the feet. I’ve allowed an ease in as the foot raises; a small ‘hang’ in the air as it passes across to create an arc and finally a sharp snap down to securely plant the foot. I achieved this through breaking the tangents of the curves so that I could create a downward motion that increased in speed as it went down and removed the ease out from the landing so that the plant of the foot felt snappy and less floaty.

I was actually really smart on this animation and mirrored the similar values from the core poses to each foot to make the posing easier and more consistent across the animation. Whilst i used this method I didn’t make the values completely identical as it may have looked a little too robotic. This process did increase my speed and I was able to quickly create the core motion of the foot. I was essentially animating through the graph editor which resulted in high quality animation quickly.
The below playblast show the results of animating the legs and hips from two different camera angles. The animation was feeling good, I particularly liked the hip motion - it felt heavy which was my goal. It also made this walk look very strong and predatory which was another element I wanted to achieve in my animation. The leg motion was looking really good too with clear and consistent motion of this walk on the spot. The legs pass backwards consistently and this is going to look great when I animate this moving forward because the feet should easily stay planted on the ground.
The below playblasts show further developments to block out the full motion of this loop cycle. I’ve focused on two main aspects, the neck and head and the tail. The neck and head are offset from the main body to create overlapping action. The head is actually offset significantly so that I can maintain the head looking forward so that it is focused. I experimented with a range of offset options and the playblasts below show the one I was happiest with. In this one I have some slight rotation, however, it maintains that focused forward look as if it has a clear target it is heading towards.
The tail I’ve created some initial up and down rotation so that offsets the main body. To strengthen the overlapping action I’ve also offset each of the control curves on the tail by one frame from one another to get the overlapped rotation to show flexibility. This is looking good, however, I want to also add a bit of swish to the tail through rotating it left and right as well. When that rotation is offset it should have a nice ‘figure of eight’ style overlapped action which should be really appealing and show the flexibility of the tail.
13/03/24
The below image shows the overlapping action on the tail through the offsetting of frames from each controller. I’ve also added the side to side rotation and increased the values ever so slightly as it gets towards the tip of the tail where it would be more flexible. This creates some really interesting motion that looks really appealing and if I pair with some hip rotation in the same axis I should get some fluid and flexible motion happening.

The below playblasts show the final developments to this animation loop from the side view, perspective view and a turn around too. You can now see the arced swish on the tail that I’m really happy with! It adds a lot of character and accentuates the force and power that this creature exerts as it walks. It also helps add to the flexibility of this carnivore which is true to the theory that I’ve studied.
To build on this I’ve added rotation to the hips and counter rotation to the chest to create more flexibility and overlapping actions. I’ve also added some sideways translation to the hips so that the raptor is leaning into the strides it takes, which I feel adds a lot more power and force to the animation. I’ve also added counter sideways translation to the chest, as I did with the rotation, to centre the body mass and create overlapping action. I feel this is looking great as the body is now even more flexible as I noticed the creatives from the Jurassic Park/World films.
The arms were really tricky I wasn’t quite sure how to pose and animate these as they are very different to a human who would swing them in an offset fashion to the legs but also there is not really a similar animal with a similar body part that I could use. I looked back at the reference from the Jurassic films to get a little bit of understanding for how they were posed and I noticed that they would either hang straight down or sort of fold up towards the body. I tried both options but it looked a little silly when I posed them straight down, I think this is because the arms on this rig were smaller than those of the raptors in Jurassic World, therefore, it looked better when I posed them folded up. I added some subtle rotation offset from the main body but also added a slight jolt as the foot plants. I experimented a lot with the amount of rotation and played around with more subtle and more exaggerated motion until I found a middle ground I was happy with. Overall I feel this looks good, particularly because when I swung the arms more wildly it looked a little silly. This more subtle jerk on the arms helps accentuate the force of the steps.
To build on the overlapping action I’ve also offset the toes by 1 frame from one another and the toe roll controls. This makes the foot look a lot more flexible and believable as it slowly leaves the ground and spread out as they land. It looked okay before this but I always felt it looked a bit stiff and as soon as I added this offset it removed that stiffness and significantly raised the quality. I’ve also added some subtle animation to the face through the jaw, nostrils and blinking of the eyelids. I timed these actions so that they occur after it places a foot. The jaw motion is very subtle but it opens and shuts as if the force of the step has caused it. This helps the animation again feel a little looser and flexible whilst also acting as a small secondary action.
Overall I’m really happy with the progress of this animation there is a lot of power and flexibility that give this carnivorous raptor a lot of character. There is a sense of ownership and superiority in the walk that exudes power and confidence. I have noticed that the body raises up fast like it comes down and this is something I think I could smooth out so that it is more gradual as it eases into and out of its raise, this hopefully then would add greater contrast to the downward motion which should again add more weight to the movement.
Environment
I wanted to put this character into a scene to create a small performance and contextualise the animation further. I started looking for city scenes but I couldn’t really find anything free that was useful. I then thought about perhaps a desert scene and came across these desert rocks from YadroGames (2021). These were absolutely gorgeous and I loved how they were modular which made me realise I could construct my own desert scene out of different assets.

Rocks by YadroGames (2021)
It made sense to find some cacti next - every desert needs cactus’s right?! Especially ones in animated sequences! I came across these assets from Parelaxel (2021) that seemed perfect! There were some more rocks too but I wouldn’t need these as they might clash with the style of the other rocks I had. The taller cacti had transparency maps on them - something I’ve not managed to get rendering properly in Maya Arnold, however, was something I wanted to look into. Despite this there were enough other cacti without transparency maps that I could use anyways!

Cactus by Parelaxel (2021)
Next I needed a ground surface and I began looking for seamless textures so that I could map it onto a simple flat plane. I found this seamless texture (Free 24+ seamless sand texture designs in PSD: Vector EPS, no date) that seemed to suit the overall style of the animation well. I would need to look into how to repeat this in Maya, however, I’m sure that wouldn’t be too challenging! I liked that this didn’t have too much major detail to it meaning that it would tile well and not be too overpowering.

I’d made a significant amount of progress in the past few days and was actually way ahead of schedule. Below shows that I’ve ticked off all major tasks including stuff that I had planned to do at the weekend. This was particularly good as I needed to work late on Thursday and I had a social event on Friday and being ahead of schedule meant I had the weekend to focus on rendering and presenting this project now that the animation was done. It felt good being on track whilst still achieving high quality outcomes. I’d focus on creating and rendering the scene on Saturday and depending on the length of the render of this I’d then work on rendering the loops for my showreel.

16/03/24
I first wanted to work on improving the hips Y translation when going up to smooth the upward motion to help create greater contrast on the downward drop. The upward motion would ease in as the dinosaur was forcing its weight upward and then slow down as it reached the up pose to reflect the forces of gravity. It then would shift downward to show weight. I did this by simply removing the key frames on the upward motion to smooth out the transition and ensure the key frames had flat tangents for the ease in and ease out. This looked significantly better and achieved the contrast that I wanted.

Final Loop Playblasts
Here are my final playblasts that show these final improvements. As I explained in the last paragraph I feel this is looking much stronger and more believable as the dinosaur forces its weight upward. This is much more natural and closer to realistic physics so I was happy I made these final improvements before moving onto the scene animation.
Scene Construction
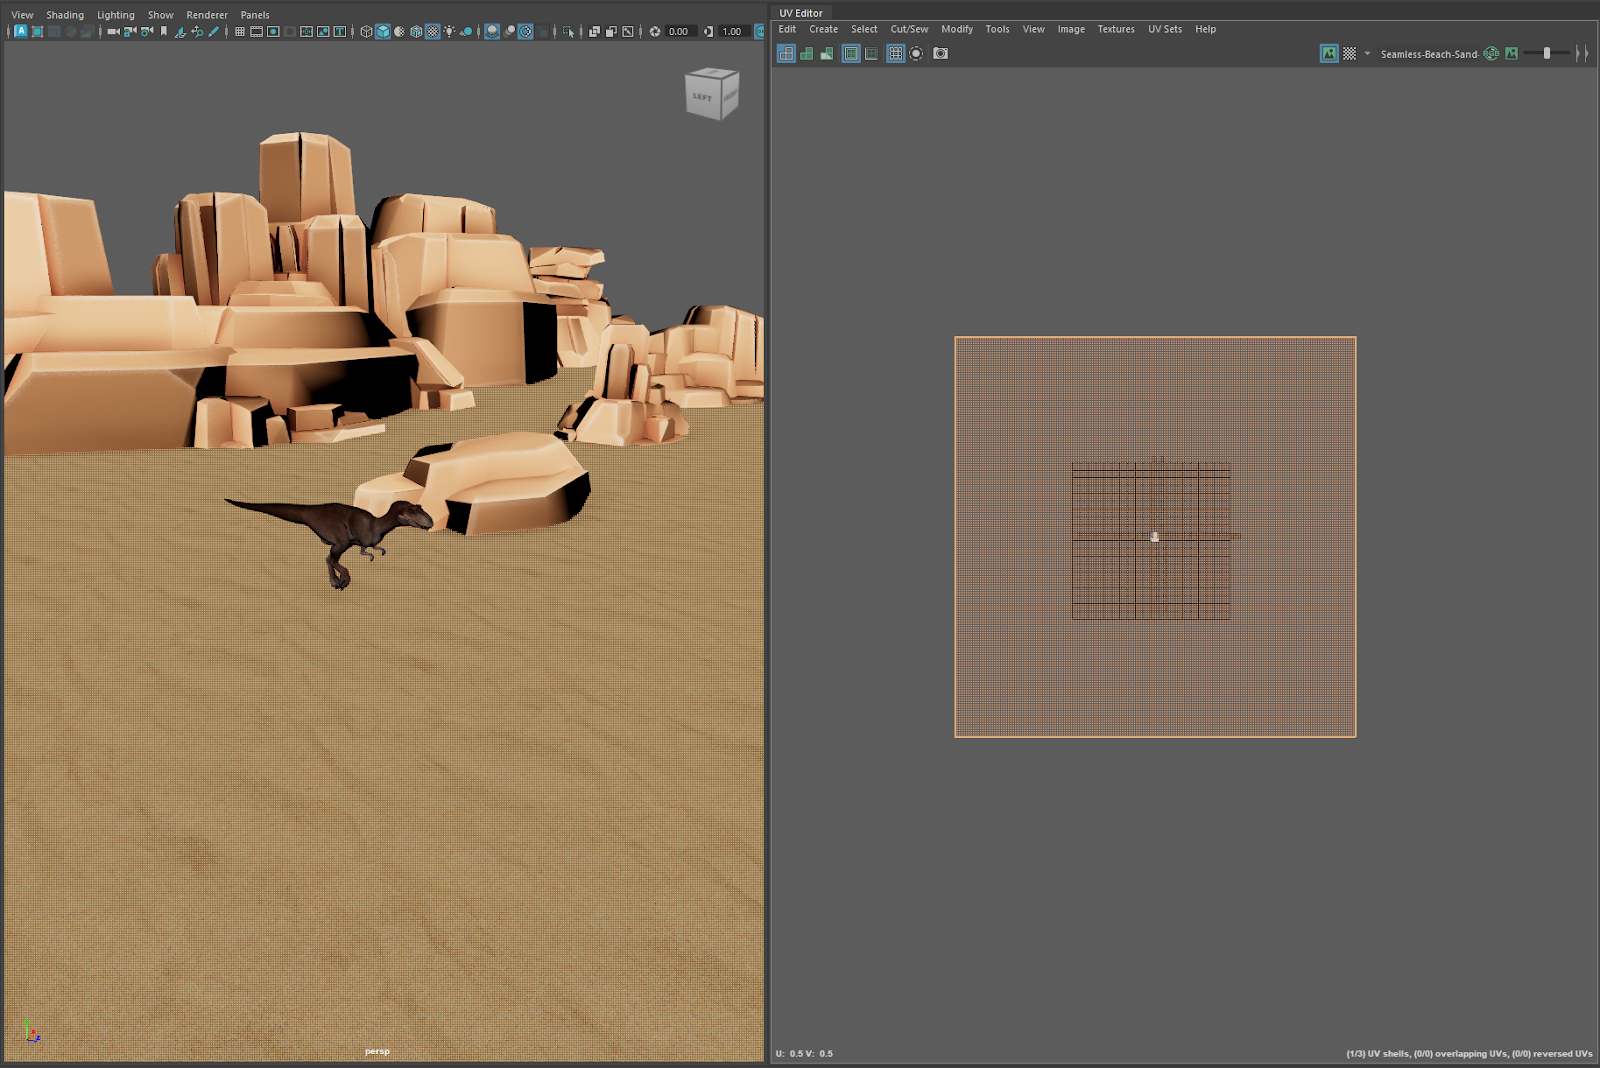
I started constructing the scene using the assets I gathered earlier. Below shows how I created the ground plane through UV mapping the seamless texture to a polygon plane. To repeat the texture I had a look through the settings but couldn’t see anything around tiling or repetition so I simply scaled the UV shell upwards which naturally makes the texture repeat. This feels a little dirt and like there must be another way, however, this was easy and it works so I was happy enough for that! If this asset was destined for a game engine rather than a rendered animation I would have pursued this further.
Instead of constructing the scene and then placing the animation, I thought I’d create the animation over a 10 second duration and then build the scene around the space that this walk takes place. I used this sneaky technique to ensure the foot placement was perfect. I essentially placed a cube and used it as a point of reference, I did this as my grid was really small and hard to see. I could have looked for the setting to adjust the grid but to be honest this was much easier. Once I’d placed the marker I could then animate the master controller so that the foot stays in the same place as it is taking its step. I can then go into the graph editor and use the cycle and offset function on the infinity curves to extend this motion across the full animation. The foot lock was absolutely perfect and stayed firmly in place across the full animation!

Now that I had the walking animation I started to move, scale and rotate the rocks around to create the scene. The second image shows the camera angle and I made sure to use this as a point of reference when creating the scene to ensure that the composition felt good.


I scattered assets around to try and make this scene feel natural and believable. I experimented with distance of assets to the camera lens to help create depth in addition to items far away to vary the horizon. I’m also skillfully using the rocks to hide the horizon line so that you don’t see the end of the ground plane. I was happy with the composition on the whole it felt well balanced and not too busy. The cacti were really good at breaking up the very orange colour palette of all assets and added some nice vibrant pops of colour.
The above playblast shows the motion on the camera to help make this scene feel alive. I really love how the foreground elements pass along the camera to create that sense of depth. I’m also using the rule of thirds to have the majority of the action happening on the right side of the screen, an area where the eye will naturally be drawn too. I’m the whole I was happy with this but wanted to make a few tweaks to some of the scene elements so that the horizon line is more varied - in particular the background rocks on the right hand side are getting a bit lost so I wanted to vary the heights of these. Perhaps I could also experiment with some depth of field to draw more focus to the main subject and further improve the quality of depth in the scene.
I also wanted to add a little bit of camera shake to the scene to make it even more engaging and further exaggerate the force and weight of this creature. I had the idea that if I made the camera shake more as it got closer to the camera and then fade off as it moved further away. You can see this in my graph editor below where I’ve reduced and exaggerated the curves over time so that it isn’t completely identical and hopefully more realistic! I also needed to make sure that it was subtle enough as to not make the audience feel motion sick!
I actually used animation layers for this. So my base animation layer is the core path of the camera and then I’ve created the camera shake on a new layer. This means that if I wanted to I can alter the path of the camera and these shake frames aren’t interfering with that main path. This is a really powerful technique and gives the animator a lot more flexibility to alter their animations.

The below playblast show the results of the camera shake. I feel it adds a lot to scene whereas before it felt a little dull but this adds more energy and force to add further appeal to this creature’s motion. I really like the way it ramps up over time, however, at no point does it feel too exaggerated that you lose focus on the main animation. I’m really happy with the overall quality of this animation, the scene and camera animation really raise the quality bar and I’m looking forward to lighting and rendering this to achieve a high quality animation sequence.
Rendering
In this animation I thought I’d try a physical sky rather than a skydome and see what to the quality of the render it would give. I also needed a light in the scene to start testing the depth of field. The challenge I always faced with depth of field was estimating the correct distance and size of the area in focus. I did a little bit of research and found the below video super useful (Maya: Focus Change [Depth of Field], 2022).
This showed me that you can use ‘Display > Heads Up Display > Object Information’ to show the exact distance of an object to the camera, which is incredibly useful (Maya: Focus Change [Depth of Field], 2022). The challenge here was that the subject was moving and the distance varied greatly, however, I remembered that you can animate almost any value in Maya so I found the start distance from camera and the end one and then animated this value on the camera so that the dinosaur would always be in focus. I also learnt that you needed to use the Arnold depth of field rather than the standard camera one which was good to know!

I rendered the image below and was really happy with the quality of finished render. This looked much stronger than all other renders I’d done and I kind of want to go back and re-render all the animations using this light instead of the skydome. The shadows have a slight blue tint to them making them feel cool and the lighting itself I’ve made ever so slightly warm.

The way that adds a realistic sky colour to the scene is really nice with a slight gradient towards the horizon, however, what is really nice about the colour set up here is that I have lots of complimentary colours happening which ensure that all elements stand out and are clear. This was actually used extensively in the film Made Max : Fury Road accessed via the article Mad max fury road the path to high dynamic range action (2020) where you have this beautiful blue and orange complementary colour theory occurring which looks stunning as seen below. I was heavily inspired why this colour theory when creating the renders for my scene!

This render of my scene took 2:12 to render a single frame. I did some quick mathematics to first convert the time to seconds : 132. Multiply 132 by the total number of frames which is 240. This gives us 31680 seconds and If I divide 31680 by 60 I get 528 minutes which is roughly 8.8 hours. Quite a long time, however, I feel it will be worth it due to the quality of the images I achieved in my test renders. I can't wait to see it all together as a movie. I did a few more test renders at various points to ensure there weren’t any errors as it would be unlikely that I would have any time to re-render this scene!
After I rendered the scene I rendered the loops in isolation for my showreel from the front, side, rear and perspective angles that just focused on the loop itself. I’m using a aiShadowMatte material to create an infinite like background as I did with the other animations - you can see in the render below the render of the dinosaur and the shadow with the transparent background, making it easy for me to composite the loops together. You can see my standard 3 point lighting set up. I'm using the Arnold Physical Sky light as the key light; a directional light pointing upwards to lighten up the bounced light and finally a rim light to catch the edge in places. I will rotate this rim light from the different angles so that it always catches the outlines.


Final Outcomes
Conclusion
I am extremely happy with this animation, I feel the quality of the animation is really high in addition to the render quality looking absolutely beautiful. I wish I’d experimented with rendering earlier in this module, however, my other renders aren’t bad just this one feels a lot higher quality! I love the range of flexibility that I’ve achieved throughout the rig - particularly how the tail circles in an offset and overlapped action from the main body. I also love the feeling of weight and strength throughout the motion - the way this creature shifts its weight from foot to foot feels believable and heavy, whilst being flexible enough to show that this is a predator.
It was super fun to explore animating creatures like this that I do really love. It was also a lot easier than a quadruped - having just two feet hitting the ground makes it a lot simpler and reinforces the opinion that quadrupeds generally take more time to animate than biped. However, I feel as my animation skills have improved over this module I have become more confident and faster at creating higher quality animations more efficiently which is the ultimate goal of studying a masters; to master the art!
- Studied a range of reference materials to understand the locomotion of creatures similar to this dinosaur in addition to looking at footage from other creatives that have interpreted real life reference to bring life to raptors. This in depth study of reference has enabled me to build a strong knowledge based of relevant theory but also inspired me creatively for how I want to bring my rig to life.
- I’ve used the dinosaur rig extensively to animate all aspects of the rig to create realistic and engaging motions. I’ve animated all major elements in addition to more subtle aspects such as toes and facial features.
- I’ve used a range of optimised methods to create this animation including extensive work in the graph editor, use of infinity curves and copying and pasting curves and key frames to create engaging animation quickly.
- I’ve completed the hands on tutorial by creating a high quality loop that captures the essence of these ancient creature through the theory I have learnt from studying relevant reference material. I’ve animated the core loop and then placed this in a scene to show a performance sequence.
Learning Objectives:
- Principles of Bipedal Dinosaur Locomotion: Explore the biomechanics that defined the way dinosaurs walked, ran, and roamed their ancient landscapes. Gain insights into the distinctive characteristics that make dinosaur animation a captivating challenge.
- Introduction to the Dino Rig: Familiarise yourself with the Dino Rig, a freeware resource designed to empower animators in creating realistic dinosaur movements. Learn the ropes of downloading, navigating, and maximizing the features and controls of this versatile rig.
- Optimizing Animation Workflow: Master the fundamentals of animation workflow tailored to bipedal dinosaurs. From understanding weight distribution to mimicking lifelike gestures, discover techniques that elevate your animation projects to cinematic levels.
- Hands-on Tutorial – Dinosaur Animation: A practical tutorial that guides you through the process of animating a bipedal dinosaur in motion. Use the Dino Rig to bring your dinosaur to life, focusing on key movements and gestures that capture the essence of these ancient creatures.
Project Management Update
I have now completed this weeks task and am ready to start the next one. I am well on track and am likely to get a little bit of down time this weekend too which will be good! Sunday I do have a little bit of freelance work to do, however, I’m hoping to watch the new Dune film. I loved the first film and its a great way to study animation but also shot composition to help build my ideas and creativity. Although incredibly fun and engaging, it does feel like I don’t stop working at the moment so it is important to take some time out from a well being perspective too. The upcoming break will also help with this.
During this week there has also been a lot of updates from the tutors and there are now finally assignments with briefs and deadline dates available. I was a little confused as the submission was asking for a 5 to 11 second video showing the loops and an element of performance, which seems almost impossible if it is a single 5 to 11 second video. I could understand this if it was the a 5 to 11 second animation showing the performance aspect of a creature using the knowledge I had learnt from this module. However, as there are 12 tasks and loops in total and most loops are 1 second long this would mean if I played every loop once then the video would be 12 second long and not include the performance element. This is also confusing as generally you would repeat each loop a few times to make it easier to understand and review quality. I’ve asked the module leader about this and he has informed me that he has an answer and will post this to the virtual learning environment, so I will wait to see what happens there!
It would make sense to use all this knowledge I’ve learnt to drive a more complex sequence therefore, I plan on adding a task card to create this high quality performance sequence and I could potentially use some of the time in the Easter break to create this animation. I would be tempted to do this with the dinosaur, partly because I love dinosaurs and partly because the biped is simpler to animate therefore I could create a short performance more efficiently. I would be tempted to explore the use of the other rig too so that I am varying my experience of different character rigs. I also could maybe broaden my search of reference into different flightless birds and lizards to inspire my animation which would be a fun challenge!
It would make sense to use all this knowledge I’ve learnt to drive a more complex sequence therefore, I plan on adding a task card to create this high quality performance sequence and I could potentially use some of the time in the Easter break to create this animation. I would be tempted to do this with the dinosaur, partly because I love dinosaurs and partly because the biped is simpler to animate therefore I could create a short performance more efficiently. I would be tempted to explore the use of the other rig too so that I am varying my experience of different character rigs. I also could maybe broaden my search of reference into different flightless birds and lizards to inspire my animation which would be a fun challenge!
I was happy with the quality of my blog as I felt I was sharing my journey well, however, I hadn’t properly referenced everything yet so I created a task card for myself to ensure that I go back through and properly reference all research that I am using. This would essentially act as a polish pass for the quality of my blog and was something I’d easily be able to do.

Reference List
- 1887 - Ostrich Walking - Eadweard Muybridge (2022) YouTube video, added by Cinema in Public Domain [Online]. https://www.youtube.com/watch?v=yUestAH4Ju8 [Accessed 29 March 2024].
- Batycka, D. (2022) A Rare Skeleton of the Raptor That Inspired the Villains of ‘Jurassic Park’ Is the Star of Christie’s 20th Century Art Evening Sale. Available at: https://news.artnet.com/market/raptor-fossil-christies-6-million-2107552 (Accessed: Day Month Year).
- Cassowary walking on a beach (2020) YouTube video, added by NatureFootage [Online]. https://www.youtube.com/watch?v=sSJShaJLXJk [Accessed 29 March 2024].
- Free 24+ seamless sand texture designs in PSD: Vector EPS (no date) freecreatives.com. Available at: https://www.freecreatives.com/textures/seamless-sand-texture.html (Accessed: 29 March 2024).
- Jurassic Park (1993) - Raptors in the Kitchen Scene | Movieclips (2022) YouTube video, added by Movieclips [Online]. https://www.youtube.com/watch?v=IEGQfrpnjWk [Accessed 29 March 2024].
- Jurassic Park 3 [2001]: Velociraptors Screen-Time (2020) YouTube video, added by Dead channel [Online]. https://www.youtube.com/watch?v=zKJ6O5ZCGEk [Accessed 29 March 2024].
- Jurassic World (2015) - Stand Down Scene (1/10) | Movieclips (2022) YouTube video, added by Movieclips [Online]. https://www.youtube.com/watch?v=Q3znhTOUqi8 [Accessed 29 March 2024].
- Leopard Cub Gets Slapped Around by Lizard (2018) YouTube video, added by Latest Sightings [Online]. https://www.youtube.com/watch?v=BZ3C7srOMyc [Accessed 29 March 2024].
- Mad max fury road the path to high dynamic range action (2020) BenQ. Available at: https://www.benq.com/en-sg/knowledge-center/knowledge/mad-max-fury-road-the-path-to-high-dynamic-range-action.html (Accessed: 29 March 2024).
- Maya: Focus Change [Depth of Field] (2022) YouTube video, added by Uhr [Online]. https://www.youtube.com/watch?v=bsXXvtFzqm0 [Accessed 29 March 2024].
- McKeever, A. (2020) Why Velociraptors are among the most misunderstood dinosaurs. Available at: https://www.nationalgeographic.com/science/article/velociraptor [Accessed 29 March 2024].
- muybridge ostrich animation (2013) YouTube video, added by Andrew G [Online]. https://www.youtube.com/watch?v=y7LO9VzMwPQ [Accessed 29 March 2024].
- Muybridge, E. (1887) Ostrich walking, [Online]. https://www.nga.gov/collection/art-object-page.167146.html/ [Accessed 28 March 2024].
- National Geographic Kids (2020) Ostrich. Available at: https://kids.nationalgeographic.com/animals/birds/facts/ostrich [Accessed 29 March 2024].
- Old Man Emu Walking (2015) YouTube video, added by Cycling Tasmania [Online]. https://www.youtube.com/watch?v=cJPNiXOV2XE [Accessed 29 March 2024].
- Ostrich Gives the Performance of His Life | The Mating Game | BBC Earth (2021) YouTube video, added by BBC Earth [Online]. https://www.youtube.com/watch?v=xVBqSJmHajg [Accessed 29 March 2024].
- Ostrich Walking (2020) YouTube video, added by Hogle Zoo [Online]. https://www.youtube.com/watch?v=djc2xTjAxMI [Accessed 29 March 2024].
- Ostrich walking in Serengeti National Park, Tanzania (2015) YouTube video, added by Tom Mazur [Online]. https://www.youtube.com/watch?v=KzjorJfvF4U [Accessed 29 March 2024].
- Parelaxel (2021) TV-World: Desert Rocks & Cacti, June 9th [Sketchfab]. Available at https://sketchfab.com/3d-models/tv-world-desert-rocks-cacti-925d73037f56443e9e521ed90efd4fa8 [Accessed 29 March 2024].
- Truong, C. (no date) Irex Dinosaur Maya Rig, no date [Gumroad]. Available at https://truongcgartist.gumroad.com/l/irexrig [Accessed 29 March 2024].
- Williams, R. (2009) The animator’s survival kit. London: Faber and Faber.
- YadroGames (2021) Desert | Rock | (FIXED) Pack, December 21st [Sketchfab]. Available at https://sketchfab.com/3d-models/desert-rock-fixed-pack-00c4468f1bca48509d7d2bd66b564cbc [Accessed 29 March 2024].


