
Quadruped Run/Gallop [Animal and Creature Animation - Unit04]
Horse Gallop
19/02/24

Introduction
It’s the final one in the series - the quadruped gallop (…or run) ! It’s been really interesting to study the differences between all these locomotions and learn about how quadrupeds move. I felt like this one might be a touch easier as I knew the frame length would be less again and there would be less room for the range of different poses. However, on the flip side it potentially could be more challenging as there would be a greater range of motion meaning that ‘popping’ of joints or snappy motions could happen and with such small space in between frames then it might be challenging to create fluid motions. Either way, I was excited to explore a quadruped run and understand the core theory behind the mechanics - building on what I’ve already learnt. I feel I have learnt a lot about quadruped through these 3 animation exercises and it is really building my confidence as an animator where I can get a little bit of imposter syndrome sometimes!From the theory lecturers I’d pick out a few key elements that were different to the previous animation - the trot. Firstly, we now return to the rocker like motion again, similar to the walk, where the hips and chest moving opposite to one another. This means when the hips go down the chest moves up and vice versa. I also studied the core 7 main poses throughout the animation with 1, 7 and 13 being the same and our extreme poses with 3, 5, 9 and 11 being our breakdown poses. I could see that this animation wasn’t going to be as symmetrical as the others meaning that I’d naturally get a bit more overlapping action in the legs and that I might need to experiment with the tangents of the curves to help the in between poses to flow from one to another. Next I picked out the stretching on the main body. Stretching hadn’t been used in any of the other animations, however, due to the force that is being generated here we would start to experiment with some stretching of the main body and squash in the suspension poses as all legs had left the ground. Lastly I looked at the ‘rocker’ like motion of the head and the tail that would be offset and overlapped in motion from the part it was connected to. This gave me a strong base to start my animation and understand how the thumbnails would work with one another.


Learning Outcomes :

As always, I updated my Kanban board to reflect my progress and visualise my tasks. I decided to kill the leopard walk animation task in my backlog. I felt I wouldn’t really gain much from this animation and the rig did seem to be quite glitchy. I feel if I were to animate a full sequence then I’d be able to explore the flexibility of the spine in a carnivore, however, I felt like I was learner a lot about quadruped locomotion through the deep analysis of horses that I was doing. Therefore, I felt like I was progressing my skills and knowledge sufficiently enough to kill this task. I am now at the point where I am completely in sync with the tasks that are being released weekly online which is incredibly satisfying, however, I am anticipating another task to be added today. However, as this is my week off work I am hoping to be able to wrap up this run today including the write up and then move onto the next practical task over the next 3 days. The last few weeks have felt pretty tough feeling so far behind, however, being at the point where I am up to date brings a lot of calm to myself - especially with juggling this course, my job and freelance work!
Preproduction and Research
I started as I started all my previous animations, by sourcing relevant reference material that would support me through the process. Starting with the thumbnails from the theory lectures provided (Quadruped
Locomotion - how a horse runs, 2013), arguably the most important part. These embodied all the theory that had been explored so far and I’d found these thumbnails curated in the lecturers to be the most useful. These would serve as my base to get the animation started and then I could tweak and stylise further once I had the core structure of the run.
The previous lecturers and this one also referenced the ‘Animator’s Survival Kit’ by Williams, R. (2009), however, after studying my copy I was struggling to find the drawings they referenced. After a quick google, I learned that since my edition wasn’t the expanded version it didn’t include these studies which was gutting. I learnt the expanded edition was 40 pages longer than the original and there didn’t seem to be any other way to get these pages. I did a bit more research to find out whether these pages were worth it and everything was indicating that it was. What really sealed the deal for me was a video from Richard Williams on YouTube discussing the book and explained that this was really the ‘post-graduate’ edition - which made me want it even more! I was worried what I would do with my existing edition since I didn’t want to create any waste but wasn’t sure who I’d give it to. Luckily, someone on my estate’s FaceBook page was interested in the book meaning I could give it a new owner!
Below is my image from the expanded edition of the ‘Animator’s Survival Kit’ (Williams, R., 2009) showing the thumbnail analysis of the horse gallop. This was particularly useful as it breaks down the gallop into every single frame, therefore I could compare this to my auto in-between frames that the thumbnails above would omit. This would enable me to study foot placement and ensure that when I edit the curves in the graph editor I could align the curves to help create the poses below. It also clearly highlights the ‘rocker’ motion, which is really useful to understand the movement in the body that I would be animating.
I also reviewed the theory in my copy of 'Timing for Animation' (Whitaker, H. and Halas, J., 1990) . The thumbnails here are particularly strong and include an additional pose compared to those shown in the theory lecturers by Alex. This gives us a slightly more detailed look at the poses required, however, they do largely match those shown in all other theory explored so far. Again it is good to see the foot placement backed up and understand how long the horse should be in suspension for. It also backs up the theory of squash and stretch in the body of a herbivore compared to a carnivore like a cat, with carnivore's spines being more stretchy. I would need to include some stretch in this high energy animation but I would need to balance the amount of exaggeration carefully so that it stayed true to the theory of less flexible spines in a herbivore.
I wanted to revisit the Horses
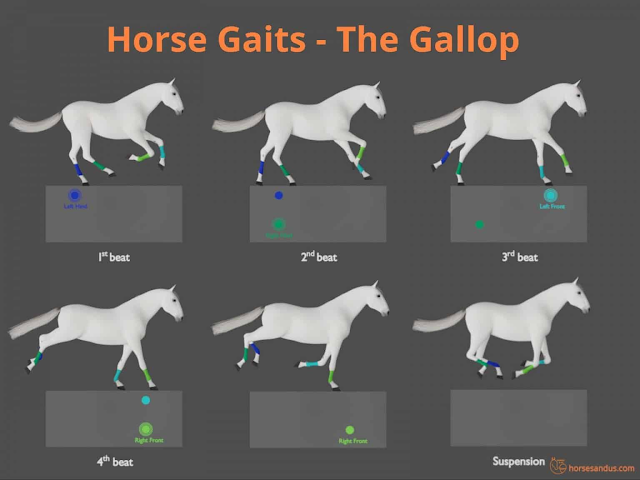
and Us (2021) again as this had been particularly useful in the previous animations. This broke down the foot placement in a really clear way. It showed that you would have a right lead gallop or a left lead gallop - our study was focusing on a left lead gallop which meant that the foot placement order would follow : Right Hind – Left Hind – Right Front – Left Front – Suspension.
The above image ( Horses and Us, 2021) and below video ( HORSE
GAITS PART 04 - GALLOP CYCLE ANALYSIS, 2012) show a breakdown of a right leading gallop and show the pattern of the foot contact poses as I described above. Asked to I experienced on the trot and the walk, I find these foot placement imagery really useful to help clearly visualise how the feet will make contact with the ground and again this pattern is significantly different to the previous two animations. I also thought that here would be more suspension frames for some reason, I suppose because the horse was moving faster, however, this clearly showed how the legs make contact with the ground to propel the body forward.
Another strong piece of information was the comparison between the canter and gallop. This was eluded to in the theory lectures but not really explained, however, the table below (Horses and Us, 2021) clearly breaks down the differences. I was definitely heading towards a gallop, however, I thought that saving this would enable me to return to my analysis and create a canter if I wanted in the future. Paired with the other analysis described above I’d be able to use this in conjunction with my knowledge of quadruped locomotion to create a canter if I needed. However, for now I was going to stick to the learning outcomes and focus on nailing the faster gallop locomotion animation!
The work of Muybridge, E. (1878) is relevant again here, particularly with how readable the poses are through his photography . This provided a further study of the poses the horse would make throughout its gallop, including the in-between poses. It’s a small point but this horse is facing to the right whereas the ‘Animator’s Survival Kit’ (Williams, 2009) example was facing to the left, therefore this should be slightly easier to work with. This one is also silhouetted which makes it even easier to read the key poses and compare to my own animations.
I’d also came across his classic gif showing Muybridge’s work in motion (Muybridge, 1878). What I found really interesting here was the looking at the stretch on the main body occurring as the back legs drove the main mass forward. You can see that as the horse kicks there is a noticeable stretch backward happening before it settles again. It is fairly subtle, however, still noticeable and might need a little bit of careful exaggeration to keep this gallop animation fitting the stylisation I explored in the trot and walk. I also found the head motion really interesting as it rocked in an overlapped motion to the chest. It seems fairly stiff but had significantly more range of motion compared to the trot. This would now work as an easy point of video reference to refer back to when I had my key poses and refined the curves to understand how realistic the in-betweens were.
Now that I had a range of pose analyse from an array of trusted resources, it was time to gather some video reference to study how actual horses gallop. I started with the below video (Thoroughbred Galloping 38 mph., 2015), which was the gallop reference I used as comparison to my trot in the previous video. I felt this was a good place to start as the camera angles were good in a side on fashion making the motion very readable. It also showed an acceleration in speed over time which enabled me to see the horse’s natural progression in poses over increasing speeds. What I really noticed was the faster the speed the almost lower the head went as it was propelling itself forward over time. I also noticed the posing of the tail was much more outright than the trot - if angled downward a little bit.
I found the below video (Galloping Horse in Super Slow Motion., 2009) interesting as it was from a clear side on camera angle and also super slowed down. This helped see the motion and speed of the horses legs more clearly due to the increased frame rate. It also helped me see how the horse would travel forward over time due to the fixed camera angle and horse travelling across the screen horizontally. I thought this would e great to refer back to to compare my poses to as I constructed the animation.
Lastly I found this video (Performing Treadmill Endoscopy at Rood & Riddle Equine Hospital, 2011) showing an equestrian team analysing the motions of a horse moving across multiple speeds using a treadmill. Since I would be animating the loop on the spot I thought this would be useful to study the horses motion and compare to my own loop. It also keeps the horse in place whilst enabling me to see the leg motion opposed to the previous two that were moving forward over time. I felt like I had a good range of varied reference and any more would be overkill. Each reference had its own unique perspective on the gallop which I could use to study the motion. Therefore, it was time to start posing and animating in Maya!
Animation
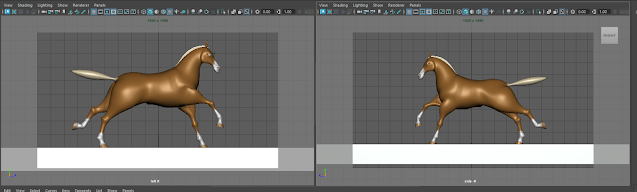
The below images show my initial process of blocking out the key poses. In previous animations I captured playblasts once extremes had been put in, however, in this animation each pose felt integral to the motion so I decided to only capture the playblast at the end of the posing to get a feel for how this animation was progressing. Without the breakdowns the motion wasn't really readable at all so it made sense to gather all the key poses and playblast at this point.
The posing was going smoothly - the range of motion was a lot more extreme than the previous animations and I ran into a few issues, with the front legs in particular, with the pole vectors controlling the knees as well as the upper leg bones. Due to the extreme curling and stretching of joints there were parts where the knee would go further than the pole vector and cause it to invert. This was relatively easy to fix but I had to make sure I was tracking where the pole vectors were and move them in front of the knees. Following on from this, it was similar with the upper leg bones - as I poses the front legs there were points where the upper mesh was looking cramped and creased. To manage this I managed the rotation and translation of this bone and tried to have it flow smoothly, however, there were a few points it was popping. However, as a first pass to block out the key poses it was fine at this point.
Frame 1 (...and 13!) - Extreme key pose; rear right contact; lowest point of the hips and highest point of the chest. :
Frame 7 - Extreme key pose; middle point of the animation; highest point of the hips and lowest point of the chest :
Frame 3 - First breakdown pose, stretched pose as the rear legs drive forward; front left contact :
Frame 5 - Second breakdown pose; front right contact :
Frame 9 - Third breakdown pose; point of suspension with no feet on the ground and in the most compressed / squashed pose of the cycle :
Frame 11 - Rear left contact :
The below playblasts show the motion of the poses above without any tweaks to the curves at all. This was the most logical point to capture progress due to nailing down all the core key poses. I was pretty happy with this already, the leg motion felt like a gallop which was distinctly different to the walk and the trot. I was getting the feeling of the rear legs driving the motion forward and the front legs steering and supporting the main body. I was getting a little bit of popping on the front right shoulder, as discussed a little previously, I planned to review the curves to try and lessen this next. I also don't think I'd exaggerated the stretch on the rear quite as much as I could have. I'd been quite cautious to do this initially as I didn't want it to look too cartoon and not believable as a herbivore but I wasn't getting as much of a read on this stretch happening at this point in time. Even when I compared this to my reference I thought I could push it that little bit further and planned to do this in the graph editor next.
My next step was to run a pass across the whole animation that reviewed the animation curves in the graph editor of the feet, upper leg, hips and chest controllers to ensure that they flowed into one another smoothly but also maintained the readability of the poses I established in the first animation pass. The attention to detail on the animation curves here made a huge impact to the full animation. All motion felt a lot more crisp and natural with increased quality in the arcs and consistency of speed to build a more believable and natural animation.
I exaggerated the stretch on the hips here and now I feel the readability of the stretch is coming through to the animation and helps accentuate the drive the rear legs are providing. It also feels a lot closer to my reference material. I also decided to exaggerate the up and down translate Y motion on the rear so that it had a greater range of motion than the front - this was something I also picked up from my reference. I was really happy with these tweaks to the rear as they added a lot more character and drive to this animation cycle which makes the more appealing to the eye as well as being more natural and closer to the reference.
I was struggling with the right upper leg bone and I still have a little bit of popping on this at this point. The issue was that in order to maintain the straight front leg I had to keep the upper leg bone lower, however, then because there was a sharp change in the posing in a short space of time as this leg left the ground I'd essentially created 2 extremes, however, the way the mesh deformed was exaggerating this further. I'd started to wonder whether it was the overall posing of the chest being too high and wanted to experiment with this next as it could be a potential solution.
I felt the last animation pass had made a huge impact on the fluidity of the overall motion of all parts animated thus far, however, I wanted to review the path of motion the feet were taking. I tend not to use motion path visualisation as I can find them a little glitchy, however, in this case it felt like the best call, particularly with how fast the motion was. Most were not too bad but a few were not taking as much of an arc as I would like so I made some minor tweaks to the motion paths and then adjusted the upper leg bones to ensure that they remained parallel to the lower leg bones. The below images show the rounded off motion paths I edited for the feet.
Rear Right Leg :
Rear Left Leg :
Front Right Leg :
Front Left Leg :
The below two playblasts show the tweaks made from my motion path pass. Again, although subtle there is a more natural and arced motion to the feet that make this more appealing that I was happy with. I was getting an intersection happening with the front right leg and rear right leg that needed to be addressed. These are the two feet that are coming together the closest just due to the order of feet contacting the ground so it was likely to be the most challenging area, particularly as there was a large range of motion of both these limbs. I tweaked the translation positions of both feet until I was happy that they were no longer intersecting although still close enough due to the range of motion.
I also focused a little on the chest translate Y to try and help address the popping on the front right upper leg bone. I made some minor tweaks here, however, it was difficult because if it lower it too much there wasn't enough room for the leg to remain straight. However, I made some minor tweaks that seemed to be making a bit of a different to the amount this was popping. Therefore, I was happy enough with the quality and needed to accept that this is a fast motion anyway and when you review the animation as a whole, rather than laser focusing on one area, it does feel natural and believable.
Now that I was happy with the legs, hips and chest motion it was time to move onto the finishing touches of head, ears, jaw and tail to complete this animation. I used the exact same process here as the previous two animations, however, took into consideration the force being applied from the the run. I used my video reference heavily here to understand the range of motion and general starting pose. I noticed that the force was creating a slight rock on the neck and my theory lecturers informed me that the neck would move in the opposite direction to the hips. So I created 3 main key poses so that the head was up when the chest was down and down when the chest was up. I used successive breaking of joints to offset each neck joint by 1 frame - when you don't do this it looks really unnatural and its actually hard to tell what motion is happening.
For this animation I actually created a bit of a greater rock on the base of the neck, a little bit in the middle to keep it a little stiffer and then a bit more on the head. I did this because I noticed that although horse's heads did move when running they did tend to keep them quite controlled. So I really wanted the horse's eyes to be able to me locked forward with intent to focus on where it was running too. I was really happy with this motion, I tweaked the curves and felt like I achieved a motion reflective of my study of neck motion from my reference. Therefore, I was then happy to move onto the smaller parts of animation on the head with the ears and jaw.
For the ears I went back to my reference again to understand how the speed and motion of a gallop was affecting the motion of these. I noticed that the general position of the ears was a little more back and there was a greater range in the rock / flop on the ears than the previous two animations that were more controlled. I adopted a very similar approach to animating these ears by posing them both both in an overlapped position to the motion of the head; creating the range in rotation of the ears; offset the ear joints from each other by 1 frame; exaggerated the range in motion as you got further towards the tip of the ear and offset the left ear from the right ear by 1 frame to prevent twinning. I was happy with this motion - it was a bit more exaggerated compared to real life, however, felt right for the stylisation of the motion in this animation.
I added some subtle jaw animation on the trot, however, felt like this was time to push it a little further. I offset the position to the head, as I did with the ears, and chose a more exaggerated open position. The motion felt a bit odd initially as it was constantly in motion with the sine wave of animation shown in the graph editor. So to improve these I added some keys to the Z rotation curve and tweaked the tangents to the positions shown below. This meant that the open and close position were held for longer and the jaw would open a little faster too as the curves were steeper. This felt a lot more natural, like the horse was opening its jaw to catch a breath before snapping it shut to prepare the next breath; meaning we had a bit of a hold on the shut and open positions which felt a lot more natural!
The final thing needed to do to complete the loop was the animation on the tail! I again took a similar approach to the head and ears through starting with studying the reference to look at the pose and range of motion in the tail. Generally, the tail seemed to be out a little more straight, at least more so than the trot, however, it did seem to vary across different horses. Animals communicate a lot with their tail's therefore I wondered whether how the horse was feeling would affect this. I decided to go for a fairly straight, slightly titled down initial pose and put most of the animation into the end of the tail again. Through studying the reference the tip or end of the tail seemed to be the part that swished the most so I thought this would make sense!
The tail motion is offset from the hips so that when the hips are up the tail is moving down and vice versa. I used the same process again as described many times before by posing; offsetting each joint by 1 frame and increasing the range of motion further the close you got to the tip. I actually exaggerated the very tip quite a lot significantly to accentuate the force and motion that was moving through the rear of the horse.
Final Outcomes
I was really happy with the full animation at this point in time now that it was complete. I loved the way that the force ran through the horse's body almost like a Mexican wave. The way the feet hit the ground were reflective of my initial study of the foot contact pattern and the thumbnails that have led me to create a believable animation. I particularly like the stretch on the rear, I'm glad I exaggerated this as it was initially not really detectable and it really helps sell the amount of energy and force this horse is creating through it's gallop! I still have a slight bit of popping on the front right upper leg bone, however, this is significantly improved from earlier attempts to fix this and I was happy enough to call this animation complete as this is a relatively minor element of the animation. To improve on this further I would study the relationship of the Y translation on the chest and then adjust these upper leg bones on both legs to keep them straight.
I imported the turn around camera at the beginning from the other 2 animations along with the simple set to present this project consistently and in line with the other 2 animations. The turn around camera enables you to see this cycle from all angles.
Finally I added a Z translation to the all mover control to move the horse forward over time. I used the same method I found effective on the trot by tracking the right read foot's position when it was on the ground and using the grid in Maya as reference to keep this foot locked in place. Once I'd done this I set that translate Z curve to cycle with offset to achieve the results seen below :
These came out really well and foot slide is pretty undetectable in any capacity, however, as this animation is faster it does make this a little easier. It was a little difficult to capture this animation as the horse moved so fast and I wanted to keep the camera static to capture the translation over time, however, although they are short I feel the animation is still easily understandable. I was happy seeing this horse's gallop in motion as I felt that it further confirmed the believability of this animation.
Conclusion
Overall I feel I have continued to build my knowledge and understanding of quadruped locomotion through studying theory, reference and applying this knowledge to this horse rig. The level of study and analysis has built after each animation and I've been able to apply my learnings from previous animations to the next one. I feel I have created 3 confident animations that clearly show the difference in motion and speed. Whilst there are still some areas I identified for improvement I feel that on the whole I have taken a systematic approach to improving the quality of these animations over time. I also feel my approach to research has strengthened and I have combined my theoretical knowledge with key learnings from my research to support me in building engaging animations with the use of some stylisation. I'm keen to apply this knowledge to other creatures as well as bipedal animations so that I can use reference and thumbnailing effectively to breakdown my animations into extremes and breakdowns to help me understand motion further. I feel this will raise the quality of my animations further and enable me to build more complex animations with a greater understanding of the underlying structure of the key poses.
I’ve achieved the learning outcomes, listed below, as I have :
- Studied the theory of a gallop in addition to studying a range of addition reference to support me when animating my gallop.
- I've created a gallop animation that has defined the key poses of a gallop, particularly the pattern of contact and suspension to create a believable gallop. I believe I've created a good level of force and energy through my use of squash and stretch to help show the level of force and energy in the gallop.
- Again I haven't used the Mothman rig due to the issues I've faced, however, I have applied the same level of study and application to the Joel horse rig. I've utilised this rig effectively to create my animation through application of studied theory.
- I've completed the animation exercise that shows the speed, grace and power of a galloping horse as described throughout this blog post.
- Principles of Quadrupeds in Motion: Continue your exploration of the principles that define the motion of quadrupeds, understanding the nuances that contribute to the realistic portrayal of running. Explore the distinctive characteristics that set running animations apart.
- Animating Quadruped Gallops: Learn the art of animating a quadruped in a galloping motion. Explore techniques to convey the energy, speed, and power of a running horse, understanding the specific movements and transitions that define a gallop.
- Introduction to the Mothman TD Horse Rig: Reacquaint yourself with the Mothman TD Horse Rig, a versatile resource that serves as your key to crafting dynamic quadruped animations.
- Hands-on Tutorial – Horse Gallop Animation: A step-by-step tutorial where you'll animate a horse in a spirited gallop using the Mothman TD Horse Rig. Apply the principles of quadruped galloping to create a visually captivating animation that showcases the speed, grace, and power of a running horse.
Finally I updated my Kanban board to drop that last outstanding animation task into the complete column, which feels incredibly good! I know that another unit will be added today, however, this puts me completely back on track and up to date and in sync with the rate of drop of new lecturers. ITs great to be at this point and not behind any more. Arguably I haven't completed unit 03 from the introductory unit, however, this was to animate a sequence which I feel I have done through the bouncy ball animation I made that shows a ball changing emotion over time. Despite this, if I get some time I would like to explore the performance animation I planned for the cartoon fox as this would add another performance sequence to my portfolio of work.
As explained I feel I have learnt a lot about quadrupeds and horses specifically, however, I'm now excited to explore some of the other creatures listed on the module overview. I believe the next creature is a spider so we are doubling the number of legs again - no pressure! However, I'm looking forward to learning the patterns in the animation and applying the theory and processes to help me understand how arachnids would move.
Onto the creepy crawlies!
Reference List
- Galloping Horse in Super Slow Motion. (2009) YouTube video, added by Discover Magazine [Online]. Available at https://www.youtube.com/watch?v=OcD1_jvhc_g [Accessed 28 March 2024].
- HORSE GAITS PART 04 - GALLOP CYCLE ANALYSIS (2012) YouTube video, added by Horses and Us [Online]. Available at https://www.youtube.com/watch?v=pNUHMqDZlCc [Accessed 27 March 2024].
- Horses and Us (2021) The 4 basic horse gaits explained [diagrams & animations], Horses and Us. Available at: https://www.horsesandus.com/the-4-basic-horse-gaits-explained/#gallop (Accessed: 28 March 2024).
- Muybridge, E. (1878) The Horse In Motion, [Online]. https://blog.bridgemanimages.com/blog/muybridge-in-motion [Accessed 28 March 2024].
- Thoroughbred Galloping 38 mph. (2015) YouTube video, added by Amynbuzz123 [Online]. Available at https://www.youtube.com/watch?v=eOV7gkPisGw [Accessed 27 March 2024].
- Muybridge, E. (1878) The Horse In Motion, [Online]. https://openlab.bmcc.cuny.edu/mes-160-1300-f2021/week-2/the-horse-in-motion-eadweard-muybridge/ [Accessed 28 March 2024].
- Performing Treadmill Endoscopy at Rood & Riddle Equine Hospital (2011) YouTube video, added by Rood & Riddle [Online]. Available at https://www.youtube.com/watch?v=yOTc35OrNgw [Accessed 28 March 2024].
- Quadruped Locomotion - how a horse runs (2013) YouTube video, added by Alexander Williams [Online]. Available at https://www.youtube.com/watch?v=upTOXRIN680 [Accessed 28 March 2024].
- Williams, R. (2009) The animator’s survival kit. London: Faber and Faber.
- Whitaker, H. and Halas, J. (1990) Timing for animation. London u.a.: Focal Pr.


